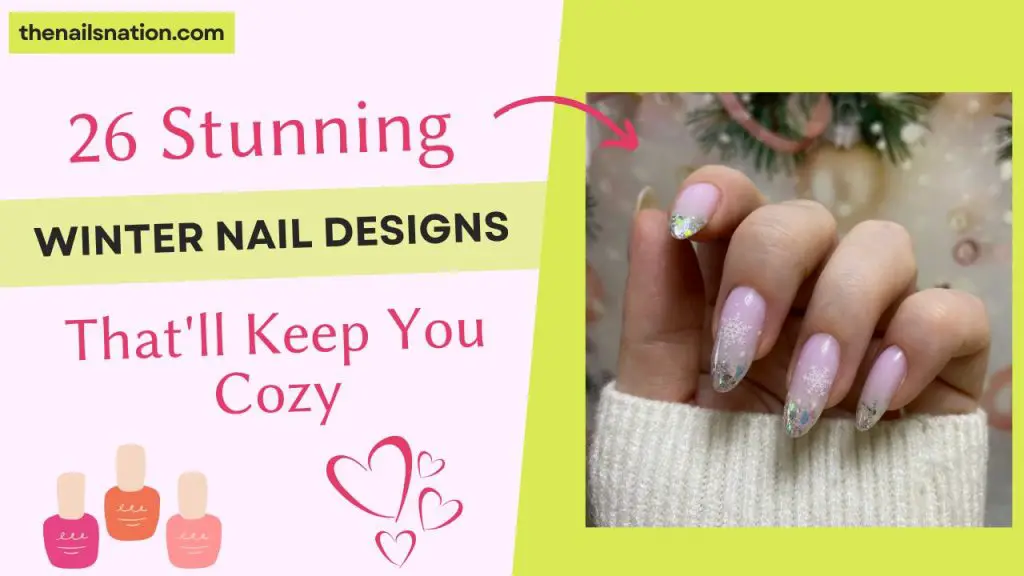
Hey beautiful! Can we just talk about how absolutely magical Winter Nail Designs can be this year?
I’ve been scrolling through my Instagram feed lately, and honestly, I’m obsessed with all the gorgeous winter nail looks popping up everywhere. There’s something so special about switching from those bright summer polishes to cozy, rich winter shades that just makes me want to curl up with hot chocolate and admire my fingertips all day long!
This December, nail trends are giving us everything we didn’t know we needed. From Pantone’s dreamy Mocha Mousse (yes, it’s the 2025 Color of the Year and I’m totally here for it!) to those mesmerizing chrome effects that look like frozen fairy dust, winter 2025 is serving up some serious nail inspiration.
Are you someone who loves spending Sunday afternoons doing your nails while binge-watching Netflix? OR you’re always rushing between holiday parties and need something quick but stunning? I’ve got you covered. These 26 designs range from “I literally just learned to paint my nails last week” easy to “I’m feeling fancy and have three hours to spare” levels of gorgeous.
And the best part? You don’t need to drop $80 at the salon every two weeks. Most of these looks can be totally DIY’d at home with supplies you probably already have (or can grab for under $30 at your local drugstore).
What Makes Winter 2025 Nails So Special?
Okay, let me spill the tea on why this winter’s nail trends are hitting different. First off, we’re seeing this amazing blend of cozy comfort meets holiday glam. Think warm, touchable textures mixed with just enough sparkle to catch the light at your office holiday party.
The color palette this year is absolutely dreamy. We’ve got those rich, chocolatey browns that make you think of your favorite coffee shop, deep evergreen shades that remind you of Christmas trees, and these gorgeous metallic finishes that are like wearing tiny mirrors on your fingertips.
Plus, there’s this whole movement toward nails that actually work with your lifestyle. No more choosing between “pretty” and “practical” – these designs are made for real people who type on keyboards, wrap presents, and build snowmen with their kids.
Essential Tools You'll Need (Promise, It's Not Much!)
Before we dive into the fun stuff, let’s chat about what you’ll actually need. If you’re completely new to nail care, our complete guide to nail care for beginners covers everything from basic tools to daily maintenance routines. I used to think nail art required a whole craft store, but honestly, you can create most of these looks with just a few key items:
The Absolute Must-Haves:
- A good base coat (seriously, don’t skip this – it’s like primer for your nails)
- Your winter color palette (I’ll give you specific shade suggestions as we go)
- A quality top coat for that salon-finish shine
- A couple of nail art brushes (the tiny detail ones are game-changers)
- Dotting tools (or honestly, bobby pins work too!)
Nice-to-Have Extras:
- Chrome powder for those magical mirror effects
- A magnetic wand if you want to try cat-eye designs
- Some tiny rhinestones or pearls for 3D texture
- Matte top coat for those sophisticated velvet finishes
Most of these you can grab at Target or order online for super cheap. I’ve been building my nail kit slowly over the past year, and now I have everything I need to recreate pretty much any look I see on Pinterest!
The 26 Designs That'll Make Your December Absolutely Magical
Mocha Mousse Magic (Because Pantone Knows What’s Up)
1. Classic Mocha Mousse Matte: Oh my goodness, can we talk about how perfect this color is? It’s like if a latte and a cozy sweater had a baby. This warm, creamy brown with a matte finish is literally the most wearable winter shade I’ve ever tried. I wore this to three different holiday events last week and got compliments every single time.
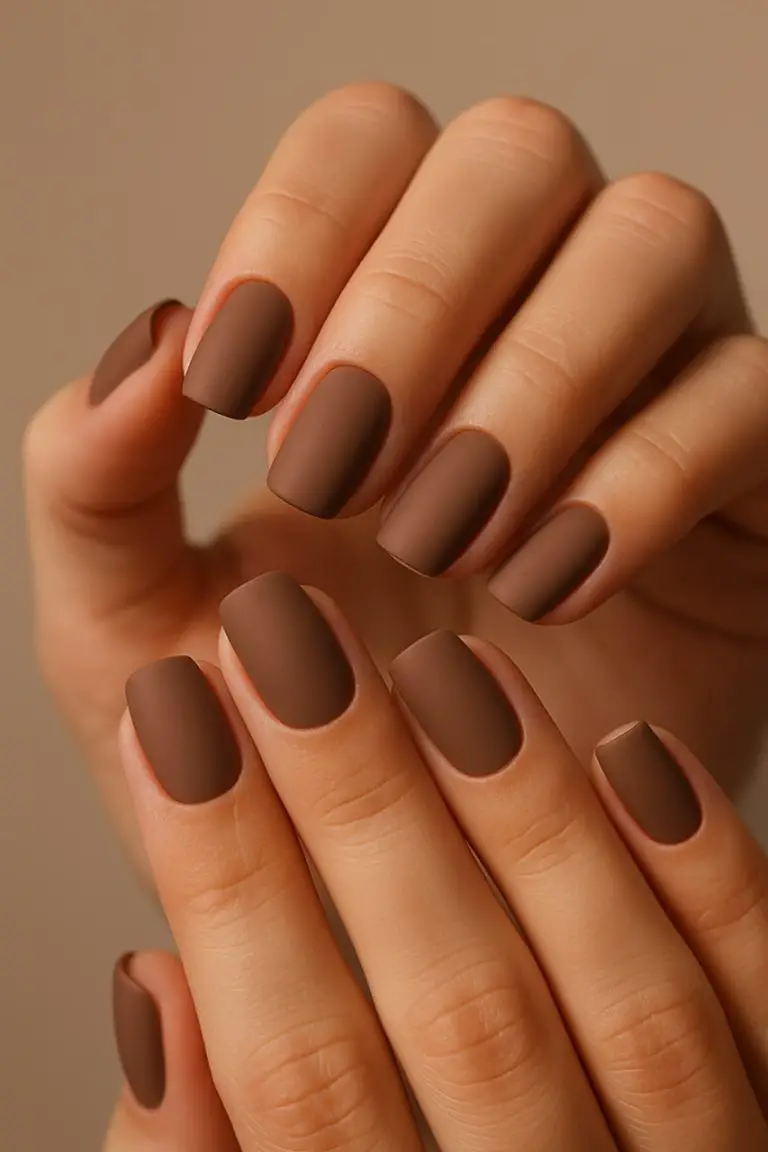
How to nail it: Start with a good base coat, then two thin coats of your mocha brown polish. Let it dry completely (and I mean completely – trust me on this), then finish with a matte top coat. The key is taking your time between coats. I usually do my base coat, make a cup of tea, come back for the first color coat, fold some laundry, then the second coat. Perfect timing!
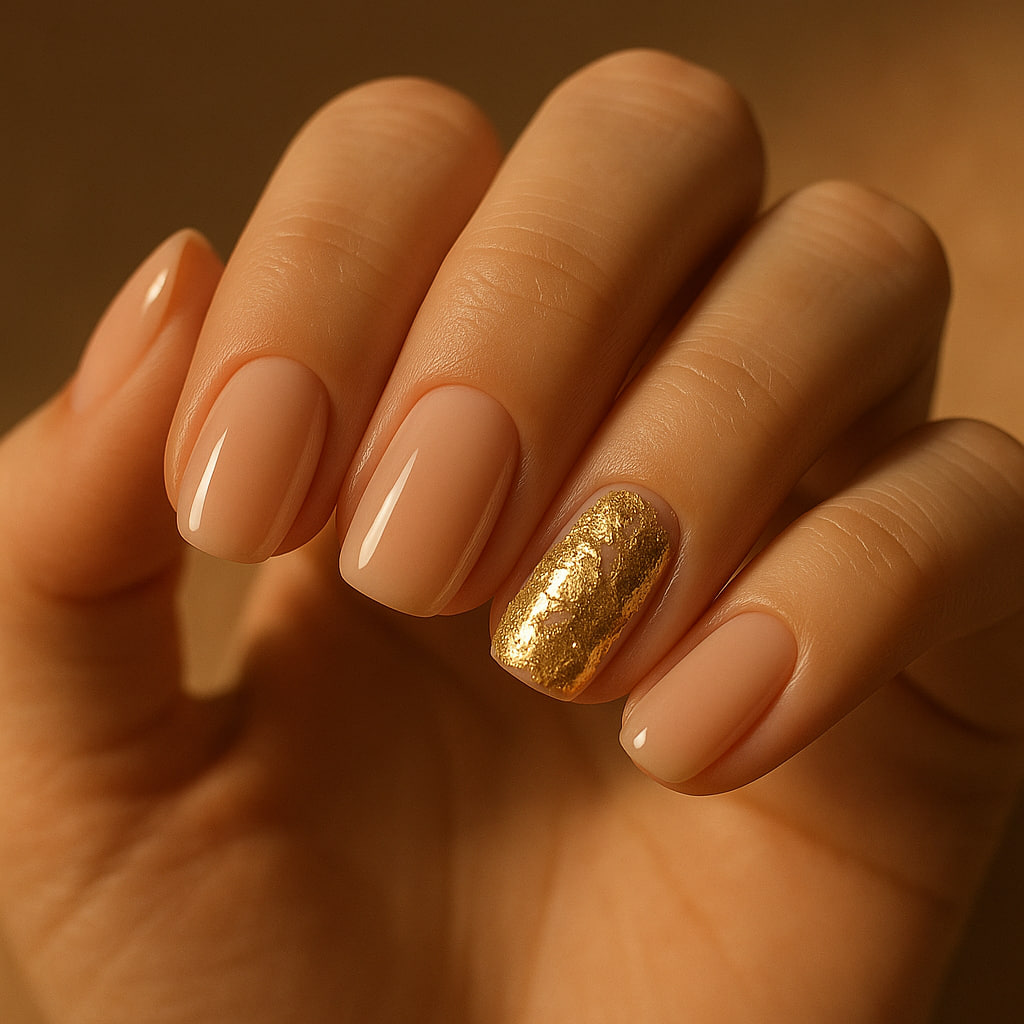
2. Mocha Mousse with Gold Chrome Tips: This is like taking the classic French manicure and giving it a major winter glow-up. The contrast between that warm brown and the metallic gold tips is absolutely stunning, especially when you’re wearing gold jewelry.
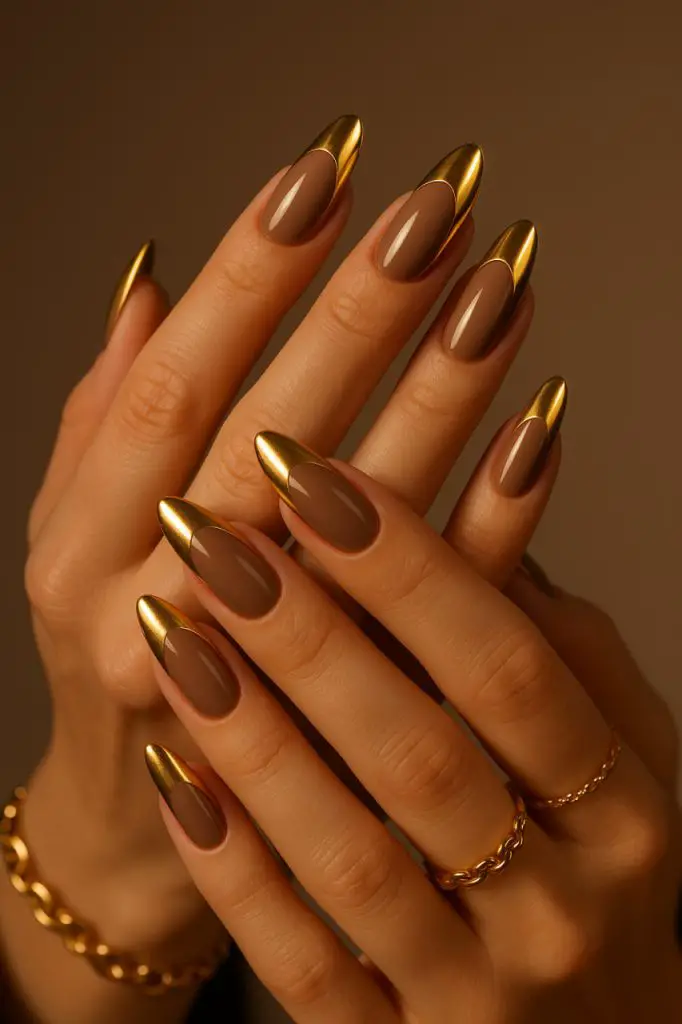
The technique: After your mocha base is completely dry, use nail tape to section off your tips. Apply a sticky base coat to just the tip area, then gently pat chrome powder over it with a soft brush or your finger. Seal with top coat and remove the tape while it’s still slightly wet. The result? Pure magic.
3. Marble Mocha Mousse: I discovered this technique by accident when I was rushing to get ready for a dinner date, and now it’s honestly one of my favorites. The swirled marble effect in different shades of brown creates this sophisticated, almost stone-like finish that’s surprisingly elegant.
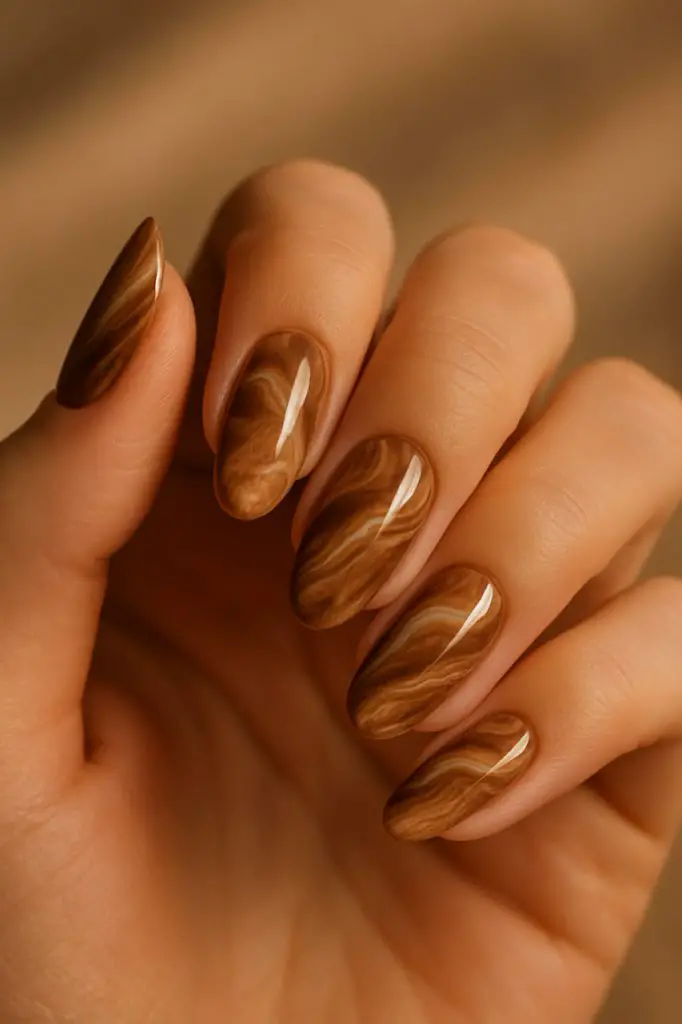
Quick marble method: Drop different shades of brown polish onto a plastic plate, swirl gently with a toothpick, then roll a makeup sponge through it and dab onto your nails. Clean up the edges with a small brush dipped in acetone, and you’re golden! If you’re new to this technique, check out our detailed how to do marble nails guide – it breaks down the water marble method step by step.
4. Mocha Mousse Ombré: This gradient from light café au lait to deep espresso is like wearing a sunset on your nails. It sounds complicated, but once you get the hang of it, it’s actually really relaxing to create.

Pro tip I learned the hard way: Work on one nail at a time, and don’t let the polish dry between gradient layers. The blending happens while everything’s still wet, so timing is everything here.
5. Textured Mocha with Tiny Pearls Adding just a few small pearls to one accent nail per hand takes this look from everyday gorgeous to special occasion stunning.
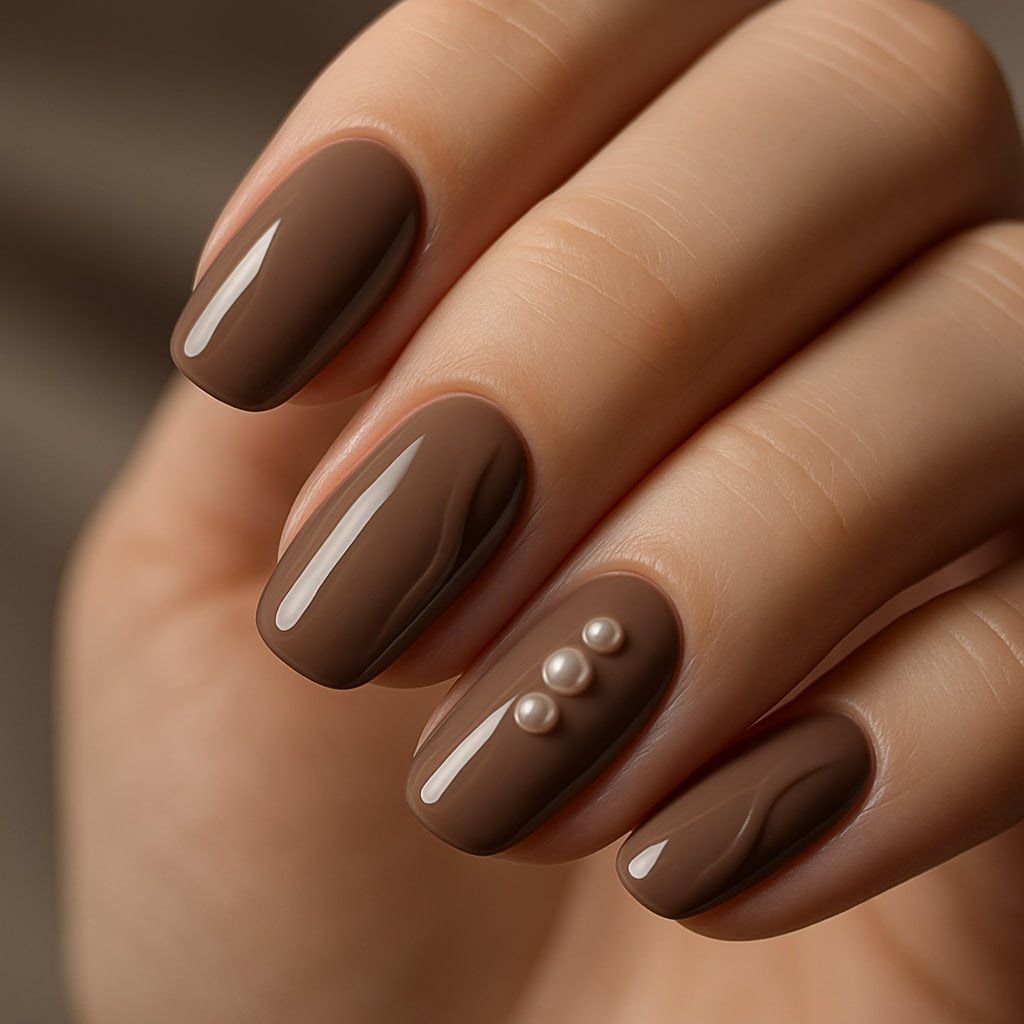
I love doing this for work – it’s professional but has that little bit of personality that makes people ask where I got my nails done.
Winter Wonderland Vibes (For When You Want to Feel Like Elsa)
6. Classic Snowflake Nails These never go out of style, and for good reason! There’s something so magical about having tiny snowflakes dancing across your nails. I usually do these in white on a clear or very pale blue base.
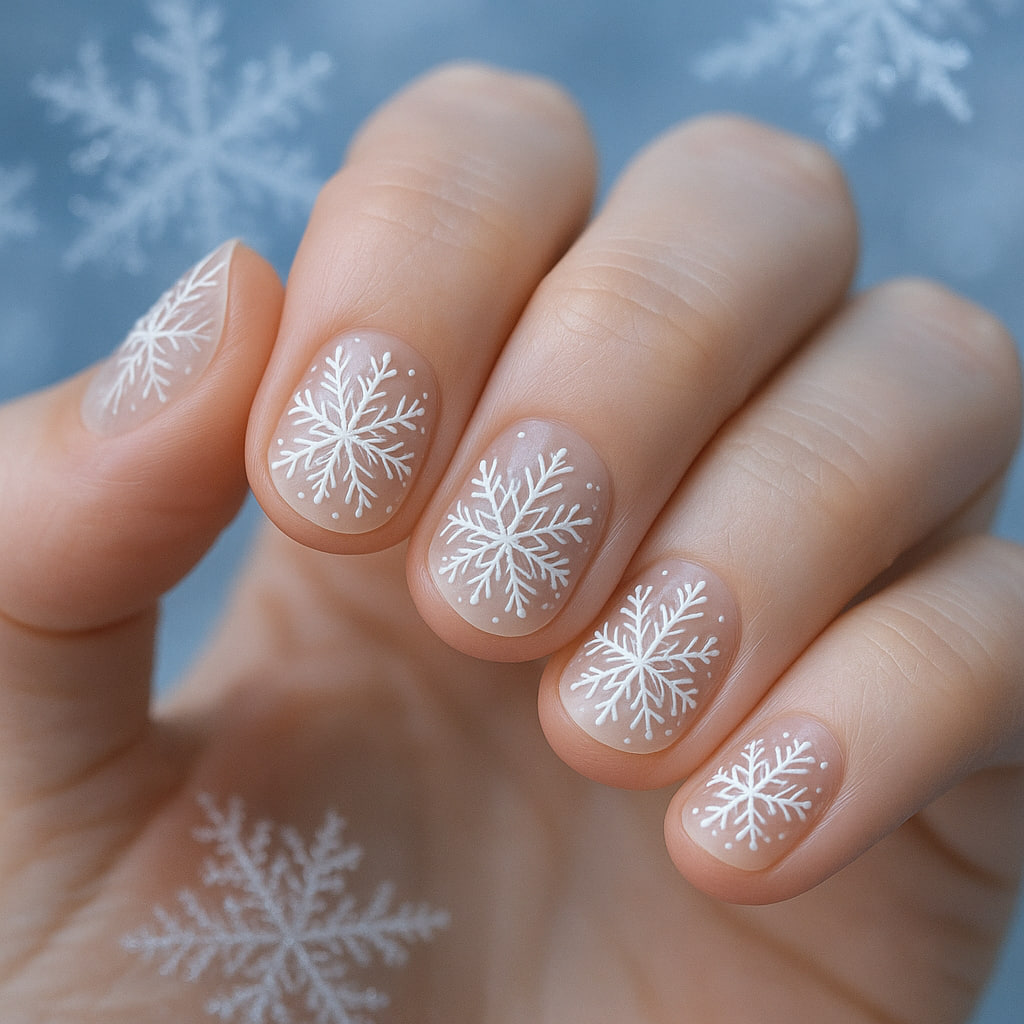
My favorite trick: Use a nail stamping plate for perfect snowflakes every time. If you don’t have one, a fine nail art brush works too – just remember that imperfect snowflakes actually look more realistic anyway.
7. Icy Blue Chrome This finish literally looks like you dipped your nails in liquid mercury mixed with winter sky. The magnetic chrome effect shifts and changes as you move your hands, and people cannot stop staring.
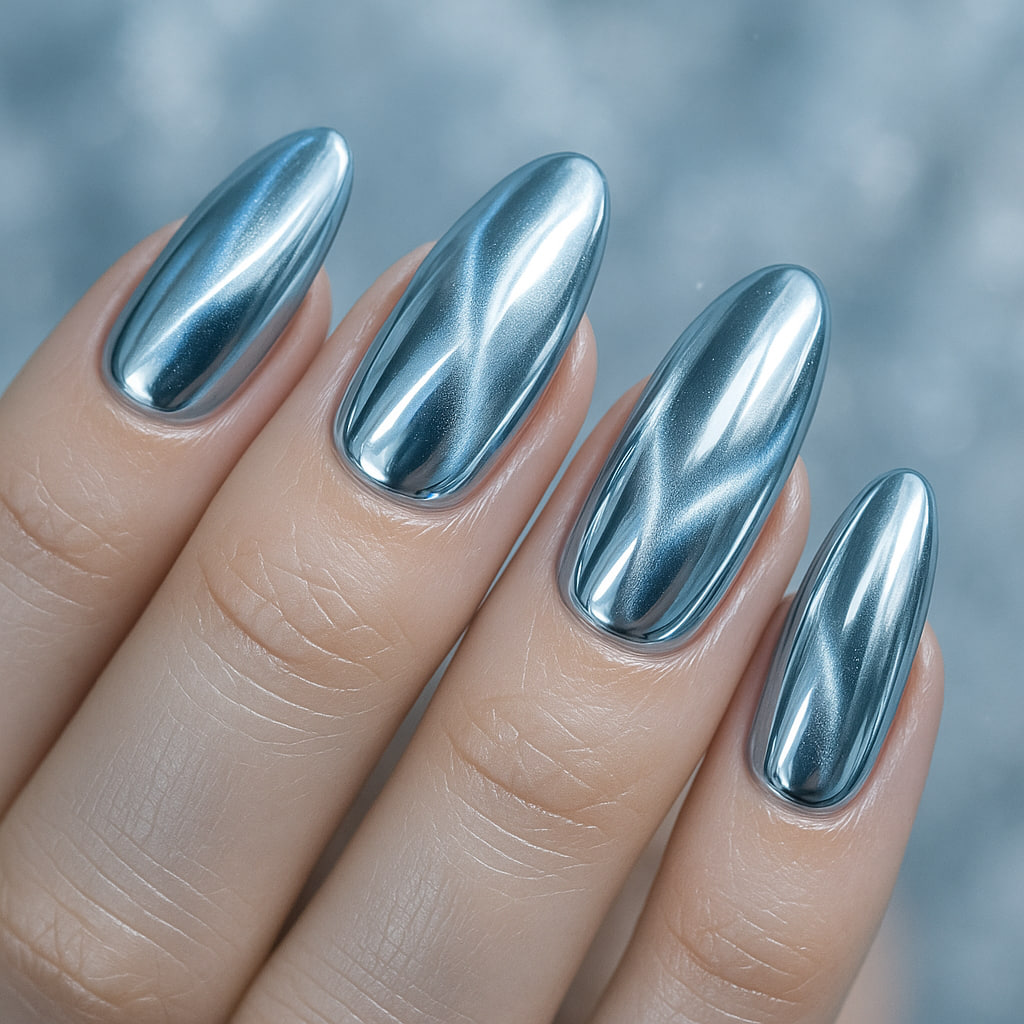
Getting that perfect chrome: The secret is in the base coat. Use a black or very dark blue base, apply your magnetic gel polish, then hold the magnet about 2mm above each nail for 10-15 seconds. The patterns that emerge are absolutely hypnotic.
8. Winter Forest Green Deep, rich evergreen with a matte finish reminds me of walking through a pine forest on a snowy day. This color is so sophisticated and pairs beautifully with both silver and gold jewelry.
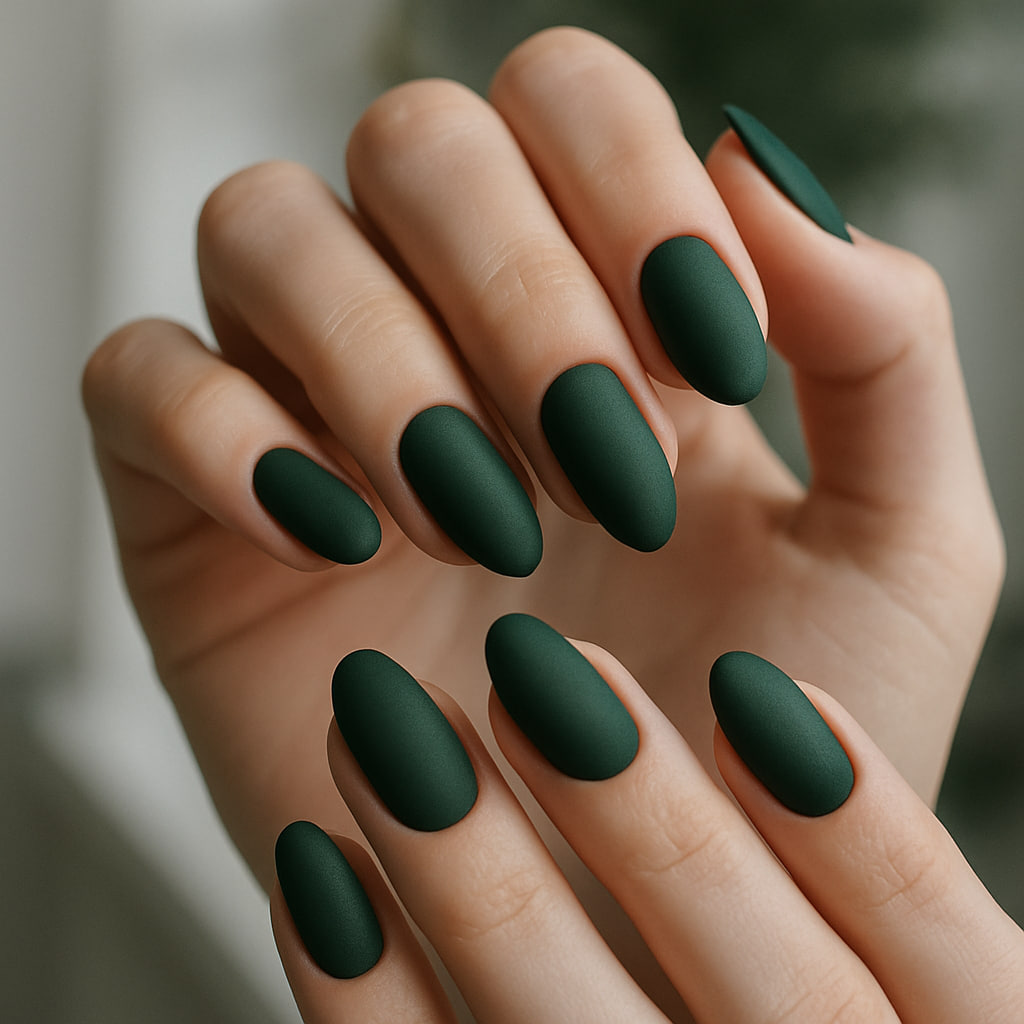
Why matte works here: The matte finish gives this green an almost velvety texture that’s incredibly chic. Plus, it doesn’t show tiny imperfections the way glossy polishes do, so it’s perfect for those of us who aren’t nail art perfectionists.
9. Silver Glitter Gradient Starting with clear at the cuticle and building up to full silver glitter at the tips creates this gorgeous frost effect. It’s like having icicles on your fingertips, but in the best possible way.
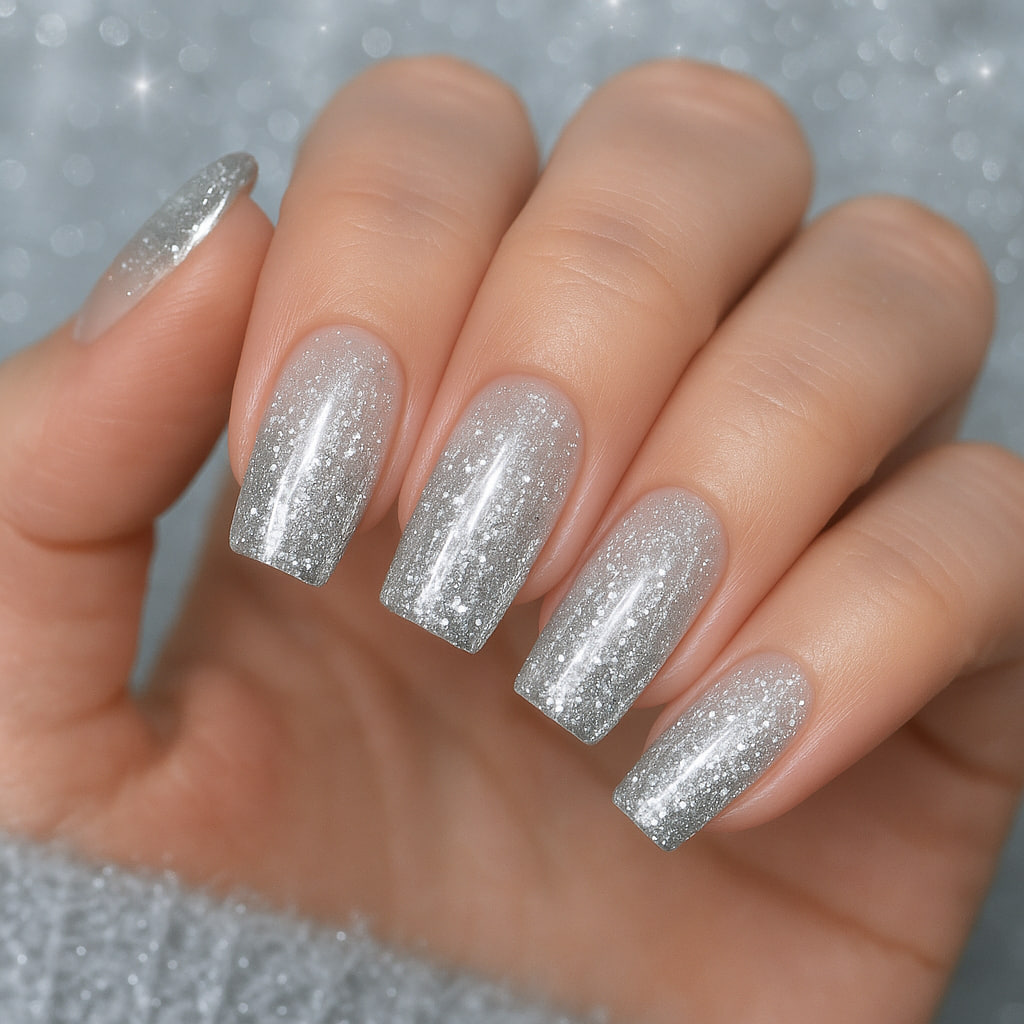
Gradient glitter technique: Start with three coats of clear base, then use a makeup sponge to dab glitter polish from the tip toward the middle of each nail. Build up slowly – more thin layers look better than one thick one.
10. Frosted Glass Effect This is my go-to when I want something special but not too dramatic. It’s like the grown-up sister of the glazed donut nails that were everywhere last year.
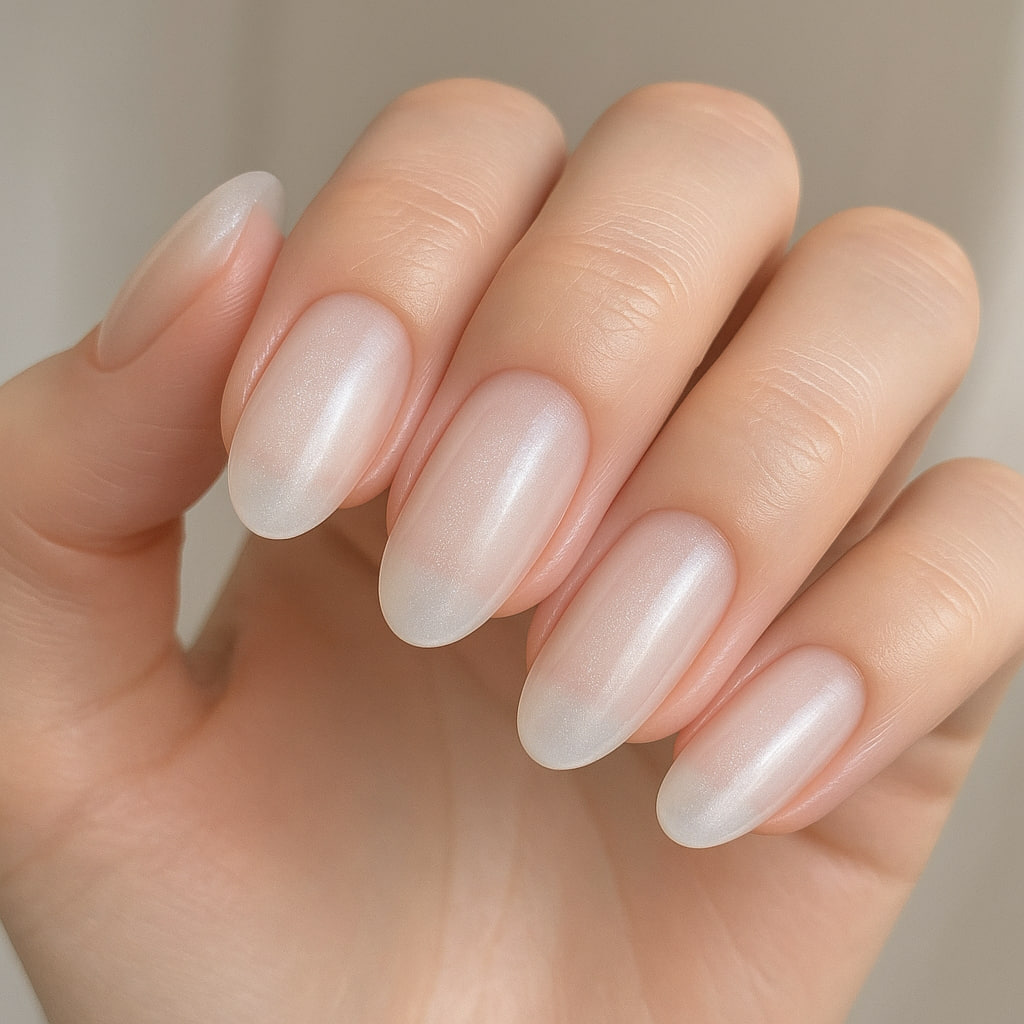
Creating the frost: Mix a tiny drop of white polish into clear top coat and apply over a sheer pink or nude base. The slight cloudiness creates that perfect frosted glass look.
Holiday Glamour (For All Your Festive Occasions)
11. Classic Red Velvet Nothing says holiday glamour like a deep, rich red with a velvety matte finish. This is the nail equivalent of wearing your favorite red lipstick – instant confidence boost.
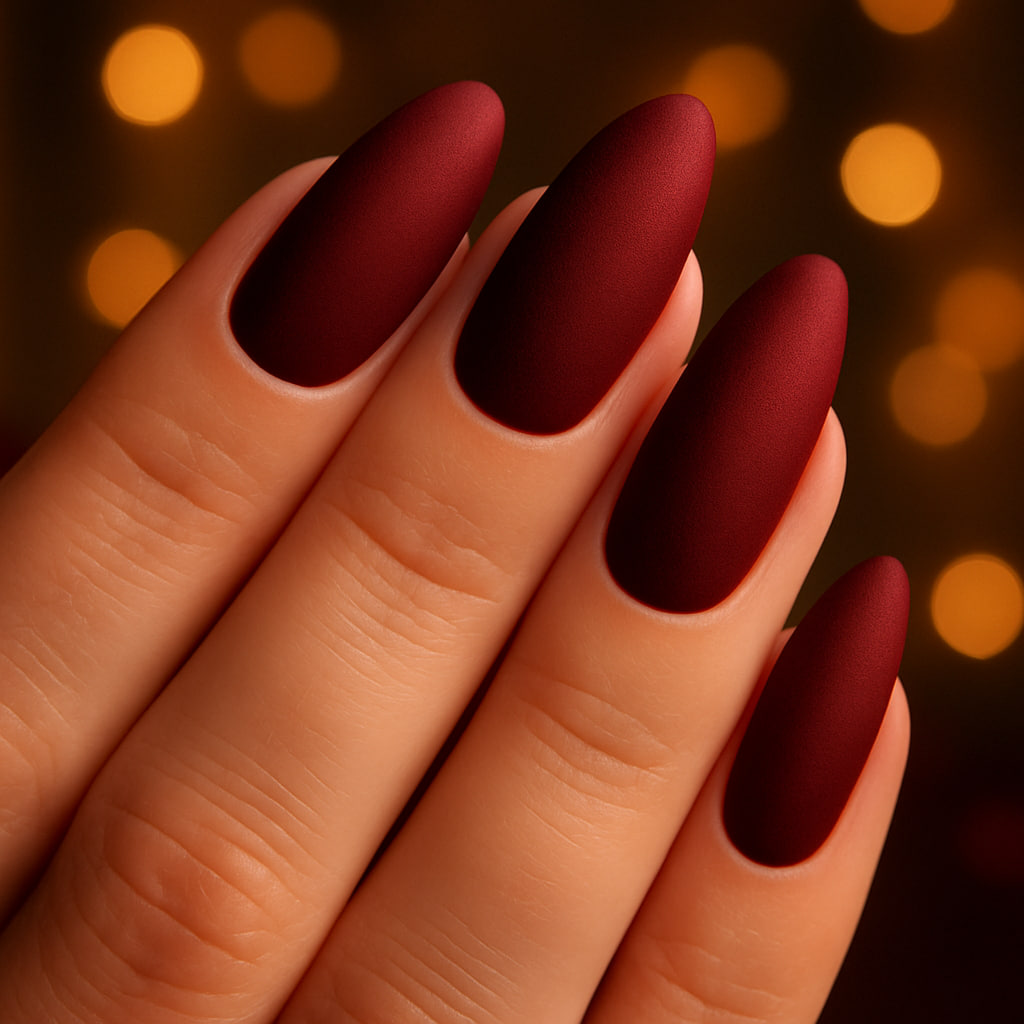
Choosing the right red: Look for reds with blue undertones rather than orange ones. They’re more universally flattering and photograph beautifully in holiday lighting.
12. Emerald Green Chrome This rich green chrome is absolutely stunning against gold jewelry and gives serious luxury vibes. I wore this to my company’s holiday party and felt like absolute royalty.
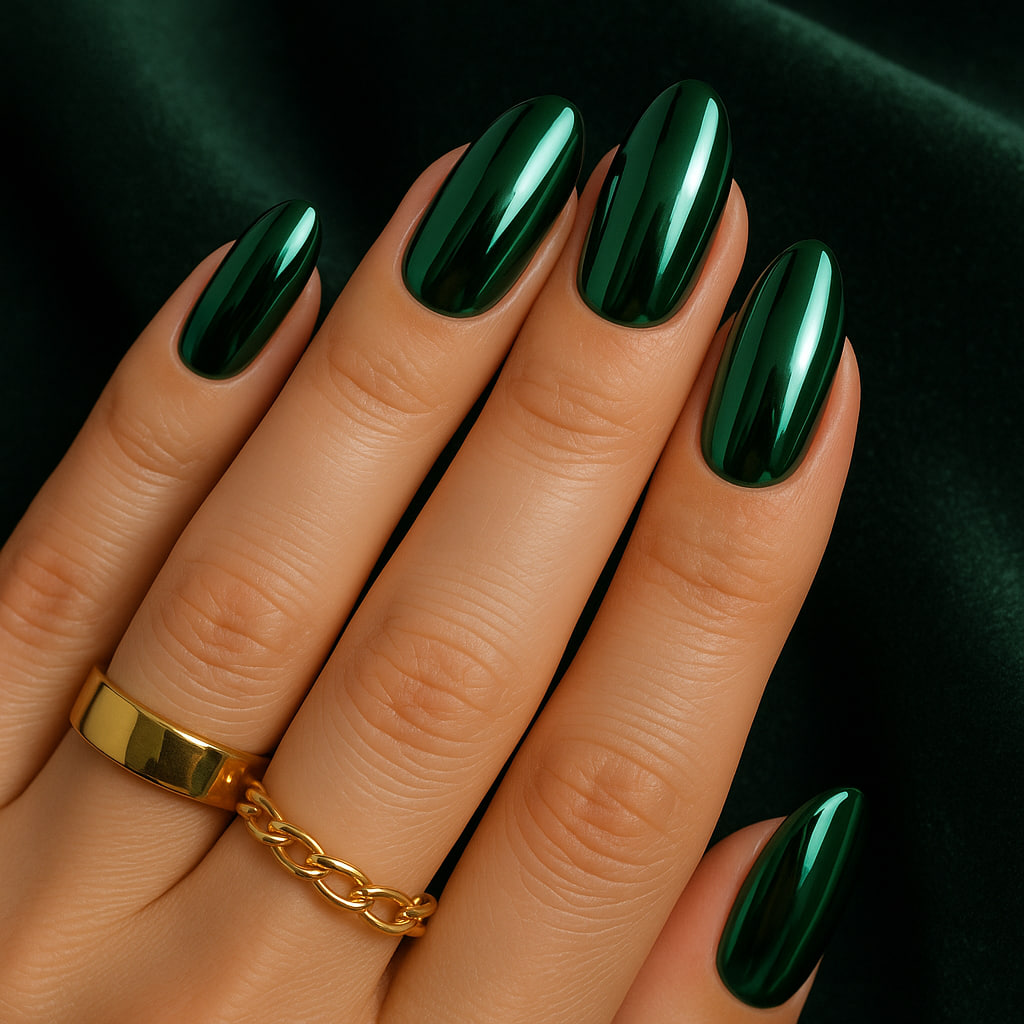
Chrome application tip: Work in a dust-free environment if possible. Even tiny particles can affect the mirror finish, so I usually do my chrome nails in the bathroom with the door closed and the fan off.
13. Gold Leaf Accent Adding real gold leaf to just one nail per hand creates the most elegant accent. It’s surprisingly easy to apply and makes any manicure look incredibly expensive.
Gold leaf technique: Apply a sticky base coat to your accent nail, let it get tacky (about 30 seconds), then gently press the gold leaf on top. Seal with a good top coat and prepare for compliments.
14. Burgundy Wine Nails This deep wine shade is having such a moment right now, and I totally understand why. It’s sophisticated, works with every skin tone, and goes with absolutely everything in your winter wardrobe.
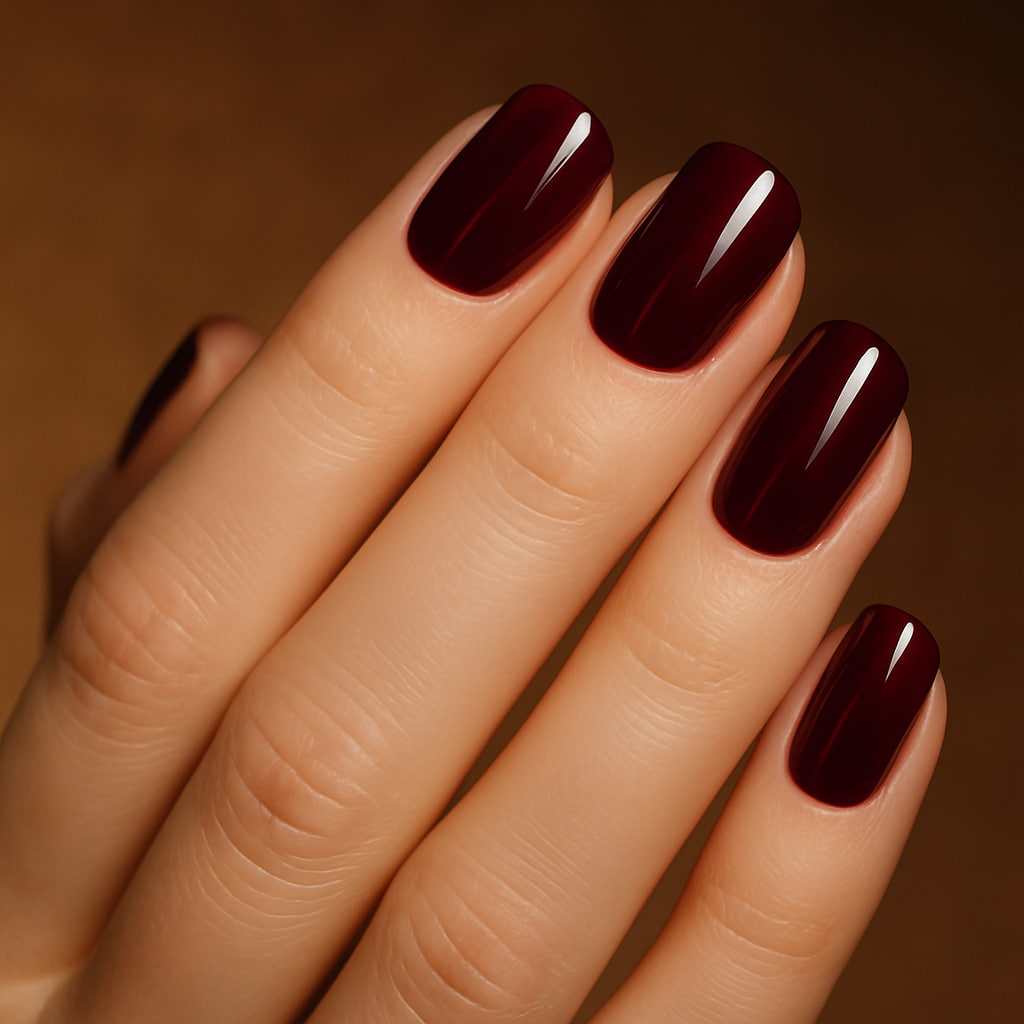
Perfect burgundy application: This shade can look streaky if you rush it. Three thin coats always look better than two thick ones, and letting each coat dry completely prevents those annoying bubble marks.
15. Champagne Bubbles For New Year’s Eve or any time you want to feel celebratory, this gold base with tiny bubble texture is pure magic. It catches light beautifully and adds such a fun element to your look.

Creating the bubble effect: Use bubble wrap pressed into wet clear polish over a gold base. The random pattern looks intentionally artistic and totally unique every time.
Cozy Texture Heaven (For Maximum Winter Feels)
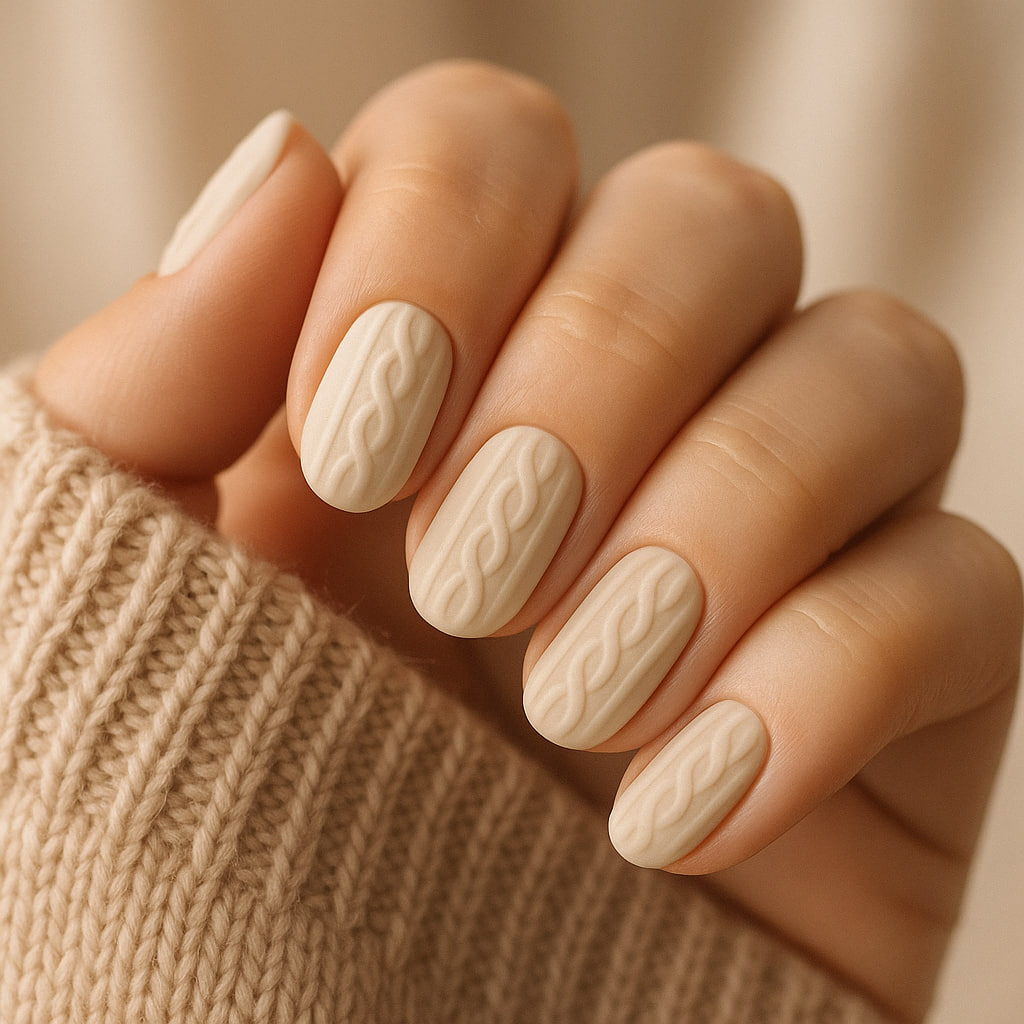
16. Cable Knit Pattern This advanced technique creates the illusion of tiny cable knit sweaters on your nails. It’s definitely a weekend project, but the results are so worth it.
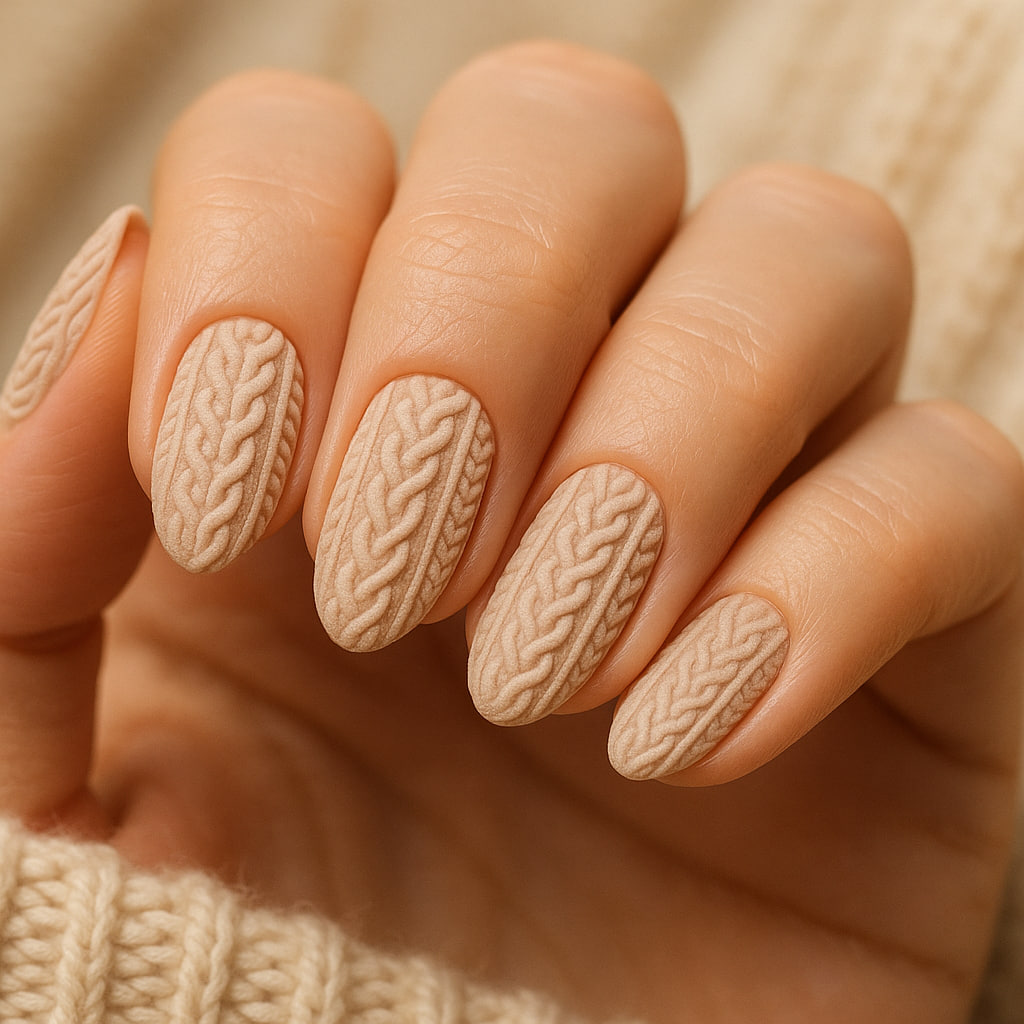
Cable knit shortcut: If hand-painting seems too intimidating, try using a fine nail art brush to create simple crossing lines over a nude base. The effect is still gorgeous but much more manageable.
17. Sweater Weather Beige This warm, creamy beige with just a hint of pink undertone is like wearing your coziest cashmere sweater. It’s neutral enough for work but still has personality.
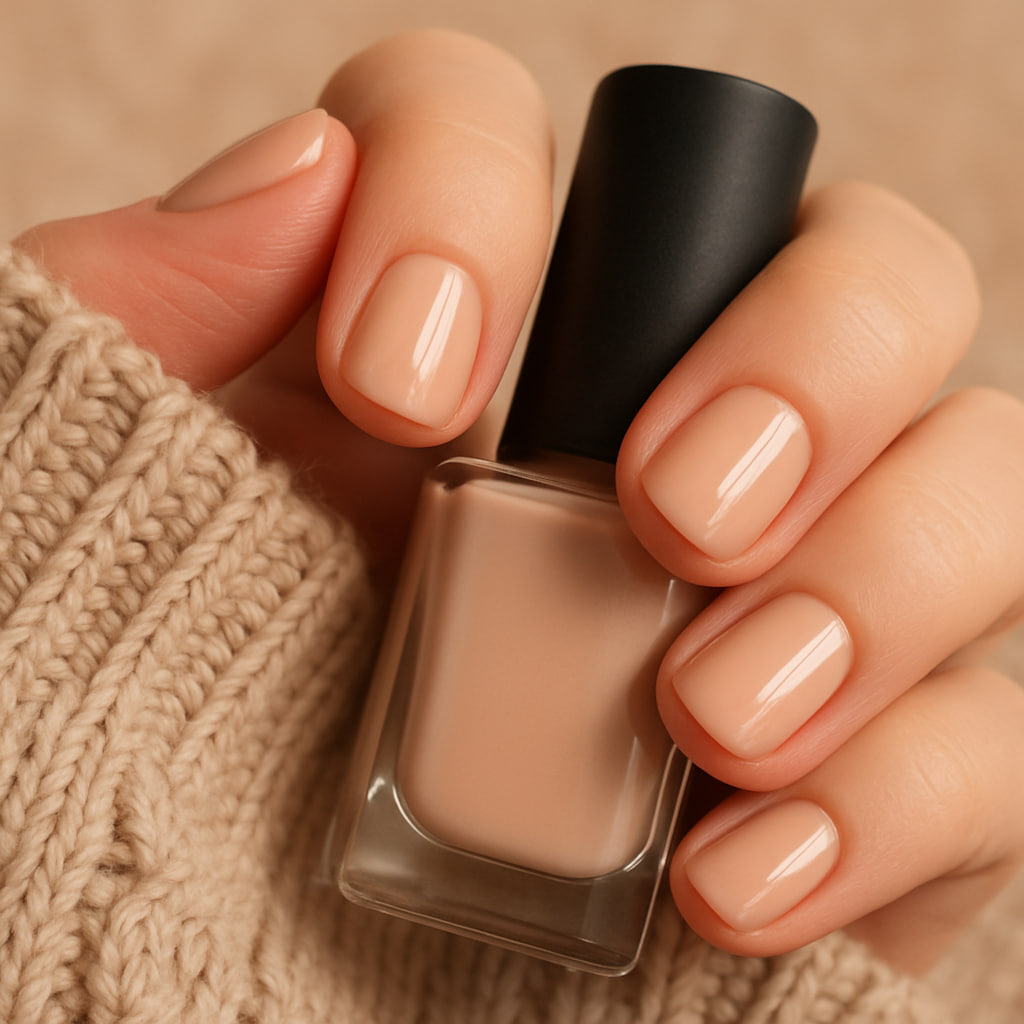
Making beige interesting: Add a subtle shimmer with a light dusting of very fine glitter, or try a satin finish instead of matte or glossy for something different.
18. Winter Plaid Pattern Creating tiny plaid patterns in traditional red and green is easier than it looks and so festive. I love doing this on just my ring fingers as accent nails.
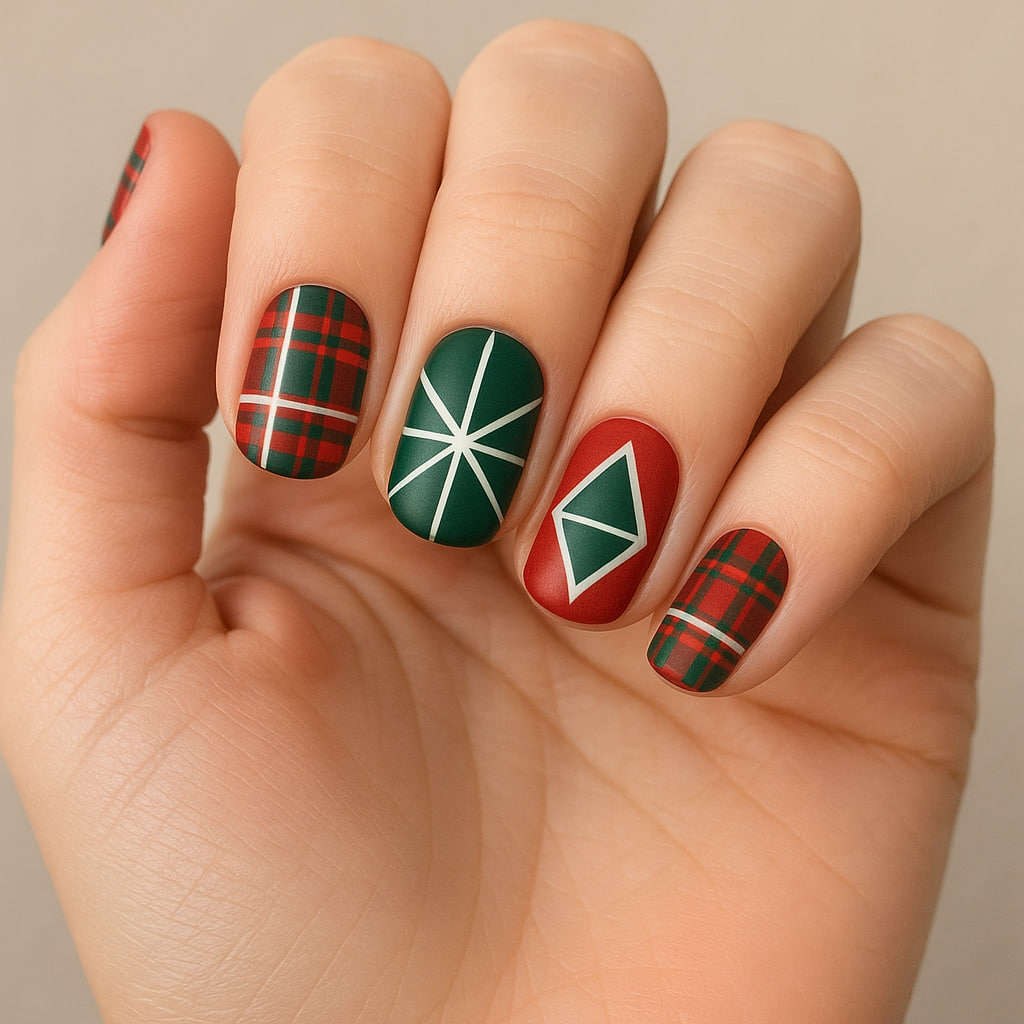
Easy plaid method: Use striping tape to create a grid pattern, paint in alternating colors, then remove the tape while the polish is still slightly wet. Clean lines every time!
19. Fuzzy Velvet Texture Using velvet powder over gel polish creates this incredible soft, fuzzy texture that you literally cannot stop touching. It’s like having tiny stuffed animals on your fingertips.
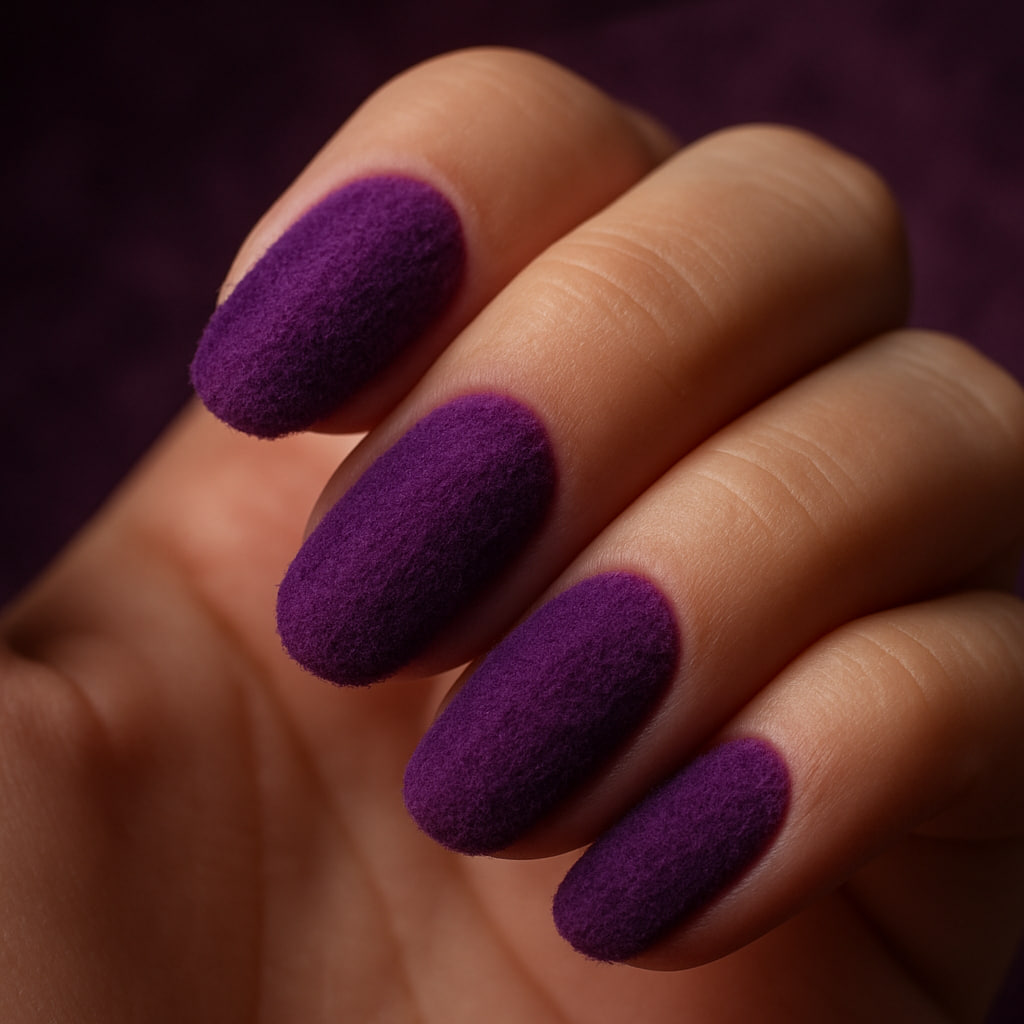
Velvet powder application: Work quickly once you apply the powder – you have about 30 seconds before the gel starts to cure. A soft brush helps distribute it evenly.
20. Cozy Cream Cable A simpler version of the cable knit that still gives those cozy vibes but doesn’t require advanced nail art skills. Perfect for beginners who want texture without the stress.
Minimalist Winter Magic (For Those Who Love Subtle Elegance)
21. Barely There Pink Shimmer This sheer pink with the finest shimmer is perfect for work or any time you want something pretty but professional. It’s like your nails but better.
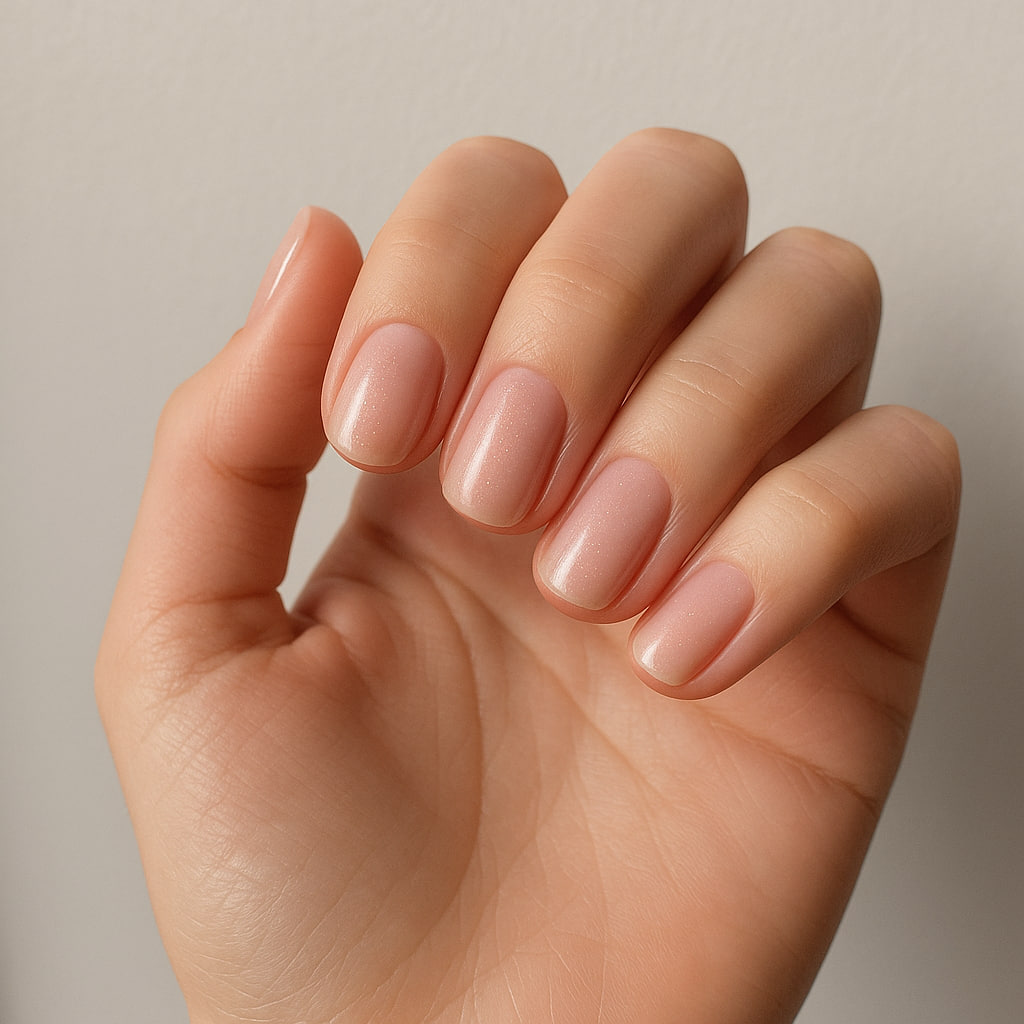
Sheer application secret: Build up color gradually with three or four very thin coats. This prevents streaking and gives you that perfect “my nails but better” finish.
22. White Tips on Nude The modern French manicure gets a winter update with creamy nude and crisp white tips. It’s classic but feels fresh and current.
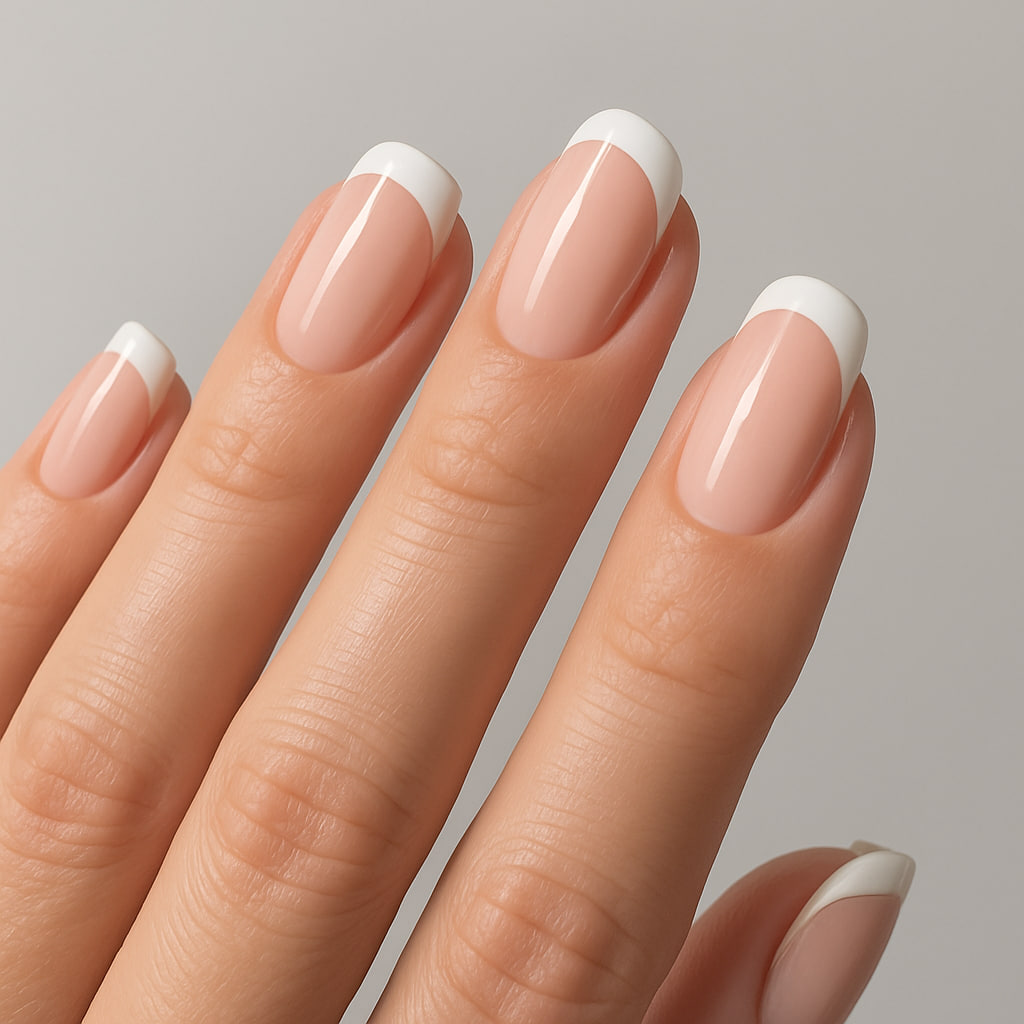
Perfect white tips: Use nail guides or tape for clean lines, but remove them while the polish is still slightly wet to avoid peeling.
23. Single Snowflake Accent Sometimes less really is more. One perfect snowflake on each ring finger nail over a nude base is understated elegance at its finest.
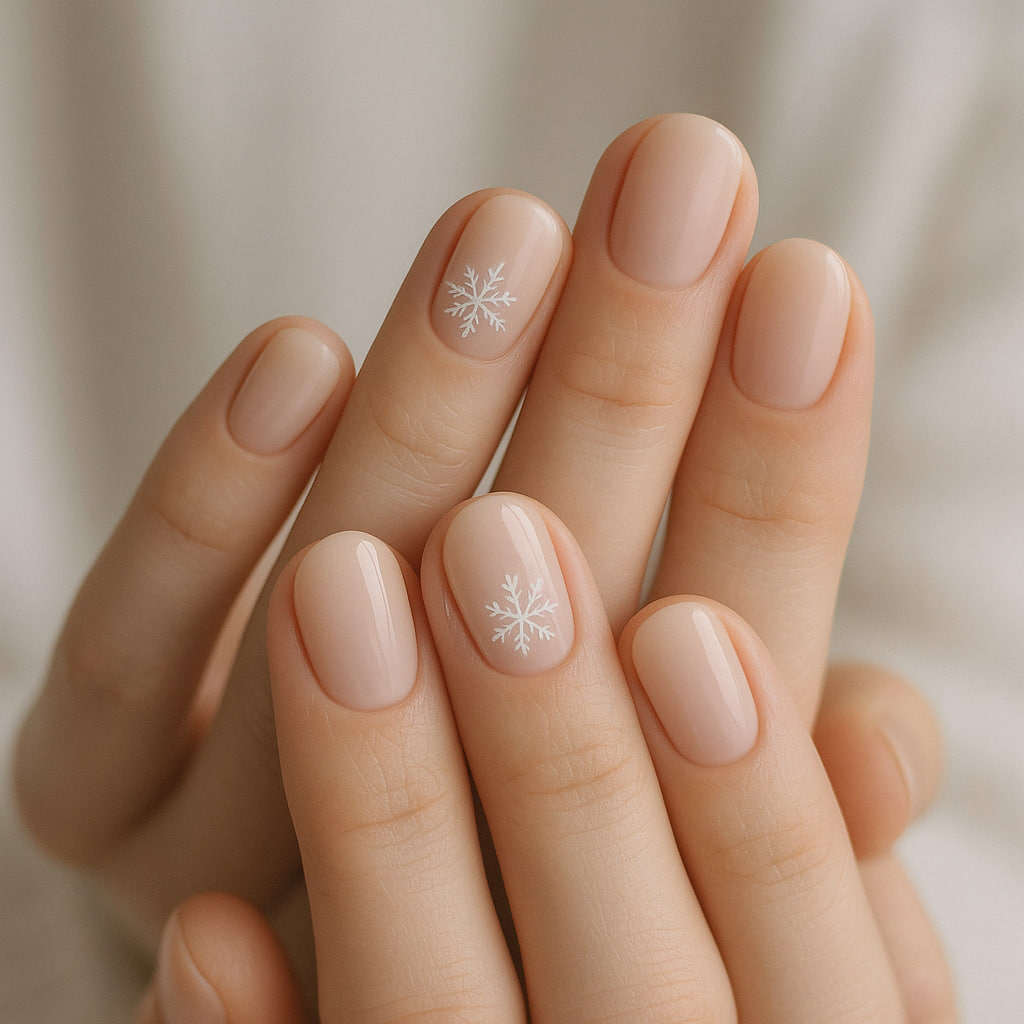
Placement matters: Put the snowflake slightly off-center for a more modern, artistic look rather than perfectly centered.
24. Matte Nude with Chrome Detail A single thin chrome stripe down the center of each nail transforms a simple nude mani into something special and contemporary.
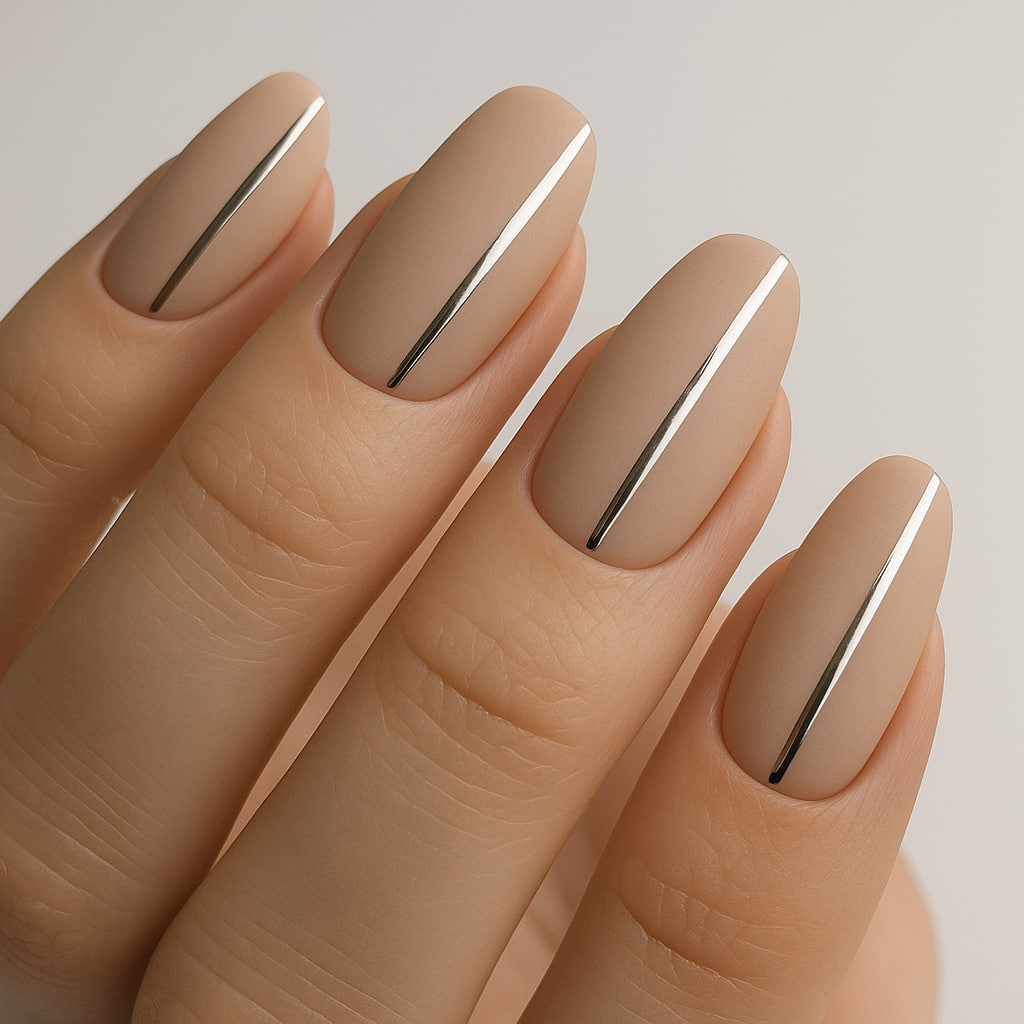
Getting straight lines: Use striping tape as a guide, but practice the motion first. Steady hands come with practice, not perfection on the first try.
25. Sheer Lavender This soft purple shade is unexpectedly perfect for winter. It’s cool-toned enough to feel seasonal but light enough to be wearable every day.
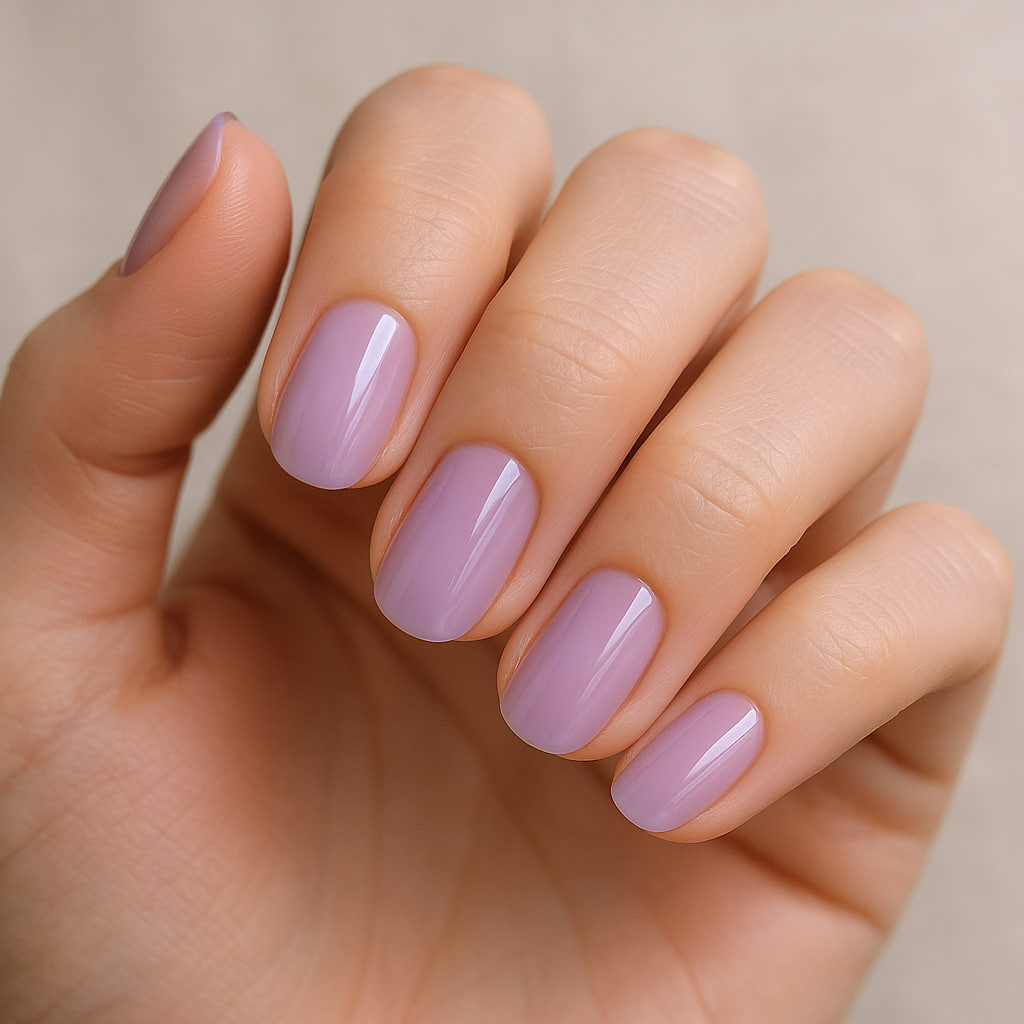
Why lavender works in winter: The cool undertones complement winter lighting beautifully, and it pairs surprisingly well with both warm and cool-toned outfits.
26. Clear with Silver Cuticle Line For the ultimate minimalist look, a thin line of silver polish right at the cuticle line adds just enough interest without overwhelming your natural nails.
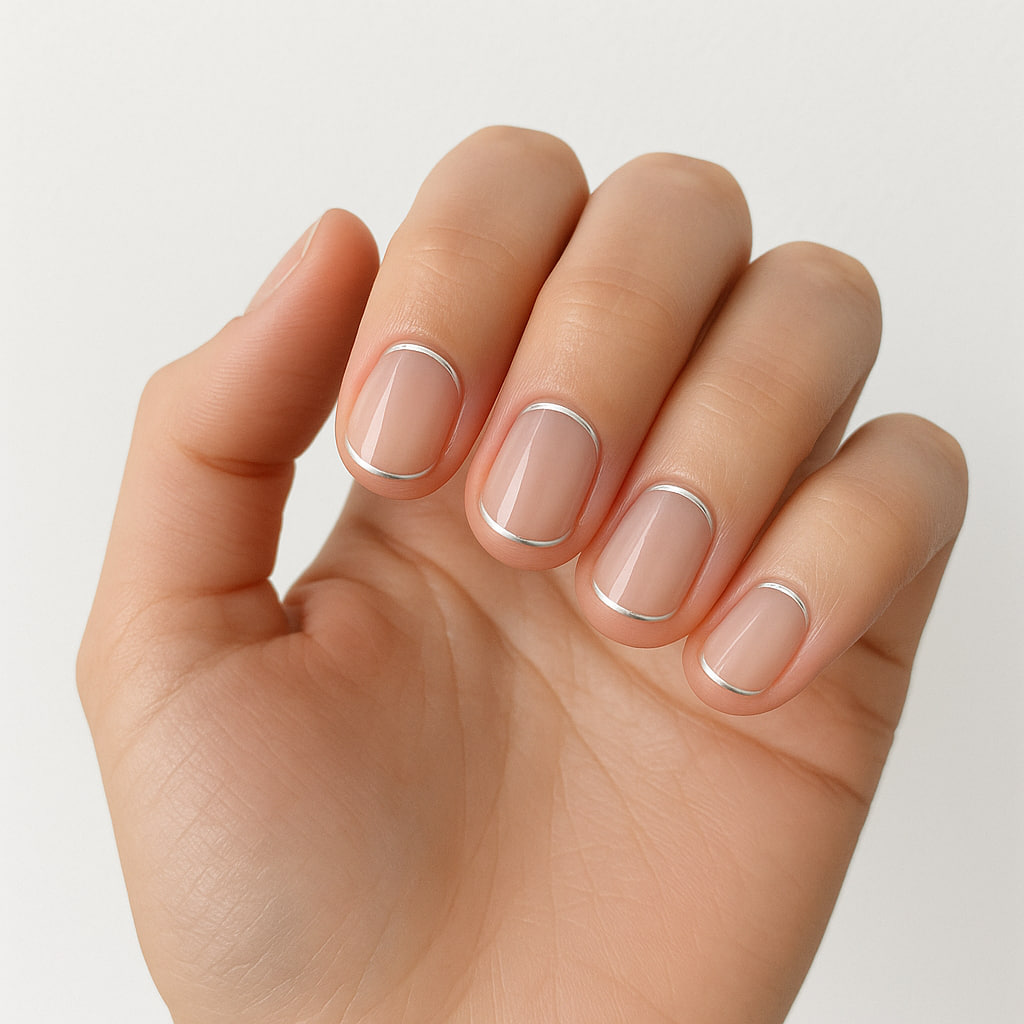
Precision technique: Use a very fine nail art brush and take your time. This look is all about clean, precise lines, so don’t rush it.
Pro Tips That Actually Make a Difference
Temperature Matters: Cold hands don’t hold polish well. Warm your hands under running water before starting your manicure, and make sure your polishes are at room temperature too.
Thin Coats Are Everything: I cannot stress this enough – two or three thin coats always look better than one thick coat. Thick coats take forever to dry and are prone to smudging and bubbling.
Base Coat is Non-Negotiable: Even if you’re in a rush, always use base coat. It protects your nails, helps polish adhere better, and prevents staining. Trust me, yellow-stained nails are not a cute look.
Clean Up Like a Pro: Keep a small brush (I use a cheap concealer brush) dipped in acetone nearby for quick cleanup around your cuticles. It makes such a difference in the final result.
Top Coat Refresh: Your manicure will last longer if you apply a fresh layer of top coat every few days. It refreshes the shine and helps prevent chipping.
Final Thoughts (Because We’re Nail Friends Now!)
Listen, I know nail art can feel intimidating sometimes. I’ve definitely had my share of “Pinterest fail” moments where my nails looked more like abstract art than the gorgeous design I was going for. But here’s the thing – practice really does make progress (not perfection, because who needs that pressure?).
Start with the easier designs and work your way up. Some of my favorite manicures have been the simplest ones. And remember, even if your nail art isn’t perfect, if you love the color and it makes you smile when you look at your hands, then it’s absolutely perfect.
This December, give yourself permission to play with these designs. Try that chrome finish you’ve been eyeing on Instagram. Experiment with matte textures. Add some sparkle just because it makes you happy. Your nails are a tiny canvas for creativity and self-expression, so have fun with them!
I’d love to see your creations! If you try any of these designs, tag me on social media – seeing your interpretations and personal touches always makes my day.
Stay cozy, stay creative, and remember – life’s too short for boring nails! ✨
What design are you most excited to try? Drop a comment and let me know – I love hearing from fellow nail enthusiasts!