Girl, can we please talk about how absolutely gorgeous chrome nails are right now?
I’m not even kidding when I say I’ve been completely obsessed with chrome nails for months! There’s something so satisfying about that perfect mirror finish – it’s like having tiny pieces of liquid jewelry on your fingertips. And honestly? Every single time I wear chrome nails out, I get stopped by random people asking where I got them done. When I casually mention that I did them myself at home for less than the cost of a fancy coffee, their minds are blown!

You know what’s funny though? Chrome nails have this whole reputation for being super bougie and expensive, like you need to go to some fancy salon and drop a hundred bucks to get them. But that’s totally not true! I’ve been experimenting with DIY chrome for what feels like forever now, and I promise you – with the right techniques (which I’m about to right about!), you can create these stunning, editorial-worthy looks right from your couch.
Whether you’ve never touched nail art before or you’re already that friend everyone comes to for mani advice, these 15 chrome designs are going to change your whole nail game. Plus, most of these looks only need a few basic supplies that you can easily order online or grab during your next Target run.
Why Chrome Nails Are Having Such a Huge Moment Right Now
Chrome nails aren’t just trending – they’re literally everywhere! What started with Hailey Bieber’s iconic glazed donut moment has completely evolved into something so much more sophisticated and fun. We’re seeing chrome nails get this amazing glow-up with incredible variations like glass nails, angel chrome (which is having a serious TikTok moment), and even these dreamy velvet chrome finishes.
Here’s why chrome nails look so ridiculously expensive: that mirror-like finish catches and bounces light in ways that regular nail polish just can’t. It’s seriously like wearing the most delicate jewelry on your fingertips! Unlike glitter polishes that kind of scatter light everywhere, chrome creates this unified, seamless shine that photographs like a dream and looks absolutely luxurious in person.
The best part? Chrome nail designs work with literally everything. You can go full-coverage chrome when you’re feeling extra, or use it as a subtle accent when you want something more low-key. The technique works beautifully on any nail length or shape too, so whether you’re team natural nails or you’re rocking long coffin acrylics, chrome is going to look amazing on you.
The Game-Changing Secret to Perfect DIY Chrome (Seriously, This Changes Everything!)
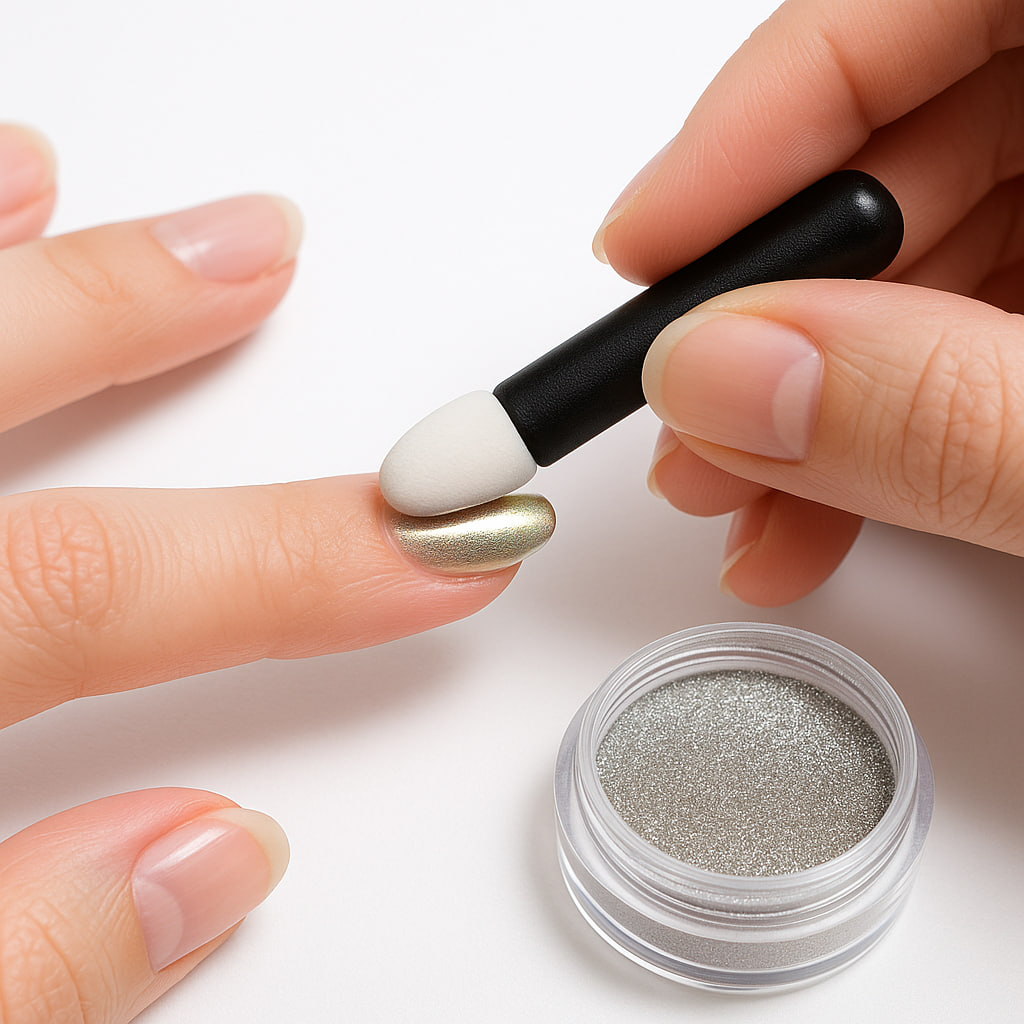
Okay, before we jump into all the pretty designs, let me share the one technique that completely changed my chrome nail game. Ready for this? It’s all about that magical no-wipe top coat! This isn’t just any regular top coat – it’s specially made to stay a little bit sticky after curing, which gives the chrome powder something to actually grab onto.
Here’s the super simple process that works every single time:
- Apply your base color and let it cure completely
- Paint on a thin layer of no-wipe top coat
- Cure for just 15-30 seconds (you want it tacky, not totally hard!)
- Gently rub chrome powder onto that sticky surface using a soft applicator
- Brush off any extra powder with a fluffy brush
- Seal everything with another layer of top coat and cure fully
The secret sauce is really in that timing – your top coat needs to be just tacky enough for the powder to stick, but not so wet that everything moves around when you touch it. If you’re totally new to gel techniques, our complete guide to nail care for beginners breaks down all the basics in super simple terms. Once you get this timing down (and trust me, you will!), you’ll be creating these incredible chrome masterpieces like it’s nothing.
Your Chrome Nail Starter Kit (Everything You Need Without Breaking the Bank!)
Here’s what I absolutely love about chrome nails – you don’t need to buy a whole salon’s worth of supplies to get started! When I first tried chrome, I was worried I’d need all these fancy tools, but honestly, the essentials are pretty simple and super affordable.
Your Chrome Beginner Kit (Under $20 total!):
- Chrome powder in a few key colors (silver, gold, and rose gold are perfect starters)
- No-wipe top coat (this is the most important thing – don’t skip it!)
- A really good base coat
- A couple of gel polish colors for your base (black makes chrome pop like crazy!)
- Silicone applicators or small makeup sponges
- One soft, fluffy brush for dusting off extra powder
- Your UV/LED lamp for curing
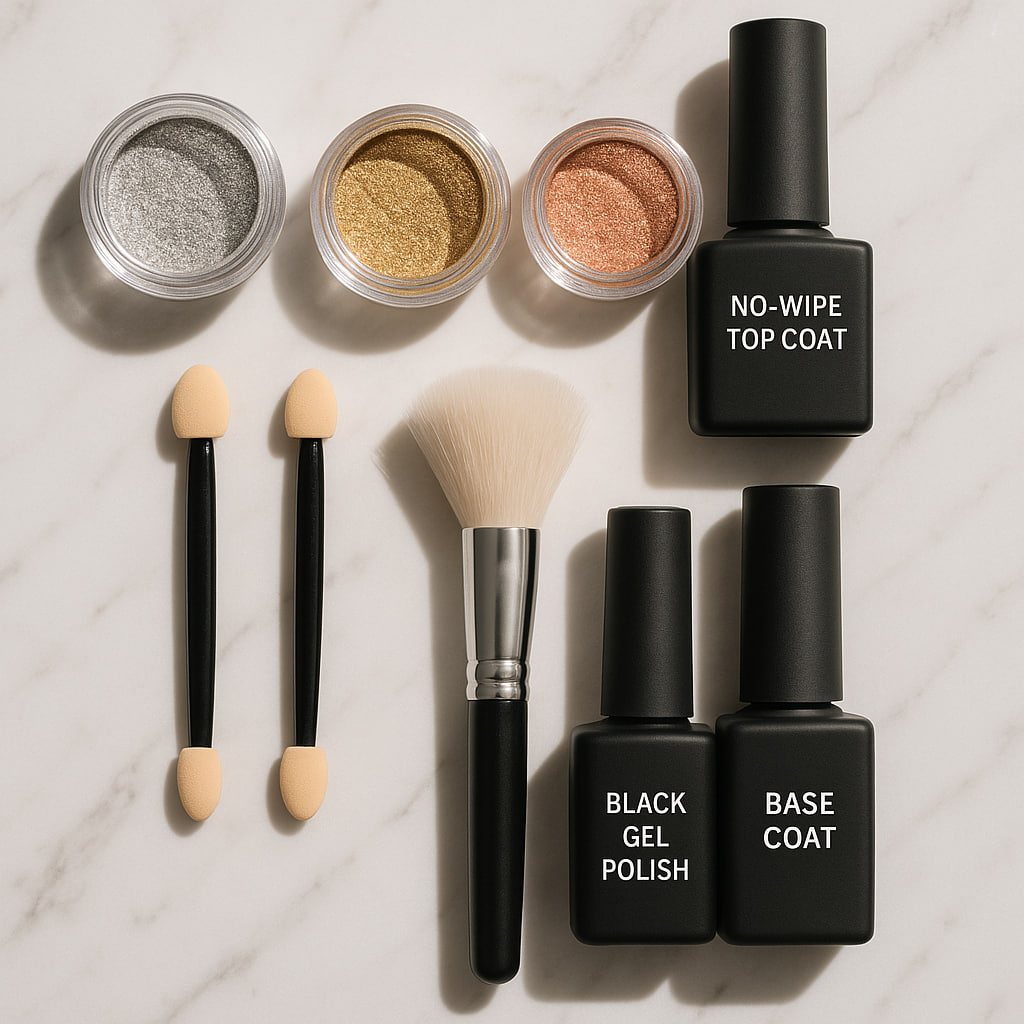
I found an amazing chrome powder set online for like $10 that came with applicators included, and the no-wipe top coat was around $7. If you already do gel manis at home, you probably have most of the other stuff already!
Here’s a fun tip: if you want to try chrome but aren’t ready to commit to gel, there are air-dry chrome systems that work with regular polish. The finish isn’t quite as intense, but they’re still absolutely gorgeous and perfect for testing the waters!
Quick note about keeping your nails happy: If you’re planning to do chrome manicures regularly (and trust me, you will be once you see how amazing they look!), make sure you’re taking good care of your nails between applications. Our guide on how to strengthen nails naturally has some really helpful expert tips for keeping your nails healthy and strong, especially when you’re using gel systems frequently.
15 Stunning Chrome Designs That Look Like Million-Dollar Manicures
Classic Chrome Perfection
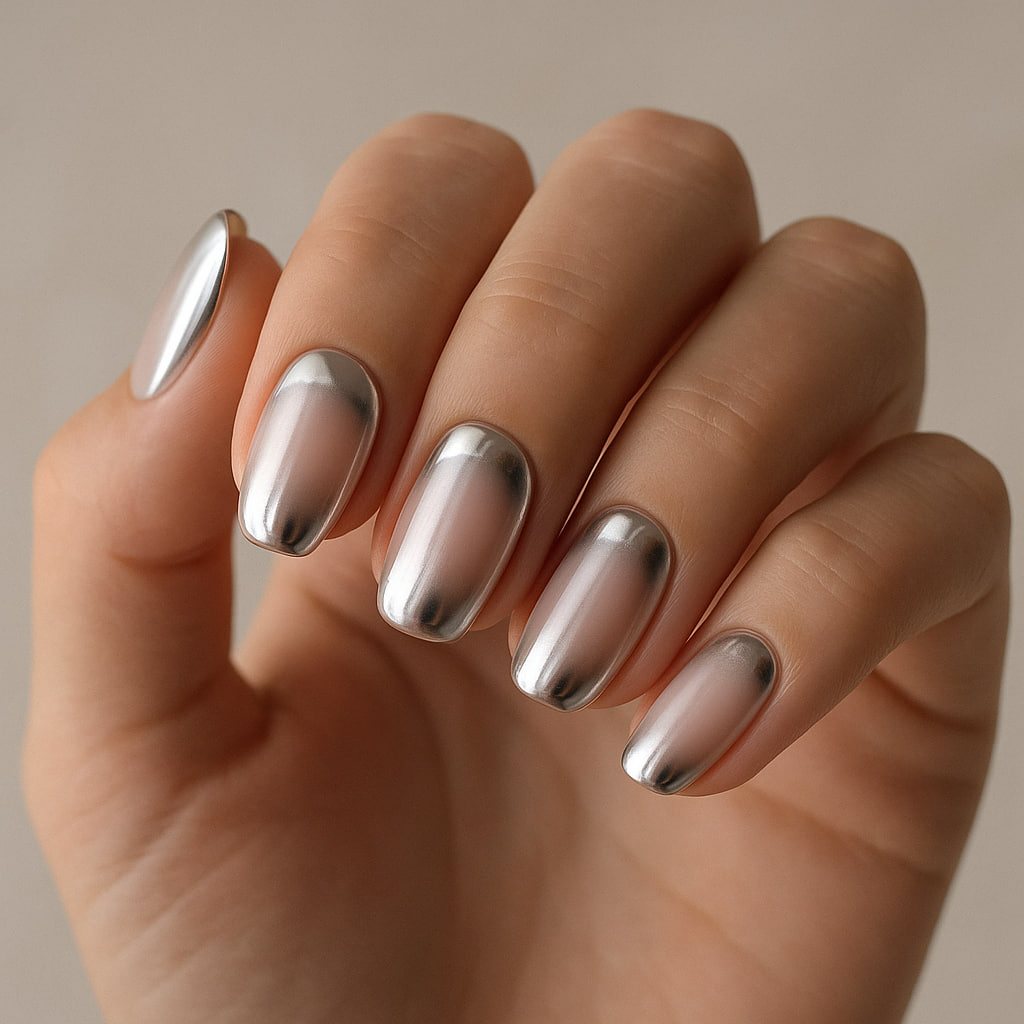
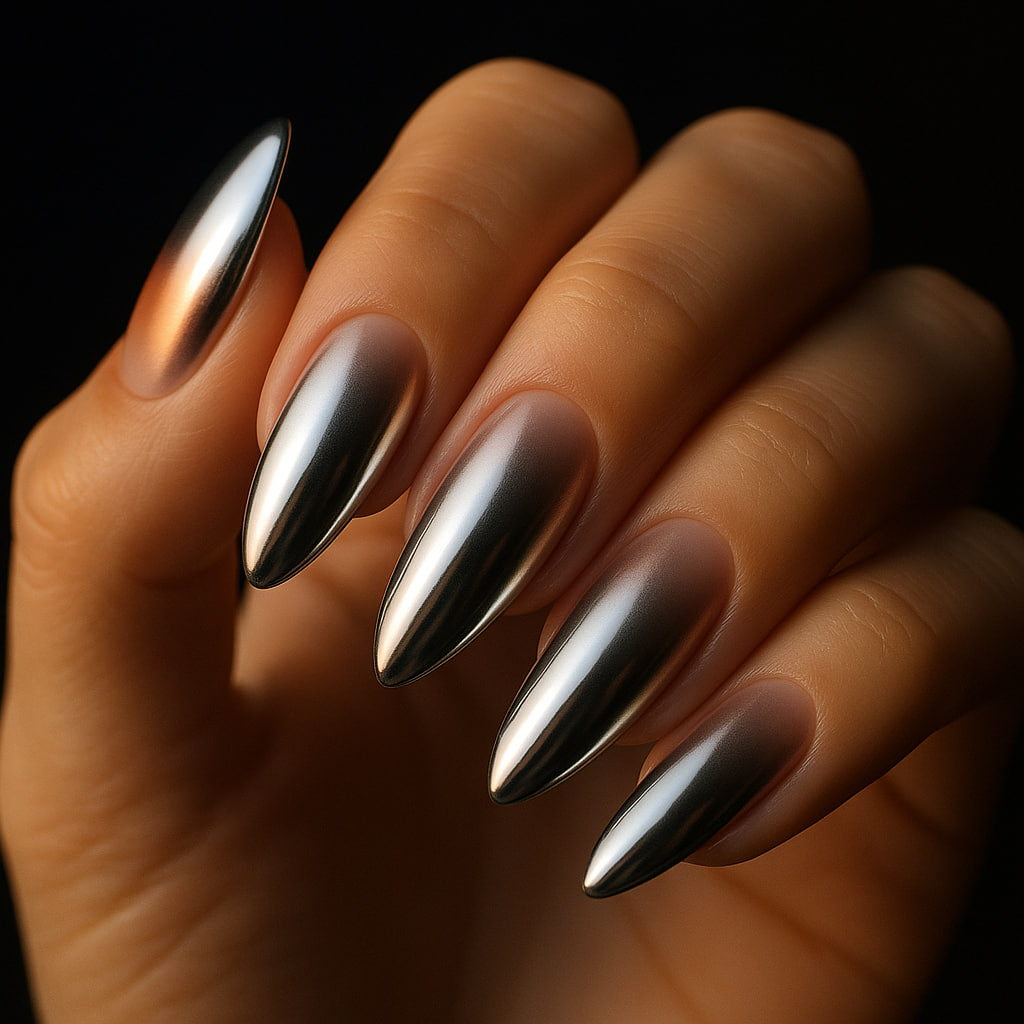
1. Mirror Silver Chrome: This is honestly the chrome design that got me completely hooked! Classic silver mirror finish over a black base creates the most incredible, liquid-metal effect you’ve ever seen. It literally looks like you dipped your nails in mercury – but in the most glamorous way possible! The trick to getting this absolutely perfect is using a really good black base because the darker your foundation color, the more dramatic and intense that chrome reflection becomes.
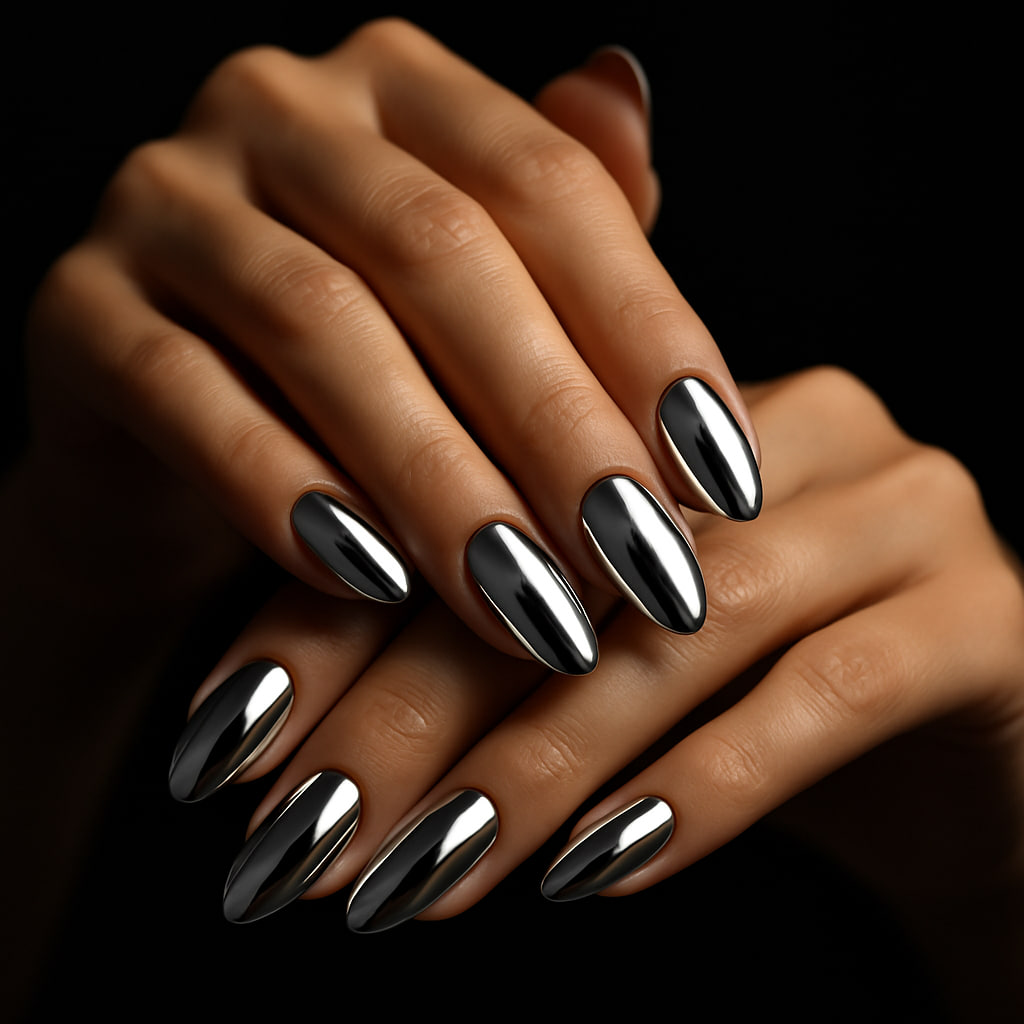
Here’s something I learned the hard way: Make sure you apply your black base in nice, thin, even coats. When I first started, I got impatient and used thick coats, which created these little bubbles that totally showed through the chrome finish. Not cute! Take your time with those base layers and you’ll get that flawless mirror effect every time.
2. Rose Gold Romance: Oh my gosh, if silver feels a little too bold for you, rose gold chrome is like a warm hug for your fingertips! This gorgeous, pinkish metal tone works so beautifully over a dark brown or burgundy base, and it goes perfectly with all your gold jewelry. I’ve worn this to everything from coffee dates to dinner parties, and it’s just sophisticated enough for work but still glamorous enough to make you feel special.
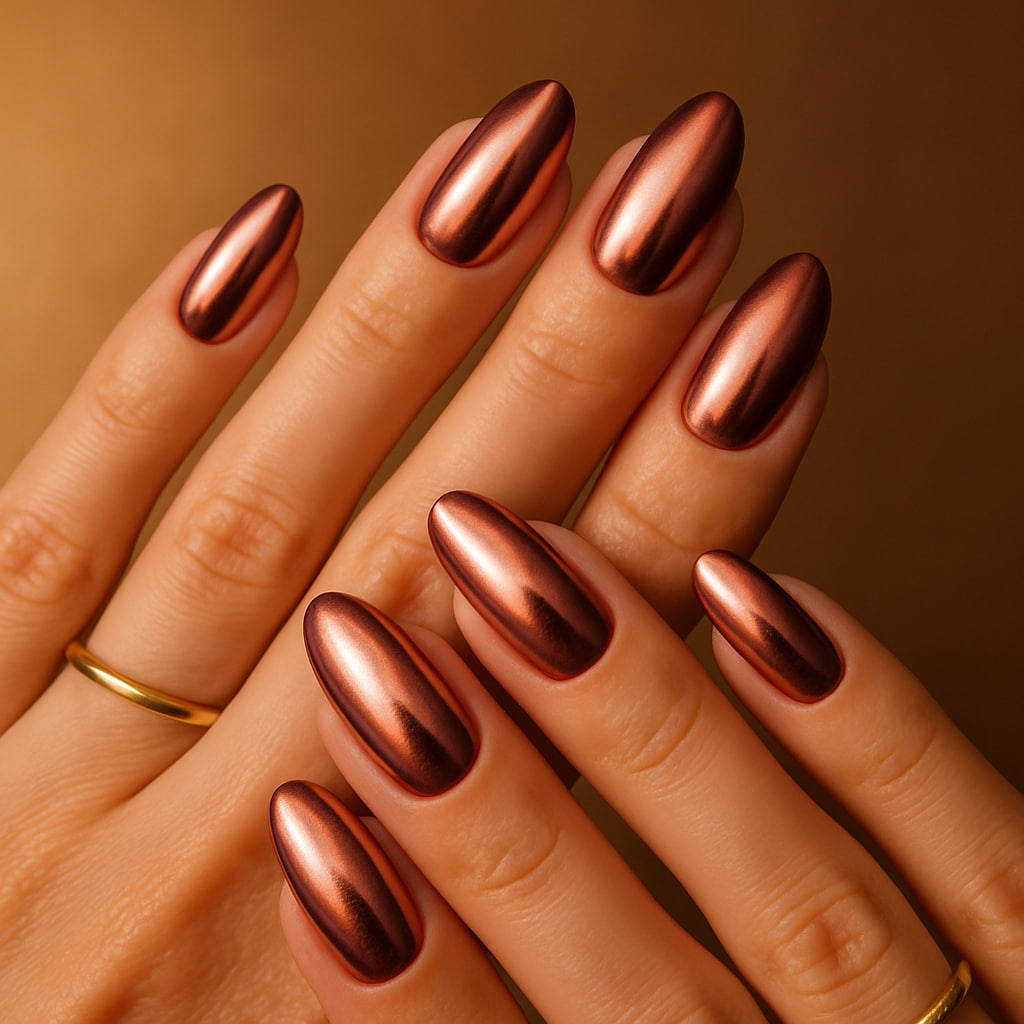
This one’s perfect for: Literally any occasion! Date nights, brunch with the girls, work meetings, or just when you want to feel a little extra special without going totally over the top.
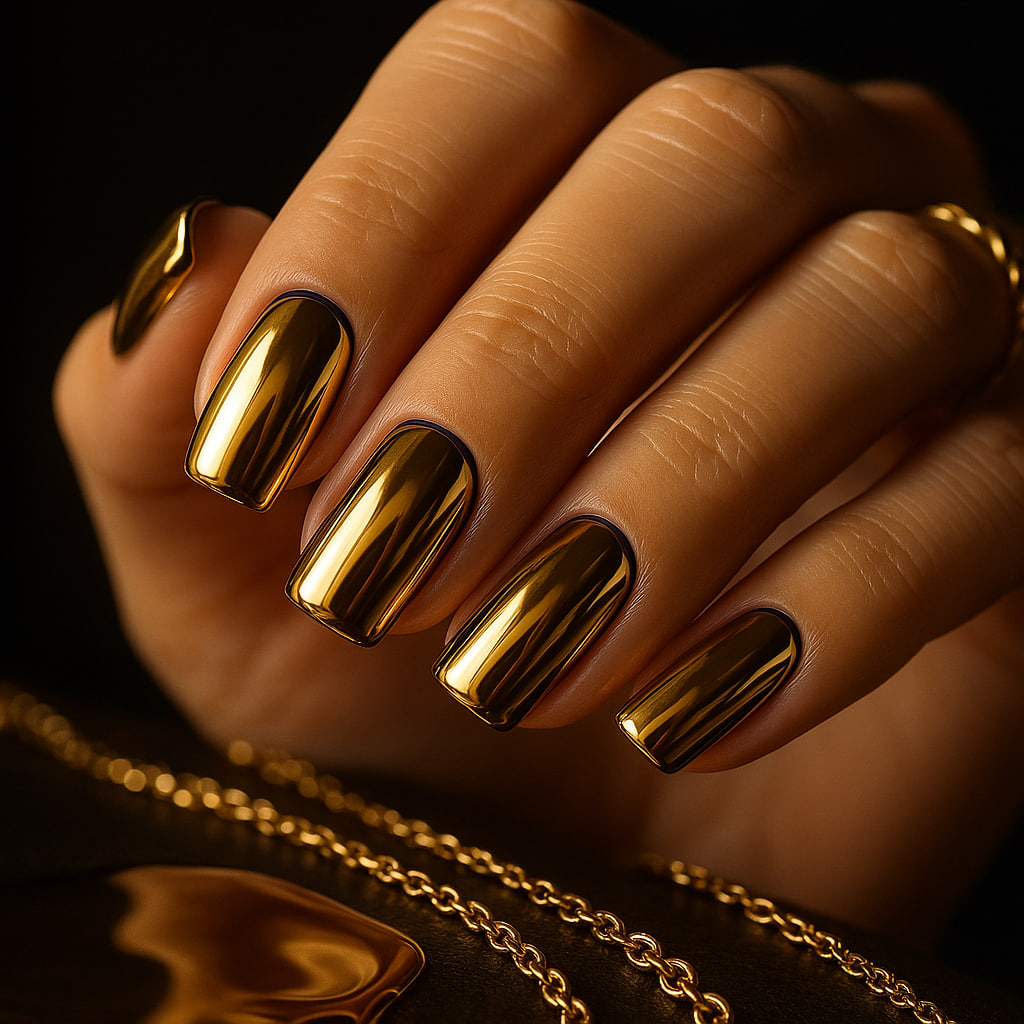
3. Gold Goddess Vibes: Can we talk about how luxurious gold chrome nails make you feel? This rich, warm finish is absolutely stunning over a dark navy or black base, and when you pair it with your favorite gold accessories, it’s like having a perfectly coordinated jewelry set that includes your nails! I love how this design makes even the simplest outfit look so put-together and expensive.
Subtle Chrome Elegance
4. Angel Chrome (The TikTok Everyone’s Obsessing Over): This viral trend is seriously everywhere right now, and I totally understand why! It features a nude or sheer pink base with just the tiniest whisper of chrome powder dusted over the center of each nail. The effect is so ethereal and dreamy – it’s like your nails are literally glowing from within. This design is absolutely perfect for anyone who wants that chrome magic but in a way that’s super wearable for everyday.
Why everyone’s loving this: It gives you that expensive, just-left-the-salon look while still being totally appropriate for work, and it goes with absolutely every single outfit in your closet.
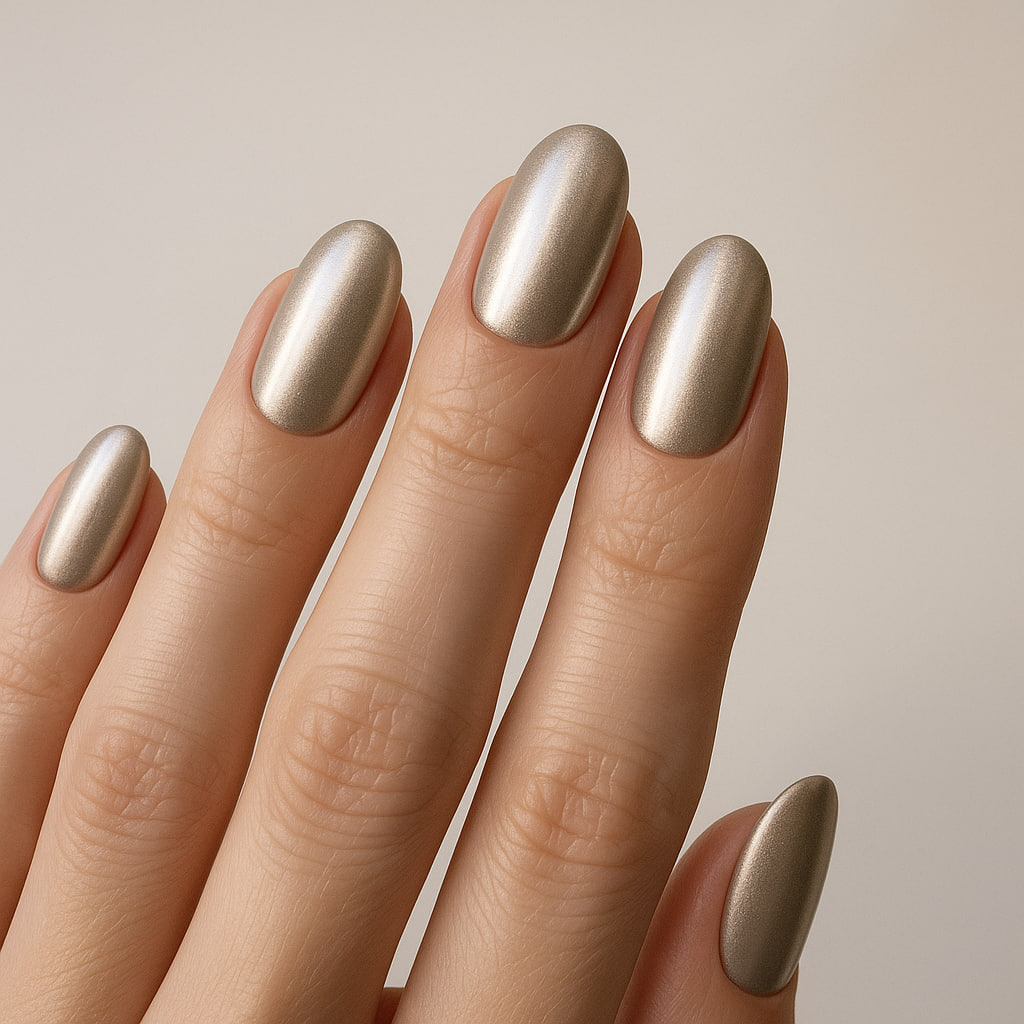
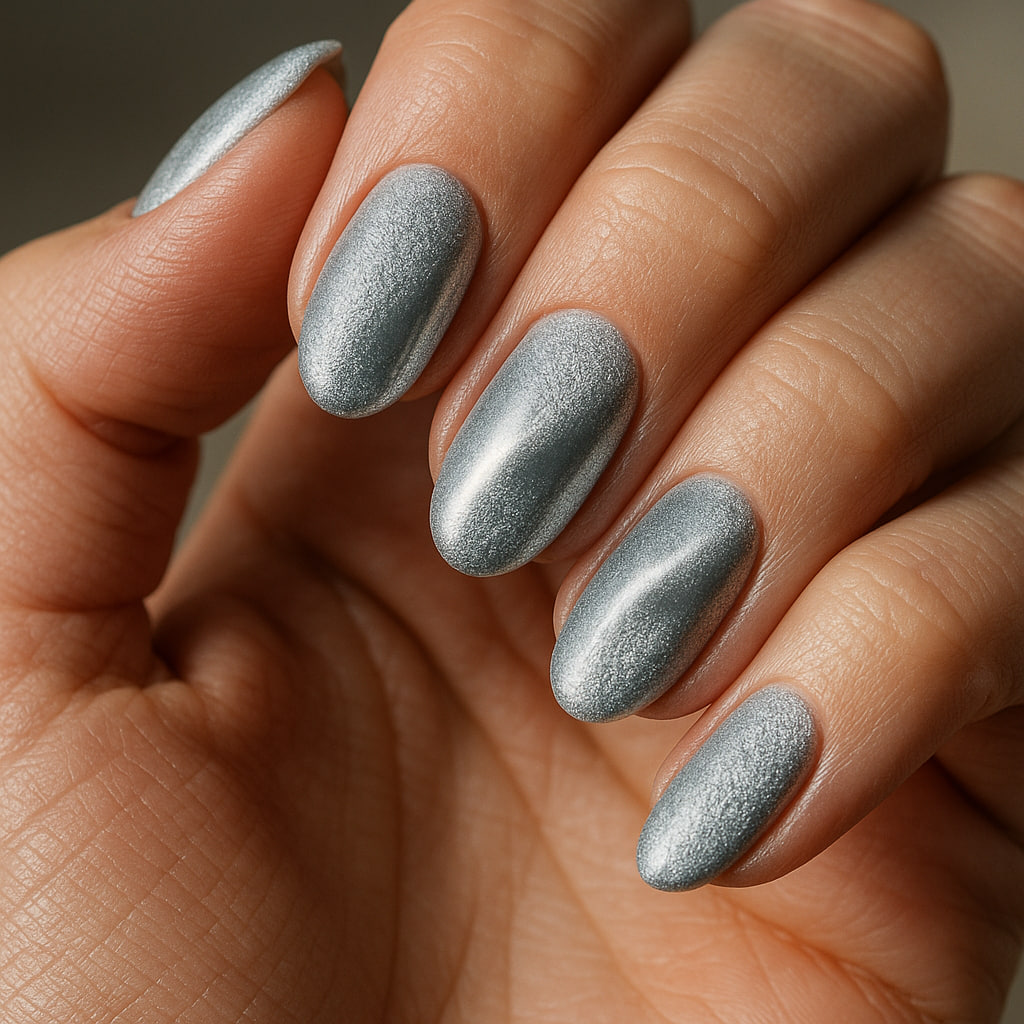
5. Champagne Chrome Elegance: Think of this as gold chrome’s more sophisticated, quieter sister. Champagne chrome has this beautiful, muted metallic finish that’s warm and luxurious but not overpowering at all. When you apply it over a light gray or soft taupe base, it creates this incredibly chic, minimalist look that feels so modern and expensive.
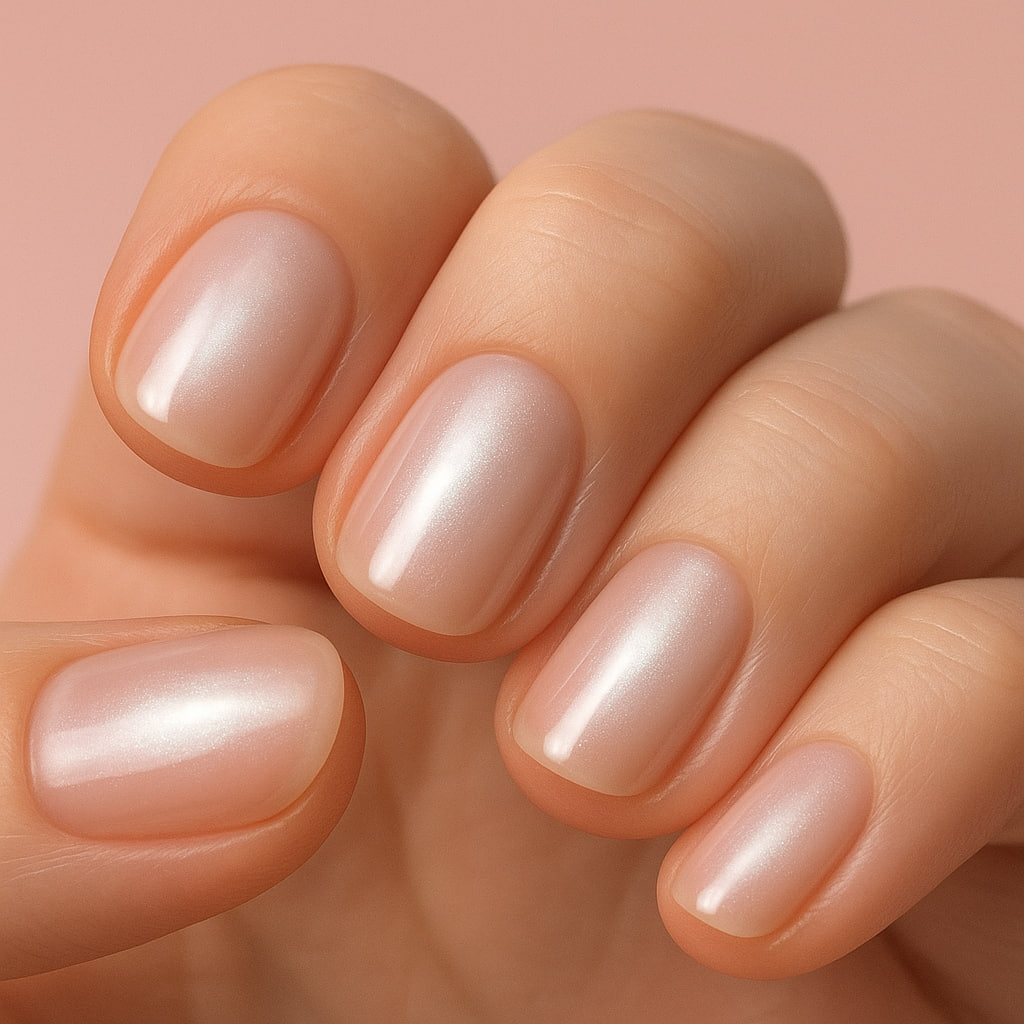
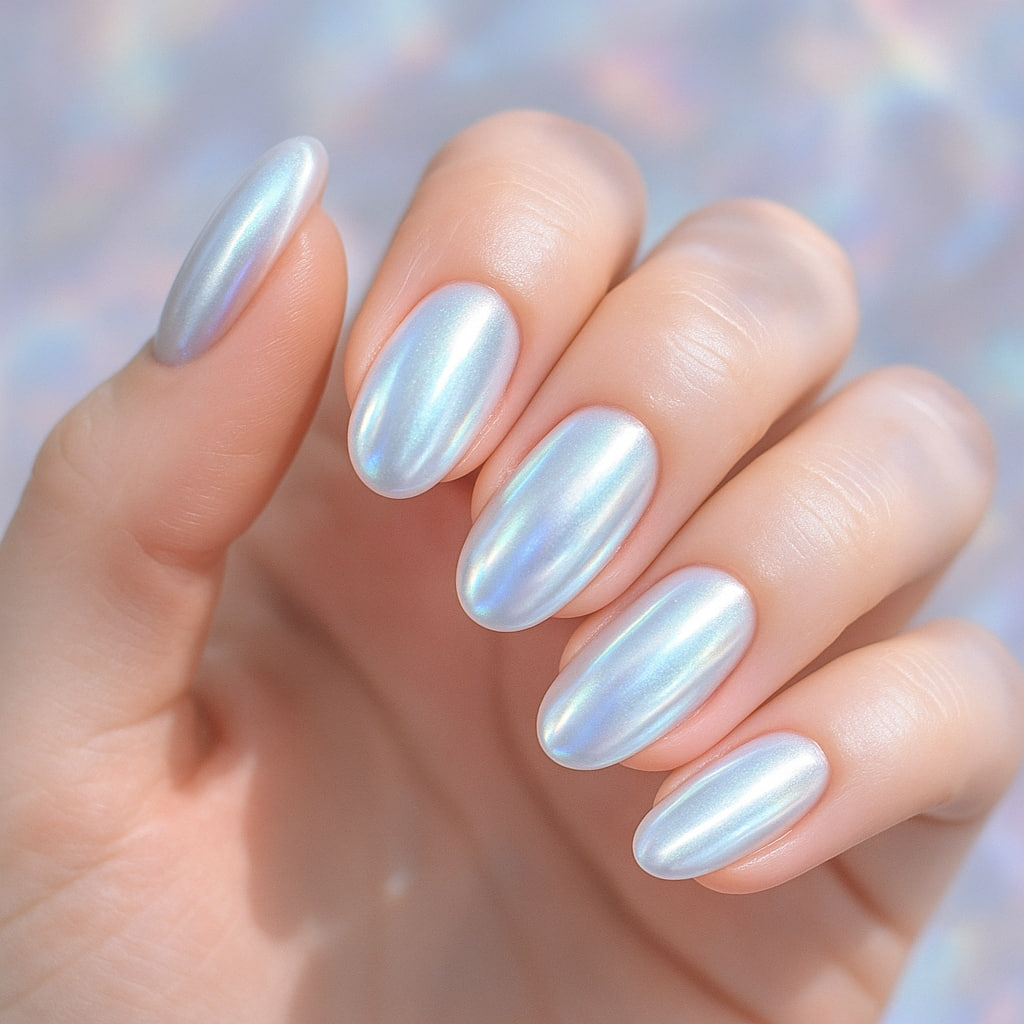
6. Pearl Chrome Dreams: This soft, iridescent finish is pure magic! It shifts between silvery and white depending on how the light hits it, and it’s created using pearl chrome powder over a white or very light pink base. The result honestly looks like you’re wearing tiny opals on your fingertips – it’s absolutely gorgeous and so unique!
Chrome French Manicures
7. Silver Chrome French Tips: The classic French manicure gets such a gorgeous upgrade with chrome tips! Start with a nude or pink base, then use tape to section off your tips before applying the chrome. The contrast between the natural base and those mirror-like tips is absolutely stunning and so modern.
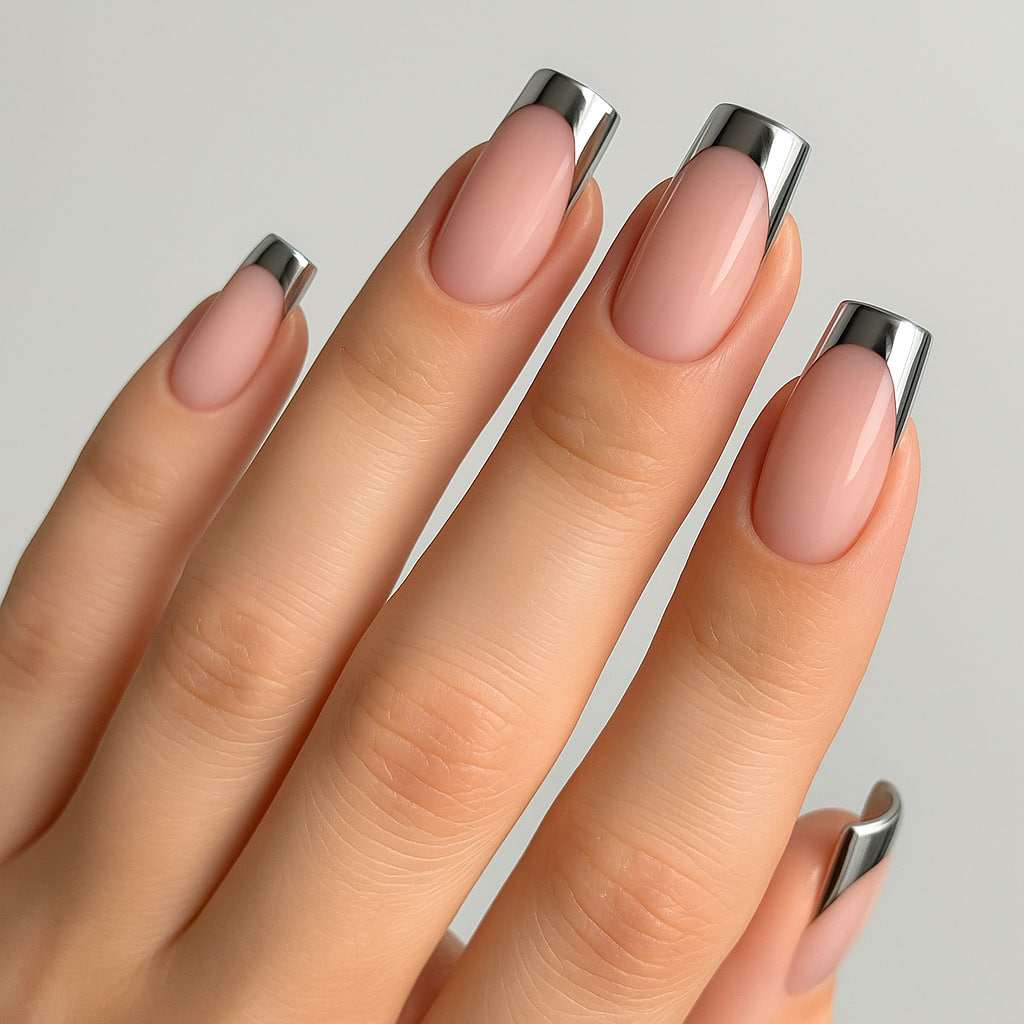
Application hack I swear by: Use nail guides or tape to get perfectly straight lines, but remove them while the top coat is still slightly wet to avoid any peeling. Trust me on this one!
8. Reverse Chrome French: This trendy variation puts the chrome at the base of your nail instead of the tips, and I’m obsessed! It creates this gorgeous gradient effect as the chrome fades into your natural nail color. It’s unexpected and so chic – definitely a conversation starter!
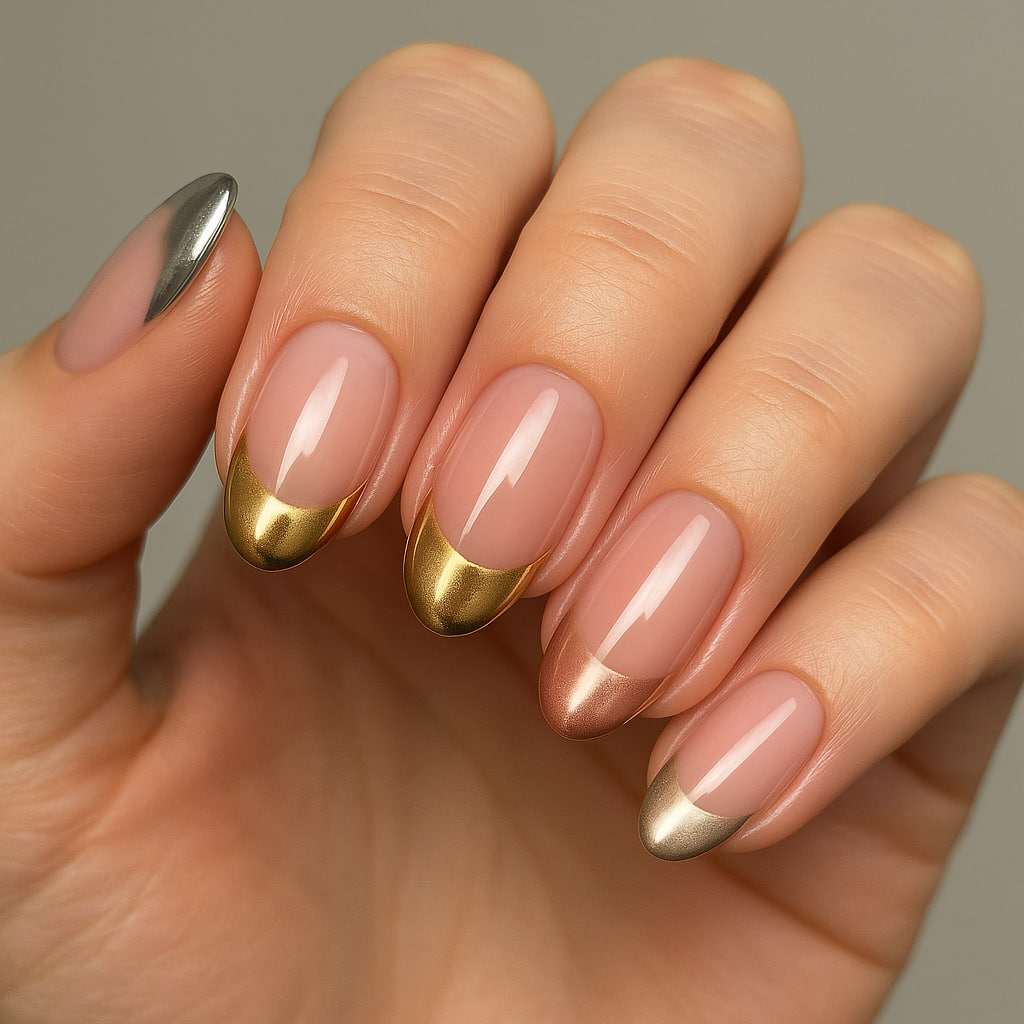
9. Multi-Chrome French: Why choose one chrome color when you can use several? This design uses different chrome shades on each nail’s French tip – think silver, gold, rose gold, and champagne. It’s bold but sophisticated, and the variation keeps things super interesting without being overwhelming.
Creative Chrome Accents
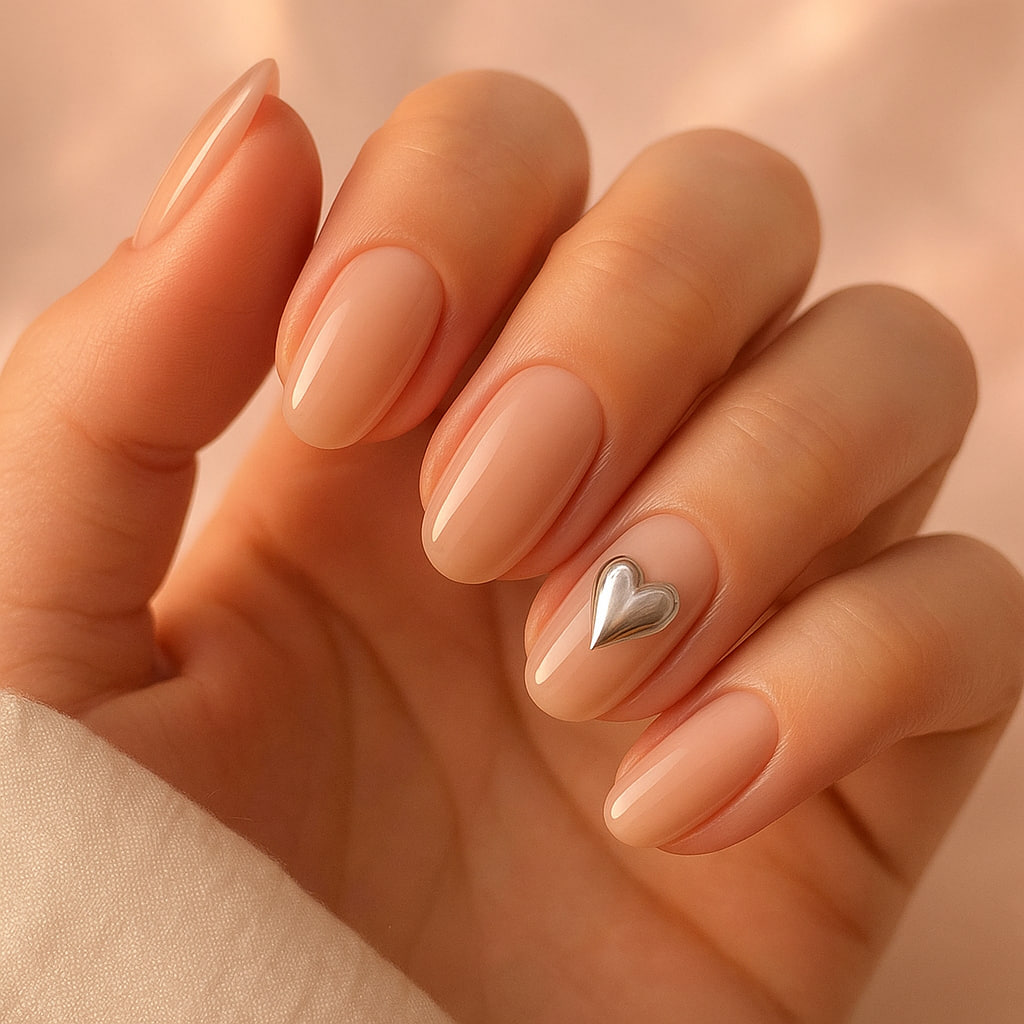
10. Chrome Heart Accent: Add a single chrome heart to your ring finger nail over a neutral base for the sweetest accent ever! Use a small stencil or freehand it with a tiny brush dipped in chrome powder mixed with clear top coat. It’s romantic without being over-the-top – perfect for date nights or just when you want something cute.
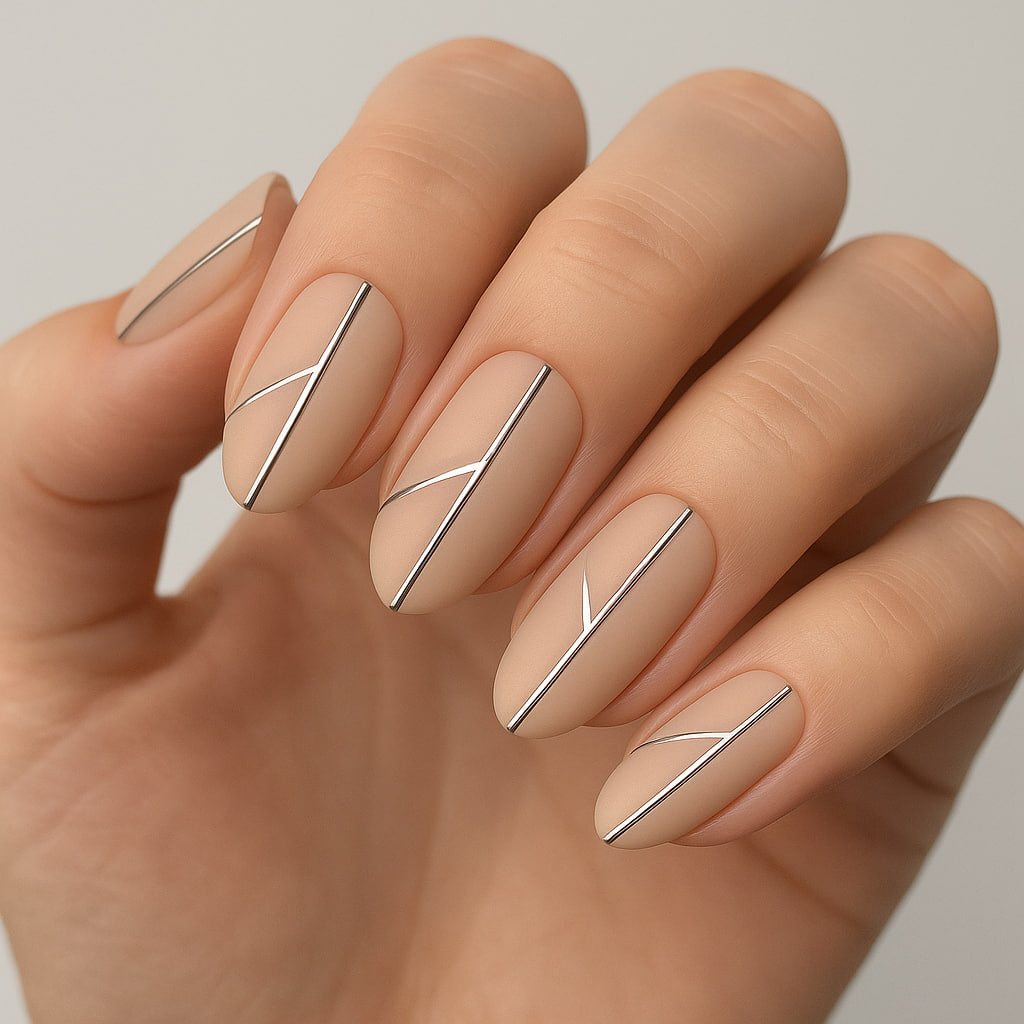
11. Chrome Stripe Details: A single thin stripe of chrome down the center of each nail transforms a simple manicure into something really special. Use striping tape as a guide, apply your chrome powder, then seal and remove the tape for perfectly clean lines. It’s modern and minimalist but still eye-catching.
12. Geometric Chrome Blocks: Create modern art on your nails with geometric chrome sections! Use tape to mask off triangles, squares, or other shapes, then apply chrome powder only to the exposed areas. The contrast between matte base and mirror chrome is absolutely striking and so contemporary.

Advanced Chrome Techniques
13. Chrome Ombré Magic: This gradient effect blends chrome powder from intense at the tips to barely-there at the cuticles, and it’s honestly breathtaking! It requires a bit more technique but creates this gorgeous sunset-like effect that’s so worth the effort. Start by applying chrome heavily at the tips, then use a clean brush to blend it upward in lighter strokes.
The secret to getting this right: Work quickly while your no-wipe top coat is still tacky, and blend in one direction only to avoid disturbing the chrome you’ve already applied.
14. Velvet Chrome Texture: This trendy finish uses magnetic cat-eye polish as your base instead of regular color, and the results are incredible! When you apply chrome powder over the magnetic effect, it creates this amazing textured, velvet-like appearance that shifts and moves in the light. It’s so unique and luxurious-looking.
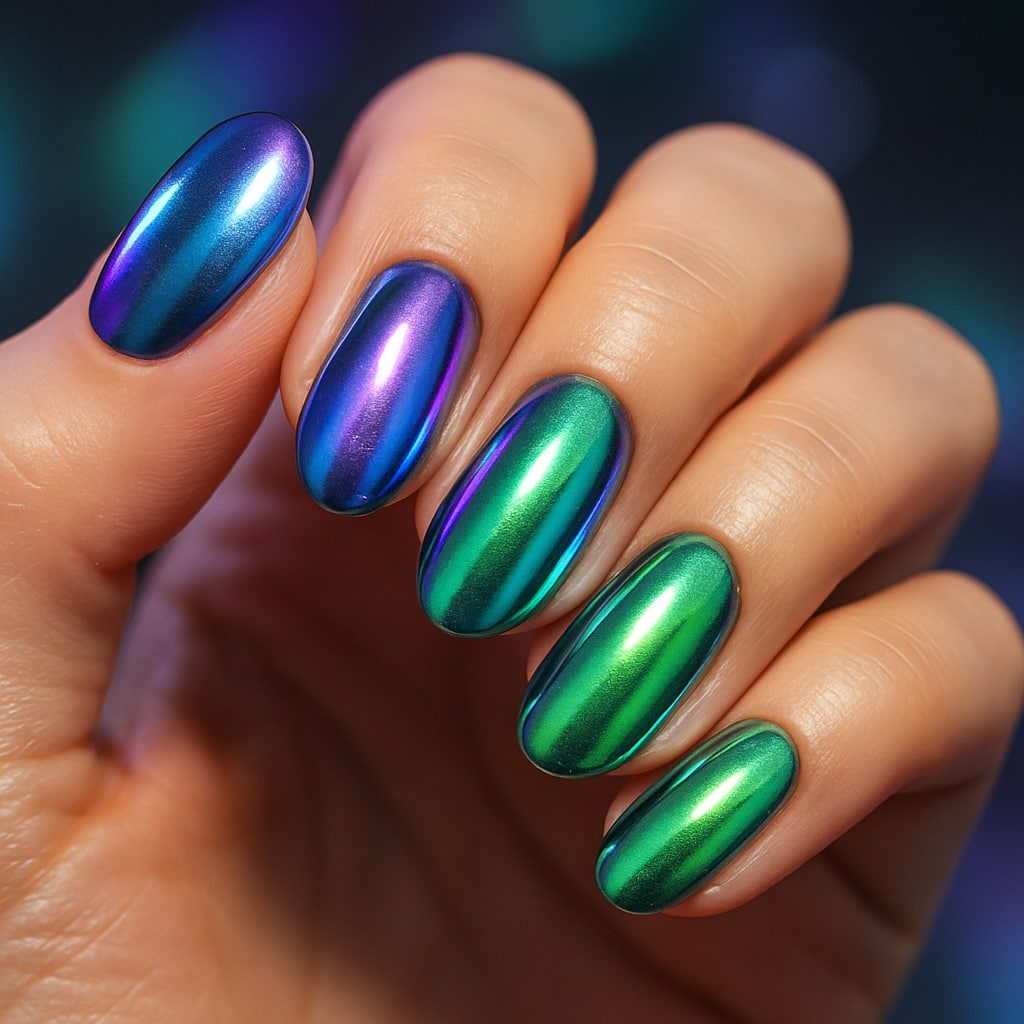
15. Rainbow Chrome Shifting: Using special color-shifting chrome powder, this design appears to change colors as you move your hands – it might look blue from one angle, purple from another, and green from a third. It’s literally like having magic on your fingertips, and people cannot stop staring!
All the Little Tips That Make a Huge Difference
Get Your Timing Right: The biggest mistake I see people make (and honestly, I made this mistake too when I started!) is curing their no-wipe top coat for way too long. You want it to feel tacky and slightly sticky, not completely hard. Start with just 15 seconds and see how it feels – you can always cure it a bit more if needed.
Seriously, Less Is More: This one took me a while to learn, but you need way less chrome powder than you think! A tiny amount that’s rubbed in really well always looks better than piling it on thick. If you need more coverage, you can always build it up gradually.
Keep Everything Super Clean: Always use a clean, fluffy brush to dust off any extra powder before you seal everything with top coat. If you leave loose powder sitting on the nail, it’ll create more of a sparkly, glittery effect instead of that smooth, mirror-like finish we’re going for. If you want to learn more about getting perfectly smooth nails as your base, check out our article on using a nail buffer – it really makes a difference in your final results!
Quality Actually Matters: I know it’s tempting to go with the cheapest option, but not all chrome powders are the same. The finer the particles in the powder, the smoother and more mirror-like your finish will be. It’s totally worth investing in good quality powder because the difference is so noticeable.
Think About Your Base Color: Your base color completely changes how the final chrome looks! Black gives you the most intense, dramatic mirror effect, while lighter colors create softer, more subtle finishes. Don’t be afraid to experiment with different base colors to see what effects you can create!
How to Make Your Chrome Manicure Last Ages
The good news is that chrome nails can absolutely last just as long as your regular gel manicures when you apply them properly and take good care of them! Here’s everything I’ve learned about making them last:
Seal Those Edges Like a Pro: This is so important! Make sure your final top coat wraps all the way around the free edge of your nail. This prevents the chrome from chipping off at the tips, which is usually where wear happens first.
Be a Little Gentle: Chrome nails are slightly more delicate than regular gel polish, so just be mindful when you’re doing things like opening packages, typing really aggressively, or trying to pry things open with your nails (we’ve all been there!).
Keep Your Cuticles Happy: Dry, lifting cuticles make even the most perfect chrome manicure look messy and unkempt. Keep them moisturized with cuticle oil – it makes such a difference! For comprehensive nail and cuticle care routines, especially if you’re using gel polish frequently, our article about whether gel nail polish damages your nails explains proper application and removal techniques to keep your nails healthy.
Smart Touch-Up Strategy: If you do get a small chip (it happens to the best of us!), you can often fix it by gently buffing the area smooth and applying just a tiny bit of top coat rather than having to redo the entire nail. It’s a total time-saver!
When Things Don't Go Exactly as Planned (Don't Worry, It Happens!)
Problem: Your chrome looks all patchy and streaky instead of smooth
What’s happening: Your no-wipe top coat was either cured too long or not long enough. It’s all about finding that sweet spot where it’s tacky but not wet.
Easy fix: Try adjusting your curing time by 5-10 seconds either way and see how that works.
Problem: The chrome powder just won’t stick to your nails
What’s happening: You might be using regular top coat instead of the special no-wipe kind, or your surface isn’t tacky enough.
Easy fix: Double-check that you’re using actual no-wipe top coat (the tacky layer is absolutely essential for this to work), and try reducing your cure time a bit.
Problem: Your chrome looks dull and not shiny after you seal it
What’s happening: You might be pressing too hard when you brush off the excess powder, or you’re applying your final top coat too thick.
Easy fix: Use super light, gentle strokes when dusting off powder, and apply your top coat in thin layers.
Problem: Your chrome keeps chipping off way too easily
What’s happening: You probably have chrome powder on your skin or cuticles where it can lift, or you’re not sealing the edges properly.
Easy fix: Make sure to clean up any powder that gets on your skin, and really focus on wrapping that top coat around the free edge of your nail.
Your Complete Chrome Shopping List (Everything You Need for Under $20!)
Here’s exactly what I recommend if you’re starting completely from scratch and want to get professional-looking results without spending a fortune:
Chrome Powder Set ($8-12): Look for sets that include at least silver, gold, and rose gold – these three colors will give you so many options!
No-Wipe Top Coat ($6-8): This is seriously worth investing in a good quality one because it makes such a difference
Base Coat ($5-7): Protects your natural nails and helps everything else stick properly
Black Gel Polish ($4-6): Essential for getting those super dramatic chrome effects
Applicator Set ($3-5): Silicone tools work way better than anything else I’ve tried
Soft, Fluffy Brush ($2-4): For dusting off excess powder without disturbing your finish
Your total investment: Under $20 for absolutely everything you need to create endless gorgeous chrome designs! Once you have these basics, you can experiment with different base colors and chrome shades to create your own unique looks.
Beyond Basic Chrome: Fun Ideas to Try Once You're Hooked
Once you’ve mastered the basic technique (and trust me, you’re going to get addicted!), there are so many fun ways to get creative with chrome:
Seasonal Chrome: Use copper chrome for fall vibes, silver for winter elegance, gold for summer holidays
Mixed Textures: Combine chrome with matte finishes on different nails for contrast
Chrome Stamping: Use chrome powder with nail stamps for intricate, detailed designs
Layered Effects: Apply chrome over textured bases for completely unique finishes
The nail art world is your oyster once you understand how chrome powder works! If you love experimenting with metallic effects, you might also enjoy our red and silver nail designs for more metallic inspiration using traditional polishes.
Final Thoughts (We're Officially Chrome Nail Besties Now!)
I really hope this guide has shown you that gorgeous, expensive-looking chrome nails are totally, completely achievable at home! I know the technique might seem a little intimidating when you’re first reading about it, but honestly, once you try it a couple of times and get the hang of that timing, you’re going to be absolutely addicted to creating these stunning mirror finishes.
My advice? Start with one of the easier designs like that classic silver chrome or the dreamy angel chrome, then work your way up to the trickier techniques once you feel more confident. Remember, even professional nail artists had to practice to get their results perfect, so please don’t get discouraged if your first attempt doesn’t look exactly like the photos on Instagram!
The most important thing is to have fun with the whole process! Chrome nails are all about that glamorous, confident feeling you get when you catch the light just right and your nails literally sparkle and shine. Whether you’re going for subtle, everyday elegance or full-on mirror magic that stops traffic, there’s definitely a chrome design out there that’s going to make you feel absolutely incredible.
What chrome design are you most excited to try first? I’d honestly love to see your creations – tag me on social media and show off those gorgeous DIY chrome nails! And remember, if you can master this technique, you can definitely tackle winter nail designs and pretty much any other nail art that catches your eye.
Happy chrome-ing, beautiful! ✨
Frequently Asked Questions About Chrome Nails
Get answers to the most common questions about DIY chrome nail designs, application tips, and troubleshooting.