Are you eager to learn – How to do Marble Nails at Home? Or you have heard a lot about these but are unsure where to begin?
Fear not, With step-by-step instructions and expert tips, you’ll soon be mastering this nail technique and flaunting flawless marble manicures that are bound to impress. Let’s learn it!
In this guide, I’ll walk you through the steps to create stunning marble nails that will leave everyone asking where you got them done. [And you tell them it’s you, you did it on your own]
Marble nails have taken the nail art world by storm. They offer a mesmerizing and sophisticated look that’s surprisingly easy to achieve at home. Today, marble nails continue to captivate enthusiasts with their elegant swirls and unique patterns, this makes them a favorite among DIY nail artists.
What are Marble Nails?
Before we get into the process, let’s first understand what marble nails are and explore the different types of designs you can create.
Marble nails are a nail art technique that mimics the appearance of natural marble stone. We blend different colors of nail polish, so you can create stunning patterns reminiscent of marble’s intricate veins and textures.
Types of Marble Nail Designs
There are endless variations of marble nail designs, they can be subtle and understated to bold and eye-catching. Some popular styles include classic white marble, pastel swirls, and vibrant rainbow marbling.
Preparing Your Nails
Before you begin creating your marble masterpiece, it’s essential to prepare your nails properly.
A. Clean and trim your nails – Start by removing any old nail polish and trimming your nails to your desired length and shape. Use a nail file to smooth out any rough edges for a polished finish.
B. Apply a base coat – Applying a base coat not only protects your nails from staining but also helps the nail polish adhere better and last longer. Choose a clear or nude base coat for a seamless foundation.
1. Gather Your Supplies
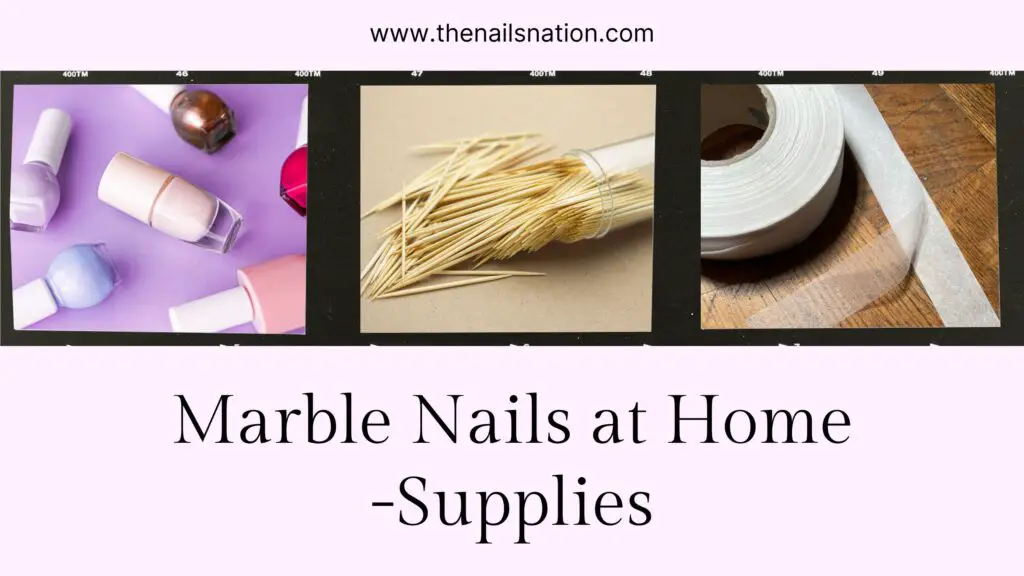
To create marble nails at home, you’ll need a few essential supplies –
A. Nail polish colors
→ Select 2-3 complementary nail polish colors for your marble design. Experiment with different combinations to achieve the perfect look.
B. Toothpicks or dotting tools
→ You’ll use toothpicks or dotting tools to swirl and manipulate the nail polish colors, creating the marble effect.
C. Tape or liquid latex
→ To protect your skin from excess polish during the marbling process, consider using tape or liquid latex around your nails for easy cleanup.
Here's How to do Marble Nails
Now it’s time to get creative and start marbling your nails.
Technique 1: Water Marbling
Water marbling is a popular method for creating intricate marble designs.
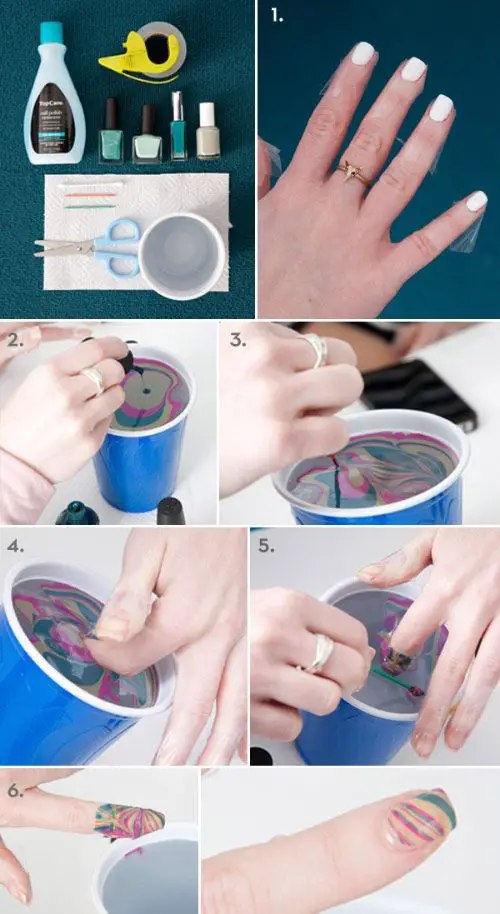
1. Filling a cup with room temperature water
Fill a disposable cup with room temperature water, preferably bottled or filtered for best results.
2. Dropping nail polish into the water
One by one, drop alternating colors of nail polish onto the surface of the water. The polish should spread out and form concentric circles on the surface.
3. Swirling the colors together
Using a toothpick or a pointed tool, gently swirl the colors together to create a marble-like pattern on the surface of the water.
4. Dipping your nails into the design
Once you’re happy with the pattern, carefully dip your nails into the water, allowing the polish to adhere to your nails. Remove any excess polish from the surface of the water with a clean toothpick before pulling your nails out.
Technique 2: Dry Marble
If water marbling seems too daunting, you can achieve a similar effect using the dry marble technique.
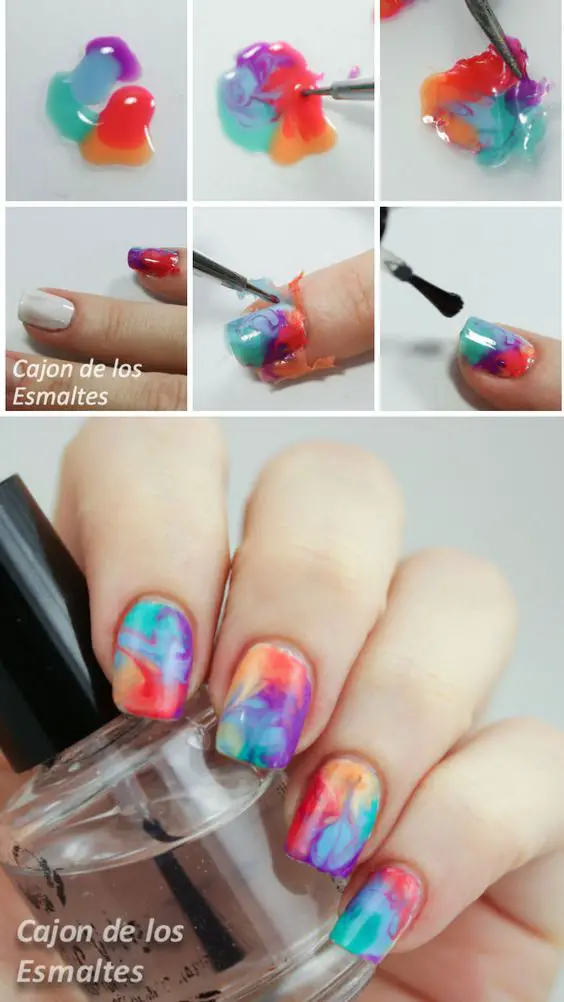
1. Applying nail polish directly onto your nail
Start by applying a base color to your nails and allowing it to dry completely. Then, dab small dots of your chosen nail polish colors directly onto your nails.
2. Swirling the colors with a toothpick
Using a toothpick or a thin brush, gently swirl the colors together on your nails to create a marble effect. Be careful not to overblend, as you want to maintain distinct patterns.
3. Blending the colors together
Continue swirling and blending the colors until you’re satisfied with the marble effect. You can add more polish as needed to enhance the design.
Clean-up
Once you’ve finished marbling your nails, it’s time to clean up any excess polish for a flawless finish.
A. Removing excess polish from your skin
Dip a small brush or cotton swab into nail polish remover and carefully clean up any polish that may have gotten on your skin or cuticles.
B. Cleaning up around your cuticles
For a professional-looking manicure, use a precision brush dipped in nail polish remover to clean up any polish that may have pooled around your cuticles.
Apply a Top Coat
To seal in your marble design and add shine to your nails, apply a top coat of clear nail polish.
A. Sealing in your design
The top coat not only protects your marble nails from chipping but also helps to smooth out any imperfections and enhance the vibrancy of the colors.
B. Adding shine and protection
Choose a top coat that dries quickly and leaves a glossy finish for a salon-worthy manicure at home.
Final Touches
With your marble nails almost complete, add some final touches to take your manicure to the next level.
A. Adding nail gems or glitter (optional)
For extra sparkle and dimension, consider adding nail gems or glitter to your marble nails. Place them strategically on your nails while the top coat is still tacky for a secure hold.
B. Moisturizing your cuticles
Finish off your manicure by applying a hydrating cuticle oil or cream to keep your nails and cuticles healthy and nourished.
Marble Nails Tutorial
If you prefer video content, you can check this video on How to do marble Nails at home. Tina Yong, the creator of this video has explained and also recorded a full tutorial on creating marble nail art –
Tips and Tricks for Marble Nails
Creating marble nails at home can be a fun and rewarding experience, but it’s essential to keep a few tips and tricks in mind for best results.
A. Use nail polish thinner
If your nail polish begins to thicken or dry out, revive it with a few drops of nail polish thinner to restore its consistency and ease of application.
B. Experiment with different color combinations
Don’t be afraid to get creative and experiment with different color combinations and techniques to create unique marble nail designs that reflect your personal style.
Marble Nails Maintenance Tips
Marble nails can be easy to do but to prolong the lifespan of your marble nails, consider the following maintenance tips:
- Apply a fresh layer of top coat every few days to maintain shine and durability.
- Avoid prolonged exposure to water and harsh chemicals, as these can cause chipping and dullness.
- Use gloves when engaging in activities that may cause damage to your nails, such as washing dishes or gardening.
- Gently buff away any signs of wear or chipping and apply a touch-up layer of polish to maintain your manicure’s pristine appearance.
In case you are interested in more nail techniques you can have a look at the – Gel vs. Dip Powder Nails.
Conclusion
We’d love to hear from you! Have you tried marble nail art before, or are you inspired to give it a try now? Share your thoughts, experiences, or any tips you have for creating stunning marble nail designs in the comments below.
Don’t forget to tag us in your nail art photos on social media—we can’t wait to see your beautiful creations! Join the conversation and let’s inspire each other to elevate our nail game together.