Hey bestie 🌷✨ If there’s one nail trend that screams spring in the prettiest, softest way possible, it’s Tulip Nail Art Ideas. Tulips are delicate, romantic, and super versatile, which means you can go from minimal and simple tulip nail art to full-on 3D tulip nail designs depending on your vibe.
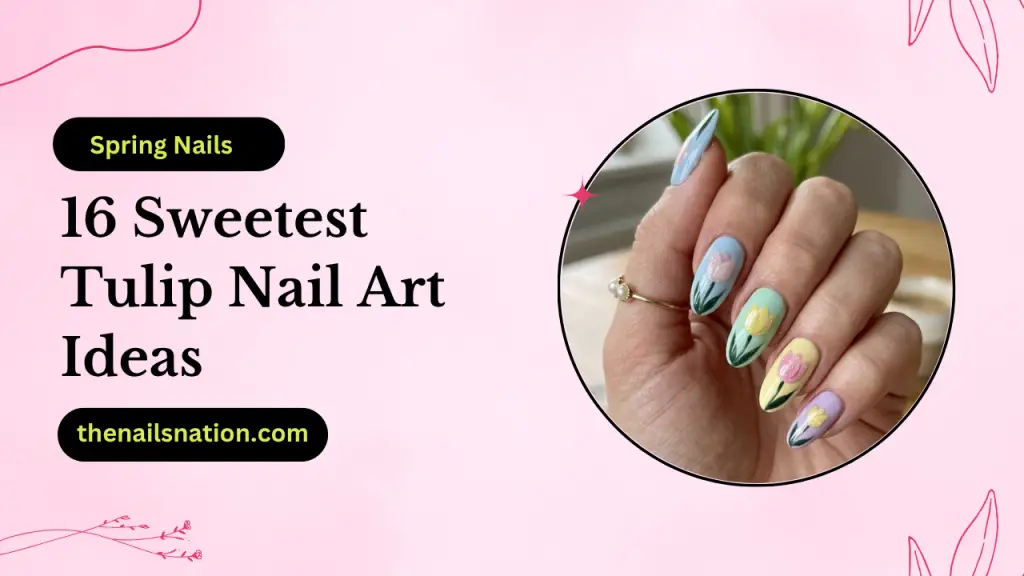
16 Sweetest Tulip Nail Art Ideas
This guide is packed with 16 sweetest tulip nail art ideas that are trending on Pinterest and salons right now – including:
- easy tulip nail art
- Simple Tulip Nail Art Ideas
- Tulip nail art gel polish looks
- 3D tulip nail art
- pink, yellow, red, and purple tulip nail art designs
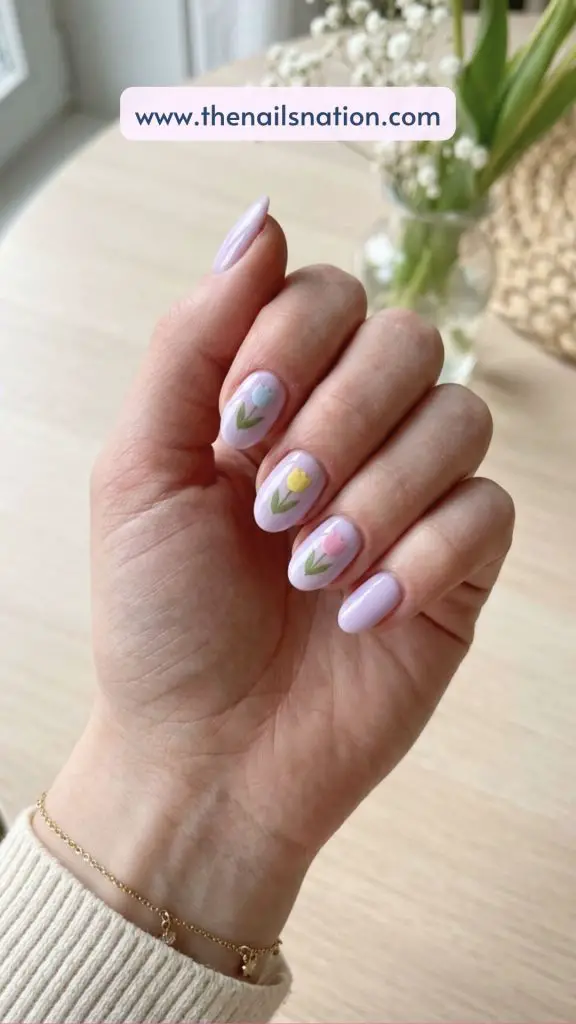
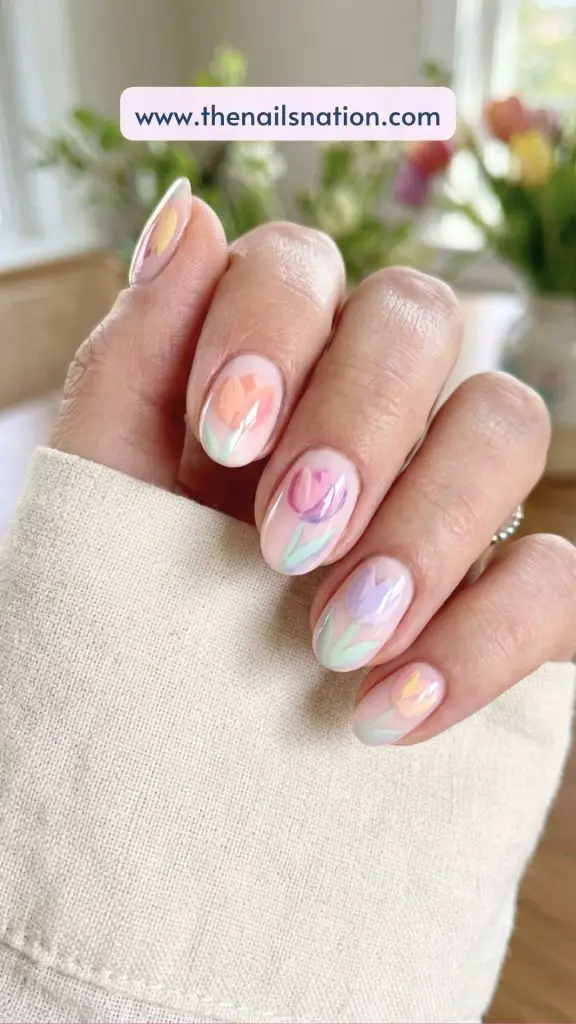
1. Minimal Pink Tulip on Sheer Base
This is the definition of simple tulip nail art – a sheer nude or milky pink base with a single delicate tulip painted on each nail (or just one accent nail).
The tulip design is tiny and minimal: just two or three brush strokes forming the petals, with a thin green stem. It looks clean, soft, and very “Pinterest aesthetic.”
Perfect if you’re into easy tulip nail art that still looks elegant and expensive.
Tutorial
- Start by shaping and buffing your nails.
- Apply a base coat to protect the nail.
- Apply two thin layers of a milky pink polish and let each layer dry fully.
- Take a thin nail art brush and paint two small curved strokes to form tulip petals.
- Add a third tiny stroke in the center for depth.
- Draw a thin green line downward to create the stem.
- Add one or two small leaves.
- Finish with a glossy top coat.
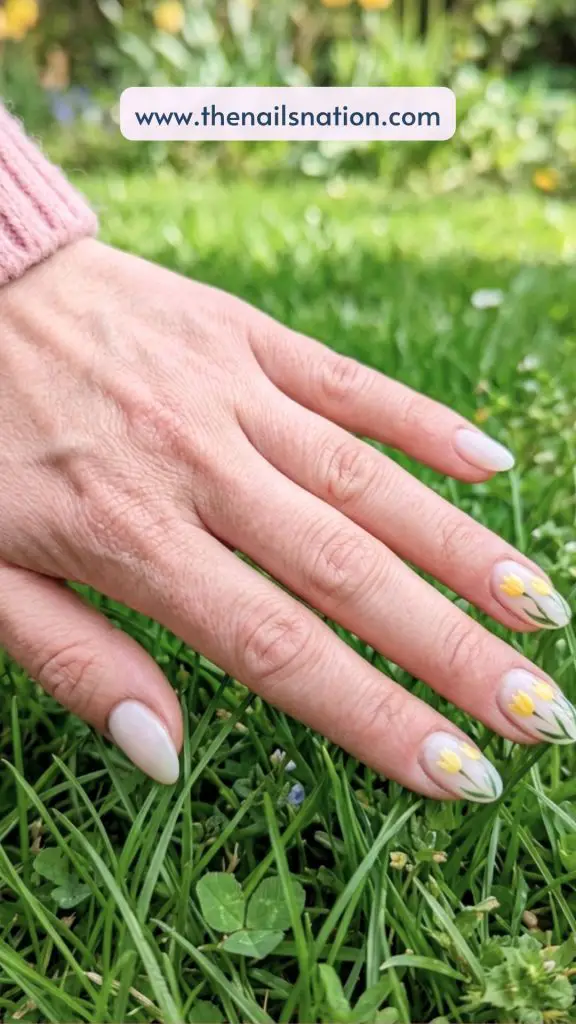
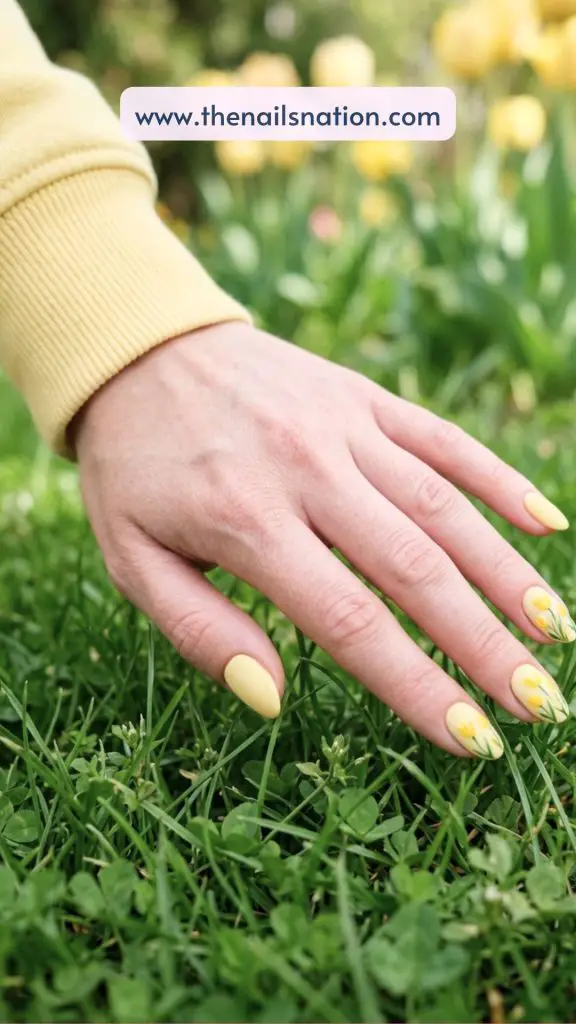
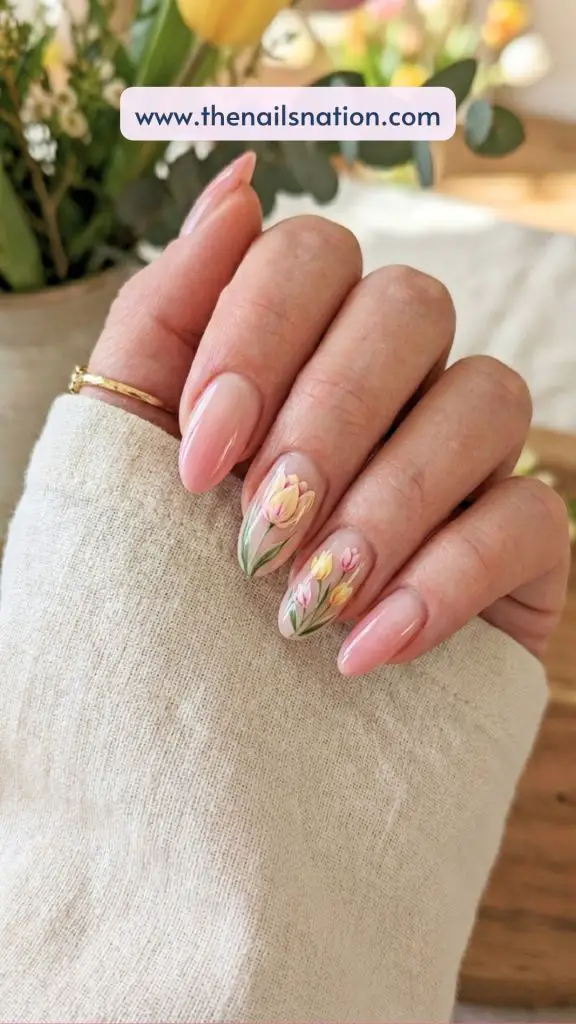
2. Yellow Tulip Garden Nails
This design is inspired by blooming tulip fields and is one of the brightest yellow tulip nail art ideas you can try. A soft pastel base acts as the sky while multiple tiny yellow tulips are scattered across the nails.
It feels cheerful and full of life, making it perfect for spring. Even though there are multiple flowers, the design still looks soft because each tulip is kept small and simple.
Tutorial
- Prep nails and apply base coat.
- Apply two coats of pastel blue or soft cream polish.
- Using a dotting tool, create small yellow oval shapes for tulips.
- Add thin green stems under each flower.
- Add tiny leaves for detail.
- Seal everything with a glossy top coat.
Also, check – 21 Trendy Butter Yellow Nails for a Soft Vibe
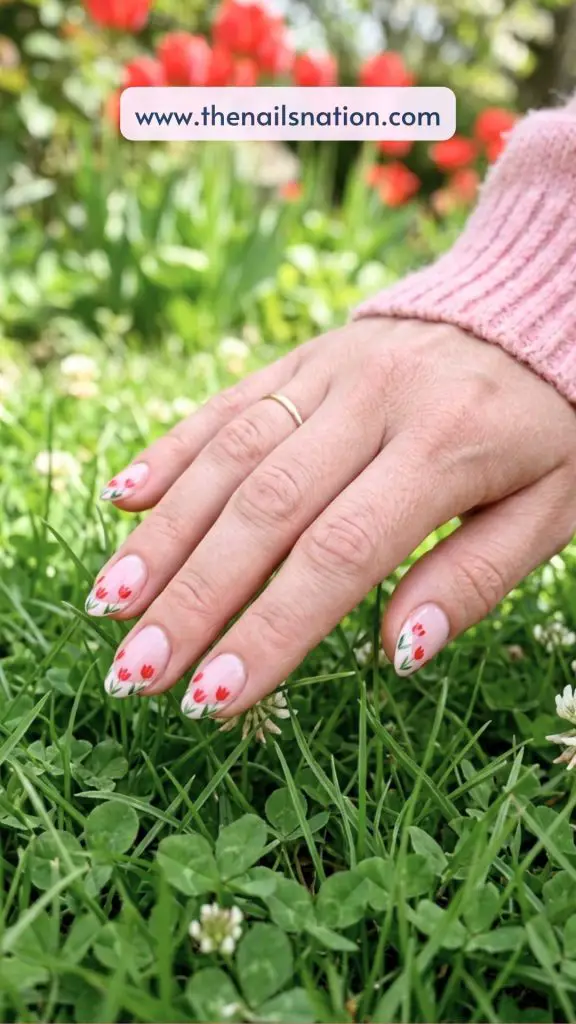
3. Red Tulip French Tip Nails
This is a creative twist on classic French tips and one of the most elegant tulip nail art designs. Instead of a plain tip, small red tulips are painted along the edge of the nail, creating a curved floral border.
The contrast between the soft base and bold red tulips makes this design stand out while still feeling classy and wearable.
Tutorial
- Apply a sheer soft pink base.
- Let it dry completely.
- Using a thin brush, paint small red tulip shapes along the tip.
- Add thin green stems extending slightly downward.
- Refine edges carefully.
- Apply glossy top coat.
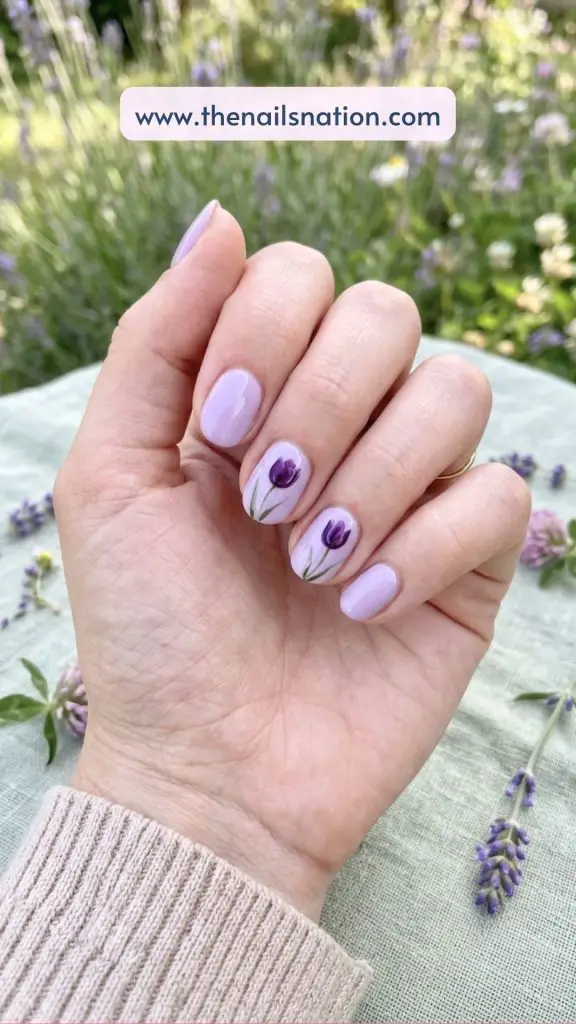
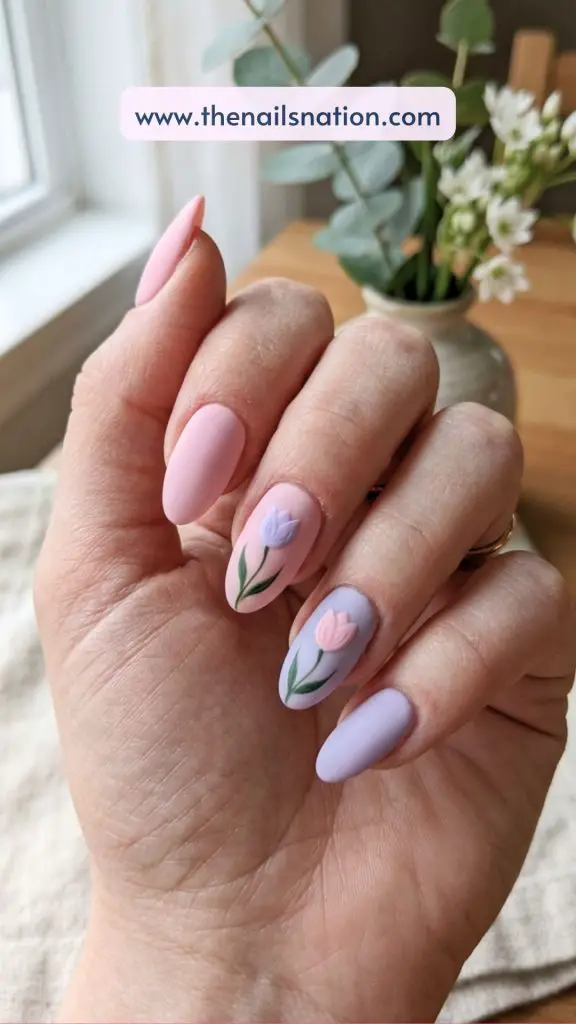
4. Lavender Base with Purple Tulips
This design uses a monochromatic color palette which makes it look very aesthetic and calming. A soft lavender base is paired with deeper purple tulips, creating depth while keeping everything in the same color family.
It is one of the most beautiful purple tulip nail art ideas for a soft and dreamy look.
Tutorial
- Apply base coat.
- Paint nails with two coats of lavender polish.
- Use a fine brush to paint the tulip petals in a darker shade of purple.
- Add thin green stems.
- Apply a top coat for shine.
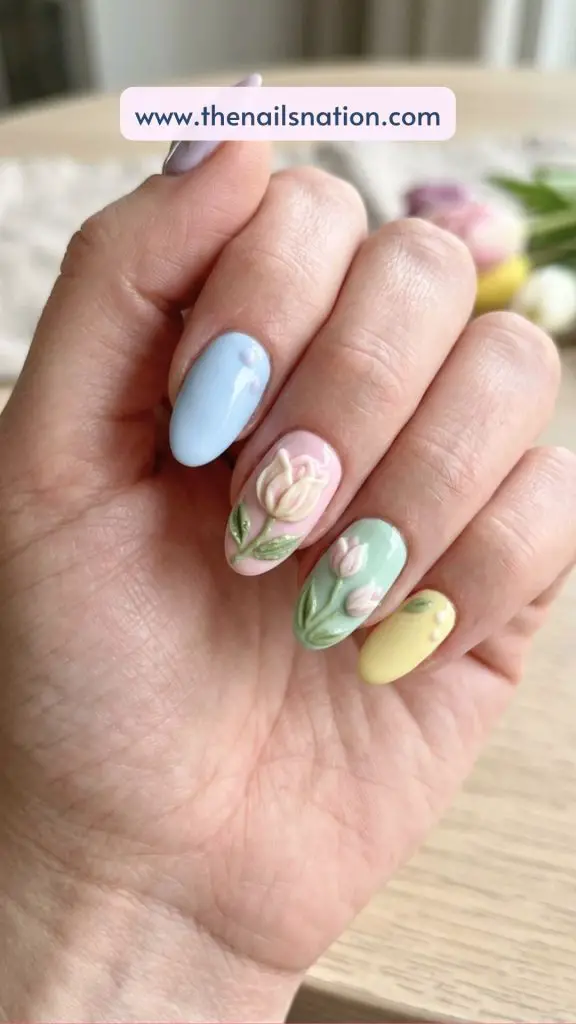
5. 3D Tulip Nail Art Design
This is one of the most detailed and eye-catching 3D tulip nail art ideas. Instead of painting the tulip, you create raised petals using gel or acrylic, which gives the design texture and dimension.
It looks luxurious and is perfect for special occasions or when you want your nails to stand out.
Tutorial
- Prep nails and apply base colour.
- Take builder gel and create small petal shapes layer by layer.
- Cure each layer under a lamp.
- Paint the petals in your desired colour.
- Add stems and leaves.
- Apply the top coat around the design.
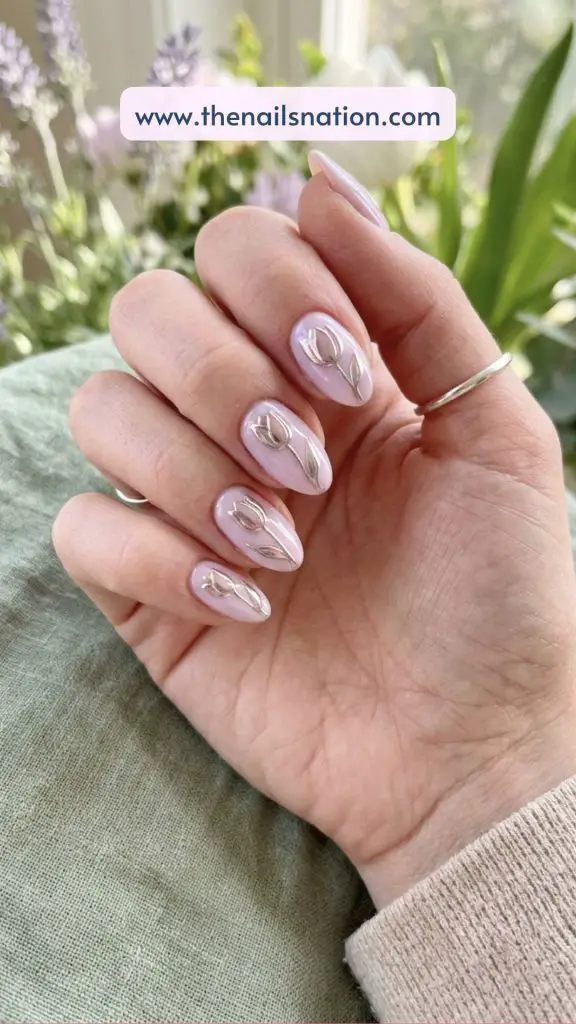
6. Tulip Chrome Nail Art
This design blends soft floral elements with a modern chrome finish. The tulips are painted first and then topped with chrome powder, giving them a reflective shine.
It is a trendy take on tulip chrome nail art and perfect for those who want something unique.
Tutorial
- Apply base polish.
- Paint tulip shapes using white polish.
- Apply chrome powder on petals.
- Seal with glossy top coat.
7. Tulip Nail Art Using Stickers
If you are looking for easy tulip nail art, stickers are your best friend. They allow you to achieve detailed floral designs without needing painting skills.
The final look is neat, clean, and very professional.
Tutorial
- Apply base polish.
- Place tulip stickers carefully using tweezers.
- Press them flat to remove air bubbles.
- Apply top coat to seal.
8. Tulip Nail Art with Mold Design
Using molds is a great way to create consistent floral designs. This method is popular for tulip nail art mold designs because it saves time and ensures symmetry.
Tutorial
- Fill the mould with gel or acrylic.
- Cure partially.
- Remove the shape and place it on the nail.
- Secure with gel.
- Seal edges with top coat.
9. Pink Ombre Tulip Nails
This design combines a soft pink gradient with tulip accents, creating a romantic and feminine look.
It is one of the most popular pink tulip nail art ideas.
Tutorial
- Create pink ombre using sponge technique.
- Paint tulips on accent nails.
- Add stems and leaves.
- Seal with top coat.
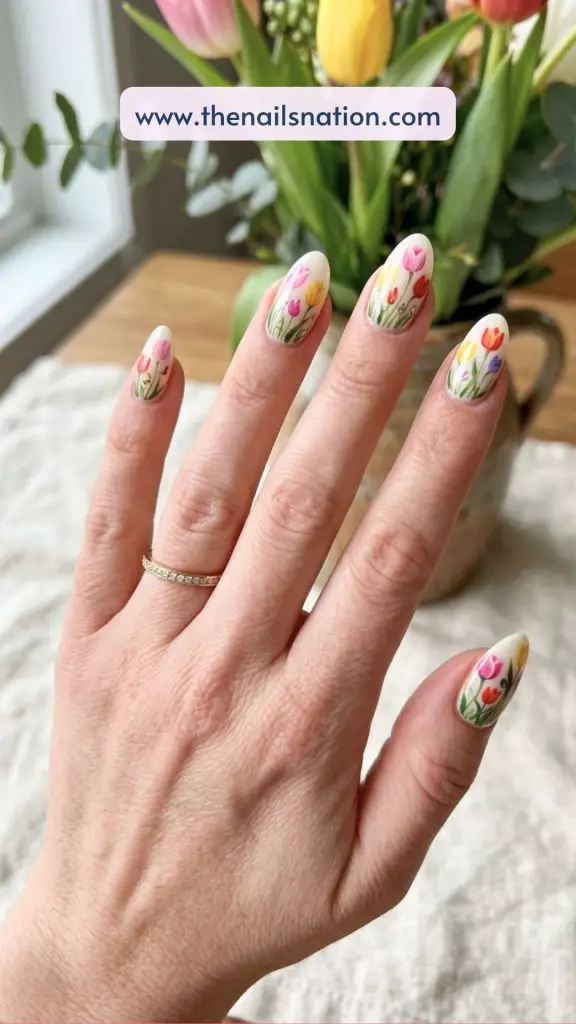
10. Tulip Garden Full Nail Art
Each nail is filled with multiple tulips, creating a full garden effect. It is bold, detailed, and perfect for those who love artistic nails.
Tutorial
- Apply base color.
- Paint multiple tulips using different colors.
- Add stems and leaves.
- Seal with top coat.
11. Minimal White Outline Tulip Nails
This design is perfect if you love simple tulip nail art ideas but still want something that feels modern and stylish. Instead of filling in the petals, this look uses thin white outline strokes to sketch delicate tulip shapes over a soft milky or pastel base. The result feels light, airy, and very clean.

Tutorial
- Begin by shaping your nails and gently buffing the surface.
- Apply a base coat to protect your natural nails.
- Paint two thin layers of a soft milky pink or light pastel polish and allow it to dry completely.
- Take a very fine nail art brush and dip it into white polish.
- Draw two curved lines to form the outer tulip petals.
- Add a small inner line to suggest the center petal.
- Extend a thin line downward to create the stem.
- Add one or two small leaf strokes on the side.
- Keep the lines light and slightly imperfect for a natural look.
- Seal everything with a glossy top coat.
12. Matte Tulip Nail Art Design
If you want your tulip nails to feel soft and unique, a matte finish completely transforms the look. This design combines pastel tulip flowers with a smooth matte top layer, giving the nails a velvety texture that feels very elegant.
Unlike glossy nails, matte nails absorb light instead of reflecting it, which makes the tulip details stand out more clearly. This works especially well with spring tulip nail art, where soft tones like pink, peach, and lavender create a calming and romantic effect. It is a great option if you want something different from the usual shiny manicure.
Tutorial
- Prep your nails by filing and buffing.
- Apply a base coat.
- Paint your nails with two coats of a pastel color of your choice.
- Using a thin brush, paint tulip petals in a slightly darker shade.
- Add stems and leaves using green polish.
- Allow the design to dry fully.
- Apply a matte top coat evenly across the nail.
- Let the matte finish dry without touching to avoid marks.
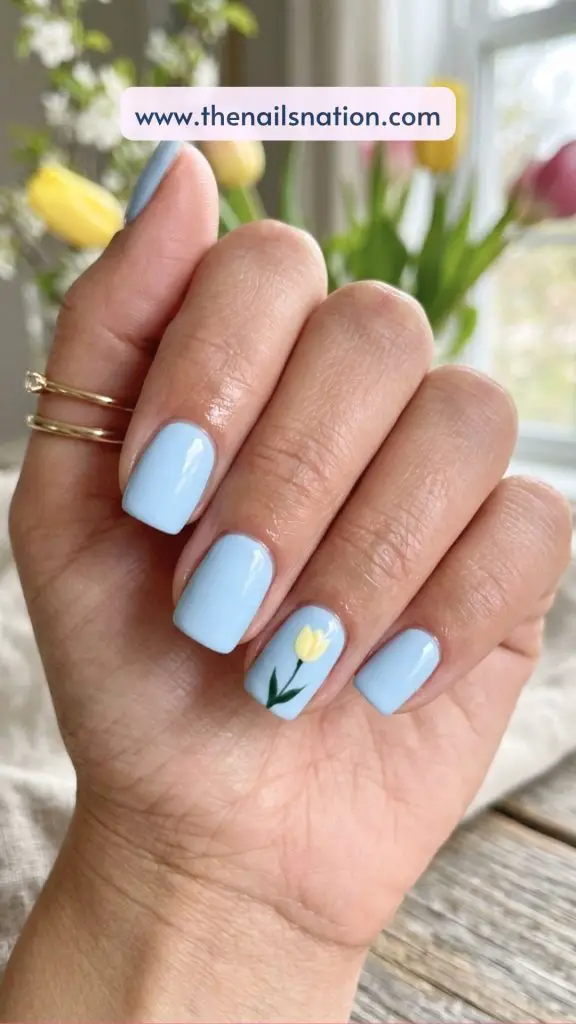
13. Short Nail Tulip Accent Design
This is one of the most practical and wearable easy tulip nail art ideas. Instead of decorating every nail, you keep most nails simple and add a single tulip accent on one or two fingers. This keeps the design clean while still giving a spring vibe.
It works beautifully for short nails because the small design does not overcrowd the nail surface. The contrast between plain nails and the detailed tulip accent creates a balanced and stylish look that feels effortless.
Tutorial
- Shape and prep your nails.
- Apply a base coat.
- Paint all nails with a soft neutral or pastel color.
- Choose one or two accent nails.
- On the accent nail, paint a small tulip using two or three brush strokes.
- Add a thin stem and tiny leaves.
- Keep the design centered and small.
- Apply a glossy top coat on all nails.
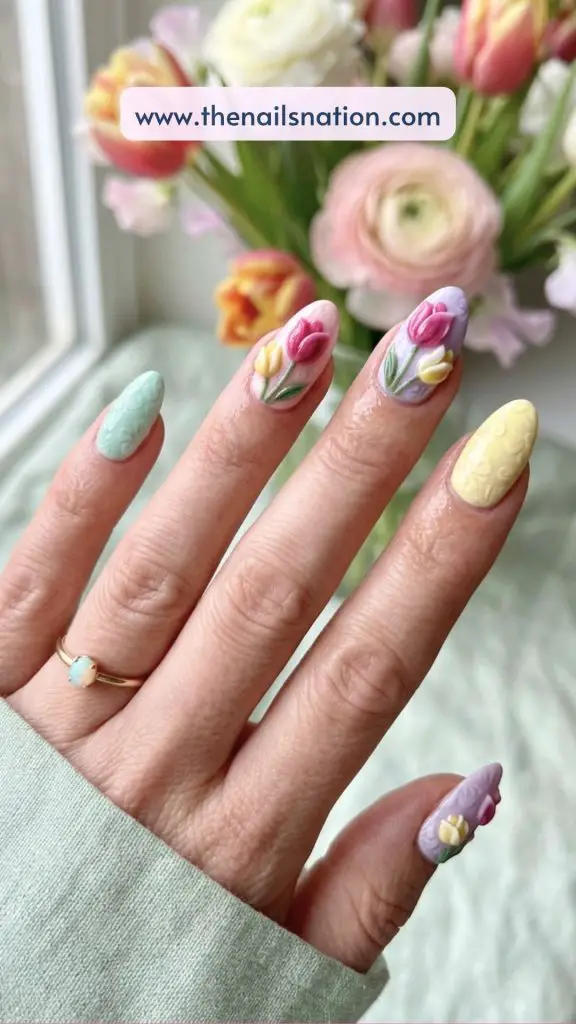
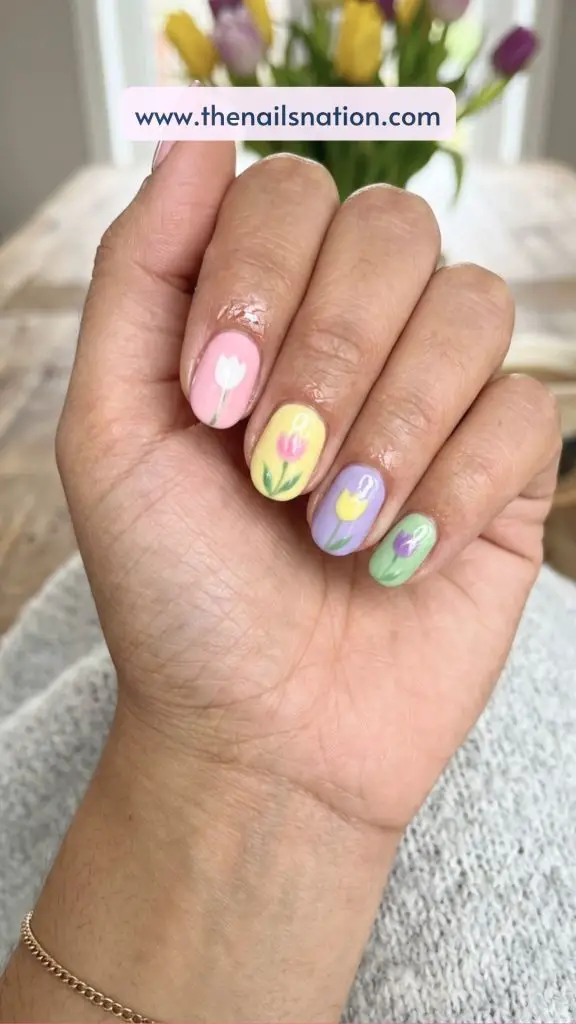
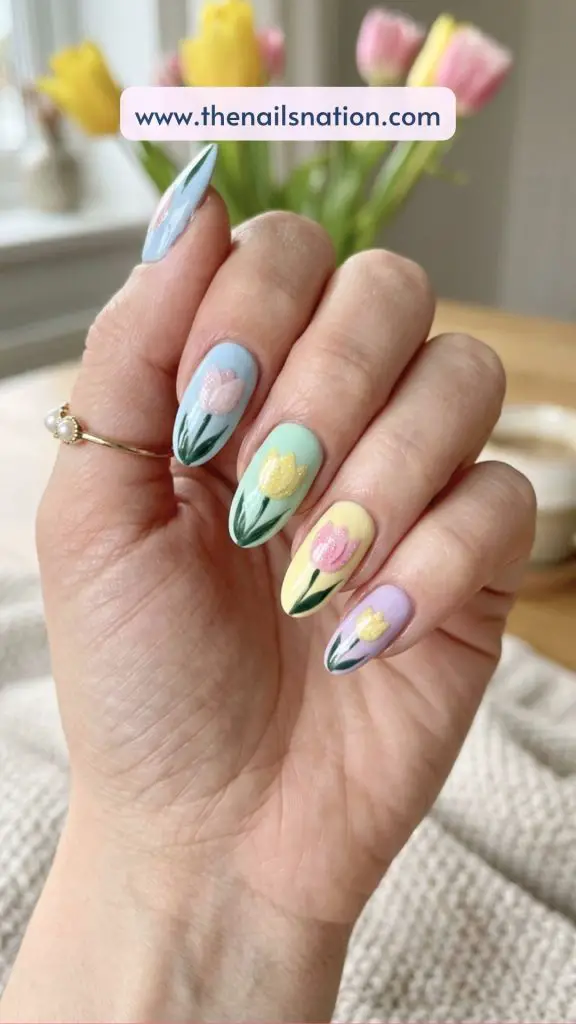
14. Pastel Mixed Tulip Nails
This playful design features multiple tulip colors across your nails, creating a cheerful and colorful spring look. Each nail can have a different tulip shade such as pink, yellow, purple, or peach, making it one of the most fun tulip nail art ideas.
Even though there are multiple colors, the design still looks cohesive because all shades are kept soft and pastel. It is perfect for those who cannot choose just one color and want a lively manicure that stands out without being overwhelming.
Tutorial
- Prep nails and apply base coat.
- Paint each nail with a different pastel shade.
- Using a thin brush, paint tulips in complementary colors on each nail.
- Add stems and leaves carefully.
- Keep spacing even so the design looks balanced.
- Apply glossy top coat for a smooth finish.
15. Glitter Tulip Nail Art Design
This design adds a touch of sparkle to classic tulip nails by incorporating fine glitter into the petals. The glitter catches light beautifully, making the tulips shimmer subtly without overpowering the floral design.
It is a great choice for events or celebrations where you want your nails to stand out a little more while still keeping a soft spring theme. The combination of delicate flowers and light sparkle creates a balanced look that feels festive yet elegant.
Tutorial
- Prepare nails and apply base coat.
- Paint your base color and let it dry.
- Create tulip shapes using regular polish.
- While the petals are slightly wet, dab a small amount of fine glitter onto them.
- Gently press the glitter so it sticks evenly.
- Add stems and leaves.
- Seal everything with a glossy top coat.
16. Abstract Tulip Nail Art
This modern design takes a creative approach to tulips by using loose brush strokes instead of detailed shapes. The petals are suggested with soft curves and color blends, giving the nails an artistic and slightly abstract look.
It is perfect if you want something unique and expressive rather than perfectly detailed flowers. The design feels trendy and works well with both bright and muted spring shades, making it a versatile option for different styles.
Tutorial
- Prep nails and apply base coat.
- Apply a soft base color.
- Use a brush to create loose curved strokes for petals.
- Blend colors slightly to create depth.
- Add simple stems without too much detail.
- Keep the design organic and free-flowing.
- Apply glossy top coat to finish.
If you love floral nails, you should also explore our Pink Spring Nails Ideas for more inspiration.
FAQs – Tulip Nail Art Ideas & Tutorials
How to do tulip nail art at home for beginners?
→ Start by applying a base coat and your chosen base colour. Once it dries, use a thin brush to paint two small curved strokes to form the tulip petals. Add a tiny stroke in the centre for depth, then draw a thin green line downward for the stem. You can finish with small leaves for extra detail. Easy tulip nail art.
What tools do you need for tulip nail art?
→ To create clean and detailed tulip nail art designs, having the right tools makes a big difference. You do not need anything complicated, just a few basics:
- Thin nail art brush for petals and stems
- Dotting tool for small flower details
- Nail polish in floral shades like pink, yellow, purple, and green
- Base coat and top coat
- Optional tools like stickers, moulds, or builder gel for advanced designs
If you are a beginner, start with a brush and basic polish. If you want more detailed looks, like 3D tulip nail art, then gel and moulds can help.
Can I do tulip nail art on short nails?
→ Yes, tulip designs actually look very cute on short nails. In fact, many simple tulip nail art styles are designed specifically for shorter lengths.
The trick is to keep the design minimal. Instead of filling the entire nail, paint one small tulip or use a single accent nail. This keeps the look clean and prevents it from feeling crowded.
What colours work best for tulip nail art?
→ Tulip nail art looks best with soft and fresh spring shades. Some popular options include:
- Pink for classic tulip looks
- Yellow for bright and cheerful designs
- Red for bold floral styles
- Purple for a soft and elegant vibe
- White for minimal and clean designs
You can also mix pastel shades for a more playful and modern look.