
June always feels a little magical. The days get longer, the sun stays out later, vacations start appearing on the calendar, and suddenly everything feels brighter.
This year’s June nail ideas are all about cheerful colours, playful details, glossy finishes, fresh florals, fruity accents, and dreamy summer-inspired designs that instantly put you in a good mood.
Some are simple enough for everyday wear, while others are perfect for vacations, weddings, beach days, and all those moments that end up living rent-free in your camera roll.
Each design includes:
☀️ Nail details and inspiration
✨ The little details
🎨 Step-by-step tutorial
📍 Best occasions to wear it
Let’s start with some of the prettiest June nail ideas of the season.
1. Sky Blue Ombre Nails with Tiny Ladybugs
There is something about a soft blue ombre that instantly feels like June. It captures those perfect sunny mornings when the sky is completely clear, the grass looks extra green, and you can’t help but spend a little more time outside.
This manicure takes that feeling and turns it into nail art.
One of the reasons this design works so well is that it perfectly balances playfulness and elegance. The ladybugs add personality, but they’re small enough that the manicure still feels sophisticated and wearable.
This is the kind of nail set that looks beautiful with white linen outfits, denim jackets, flowy dresses, and pretty much anything else you’ll be wearing this June.
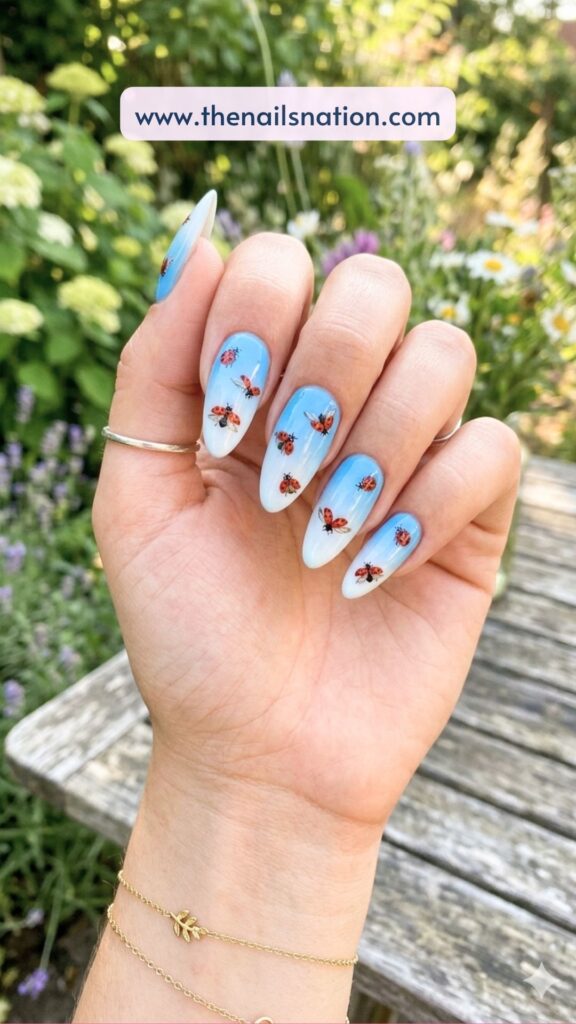
The Little Details –
Base Colour: Sky blue fading into soft white
Shape: Almond, oval, or soft square
Design Element: Tiny flying ladybugs
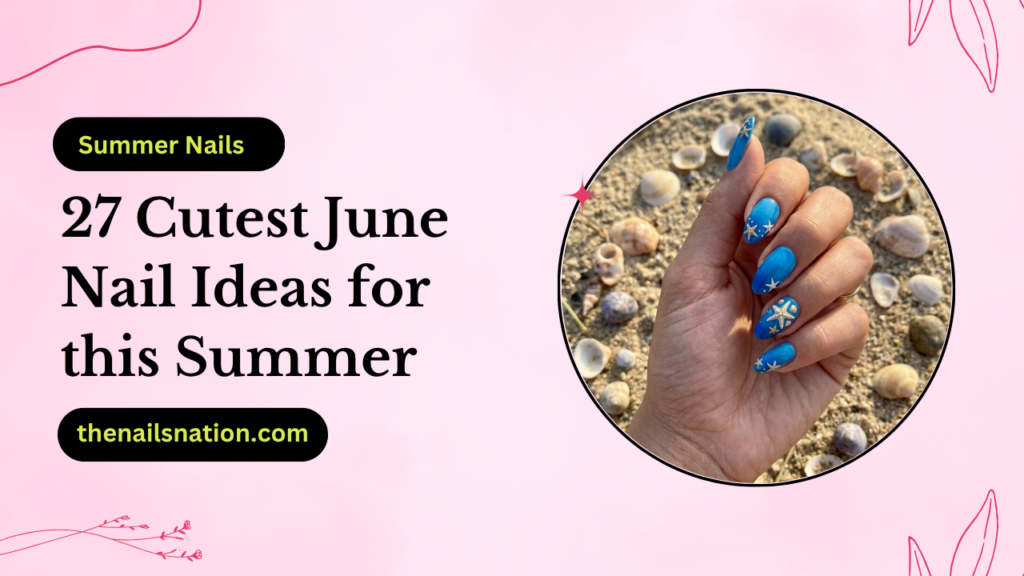
Finish: Ultra glossy top coat
Nail Art Tutorial –
- Prep nails and apply your favourite base coat.
- Paint the nails with a light sky blue polish.
- Apply blue and white polish side by side onto a makeup sponge.
- Dab the sponge gently onto the nail to create a seamless ombre effect.
- Repeat until the blend looks smooth and airy.
- Clean around the cuticles with a small brush dipped in remover.
- Using red polish, paint tiny oval shapes for the ladybugs.
- Add black heads, dots, and tiny antennae.
- Seal everything with a glossy top coat.
Best Occasions –
- Weekend picnics
- Outdoor brunches
- Garden parties
- Farmers markets
2. Lemon Sorbet French Tips
If June had an official colour, there’s a strong argument that it should be lemon yellow.
Fresh lemonade, citrus desserts, sunshine, and those bright, cheerful days that seem to stretch forever. This manicure captures all of that summer happiness in one incredibly wearable design.
What makes this design so special is how simple it is. There aren’t any complicated details or intricate patterns, yet it still feels fresh and seasonal. It’s the kind of manicure that makes your hands look polished without trying too hard.
For anyone looking for June nails simple enough for everyday wear but still cute enough to earn compliments, this one is an easy favourite.
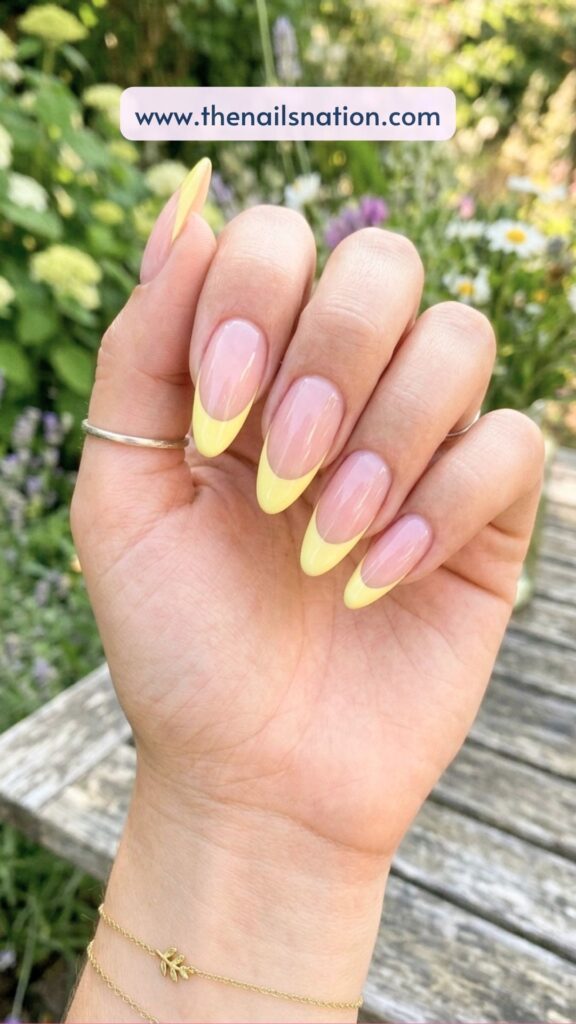
The Little Details –
Base Colour: Sheer pink
Shape: Almond, square, oval
Design Element: Lemon yellow French tips
Finish: Glossy and glass-like
Nail Art Tutorial –
- Apply a strengthening base coat.
- Paint two thin coats of sheer pink polish.
- Allow the base to dry completely.
- Use French tip guides if needed.
- Paint the tips with a creamy lemon yellow shade.
- Remove the guides carefully.
- Clean any uneven edges.
- Finish with a glossy top coat.
Best Occasions –
- Vacation outfits
- Everyday wear
- Graduation celebrations
- Weekend shopping trips
3. Strawberry Picnic Nails
This manicure feels like a picnic blanket, a basket full of fresh strawberries, and the first truly warm weekend of summer all rolled into one.
What makes this set so cute is how cheerful it feels. The little strawberries instantly bring personality to the manicure without making it feel overly themed. They look playful, sweet, and surprisingly chic when paired with a clean, glossy finish.
Every time you look down at your nails, they feel like a tiny reminder that summer has finally arrived.
This design has been all over Pinterest lately, and honestly, it’s easy to see why.
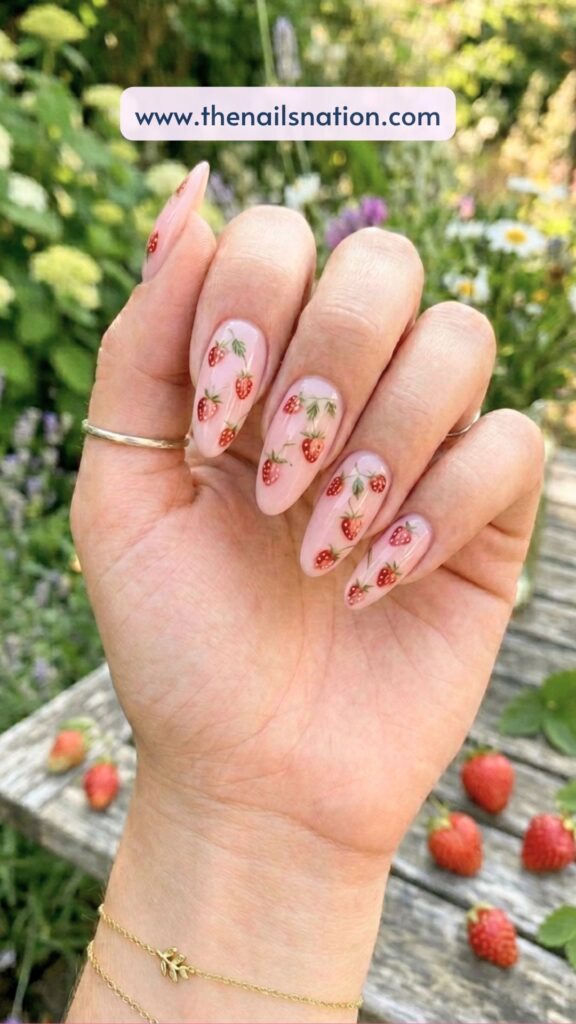
The Little Details –
Base Colour: Soft strawberry pink
Shape: Almond or oval
Design Element: Tiny hand-painted strawberries
Finish: High-shine glossy top coat
Nail Art Tutorial –
- Apply base coat.
- Paint nails with a soft pink polish.
- Using a thin nail art brush, paint small red strawberry shapes.
- Add tiny green leaves at the top.
- Use a dotting tool to add tiny white seeds.
- Let everything dry completely.
- Finish with a glossy top coat.
Best Occasions –
- Picnics
- Farmers markets
- Summer dates
- Outdoor concerts
4. Cotton Candy Cloud Nails
Some nail designs feel bold and energetic. This one feels soft, dreamy, and almost impossible not to stare at.
One of the prettiest things about this design is how light it feels. The colours melt into one another effortlessly, creating a colourful manicure without being loud. Tiny white cloud accents add just enough detail to make the design feel special without overwhelming the softness of the blend.
This is the kind of manicure that pairs perfectly with oversized sweaters during cool summer nights, flowy dresses, and pastel accessories.
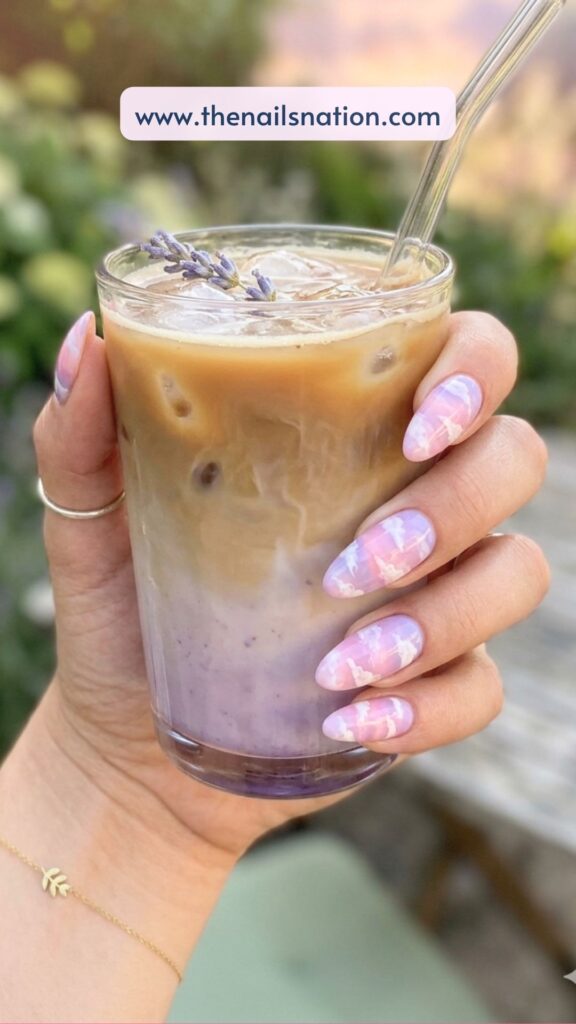
The Little Details –
Base Colour: Pink, lavender, and white blend
Shape: Almond
Design Element: Soft cloud accents
Finish: Glossy and dreamy
Nail Art Tutorial –
- Apply base coat.
- Use a sponge to blend pink and lavender polish.
- Add touches of white polish for dimension.
- Create fluffy cloud shapes with white polish.
- Let the design dry fully.
- Apply a glossy top coat.
Best Occasions –
- Sunset dinners
- Weekend brunches
- Birthday celebrations
- Concert nights
5. Honey Bee Floral Nails
This manicure feels like walking through a flower garden on a warm June afternoon when everything is in full bloom, and bees are lazily moving from flower to flower.
The warm yellow tones instantly make the nails feel sunny and cheerful, which is exactly the kind of energy June brings.
This is one of those nail designs that always sparks conversation because people can’t help but look closer at the tiny details.
The combination of florals and bees feels whimsical, fresh, and perfectly seasonal without looking overly themed.
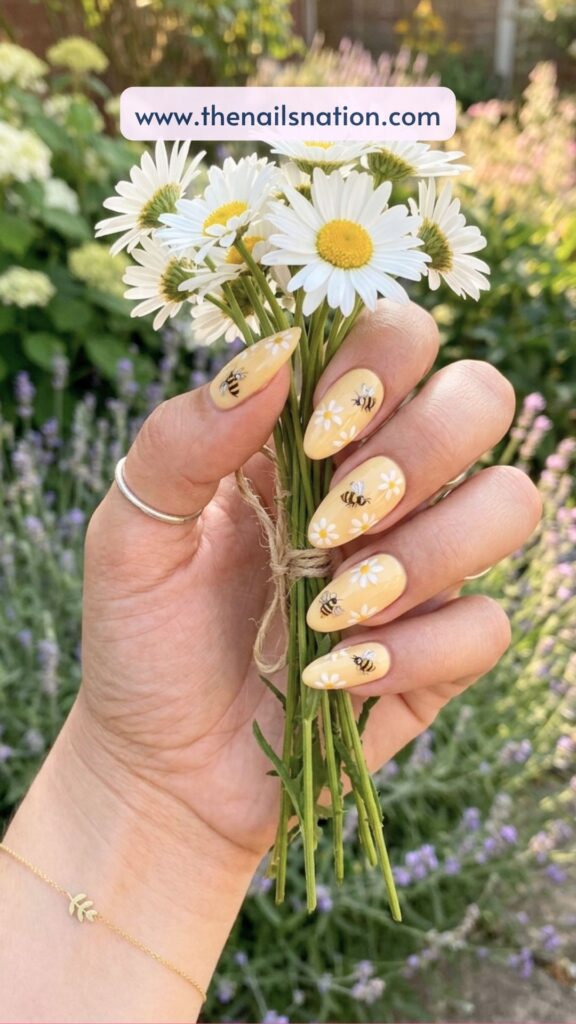
The Little Details –
Base Colour: Soft butter yellow
Shape: Almond or oval
Design Element: Tiny honey bees and white flowers
Finish: Ultra glossy
Nail Art Tutorial –
- Apply a base coat.
- Paint nails with two coats of creamy butter yellow polish.
- Use white polish and a dotting tool to create small daisy flowers.
- Add yellow flower centres.
- Using a thin nail art brush, paint tiny bee bodies with yellow and black stripes.
- Add miniature white wings.
- Allow all details to dry fully.
- Finish with a glossy top coat.
Best Occasions –
- Garden parties
- Spring and summer weddings
- Weekend outings
6. Butterfly Garden Nails
There is something about butterflies that instantly makes a manicure feel magical.
One of the prettiest things about this manicure is the sense of movement it creates. Instead of placing identical butterflies on every nail, each one can be painted at a slightly different angle. The result feels more natural and artistic, almost like a snapshot from a summer garden.
This is the kind of manicure that looks beautiful from every angle and photographs incredibly well.
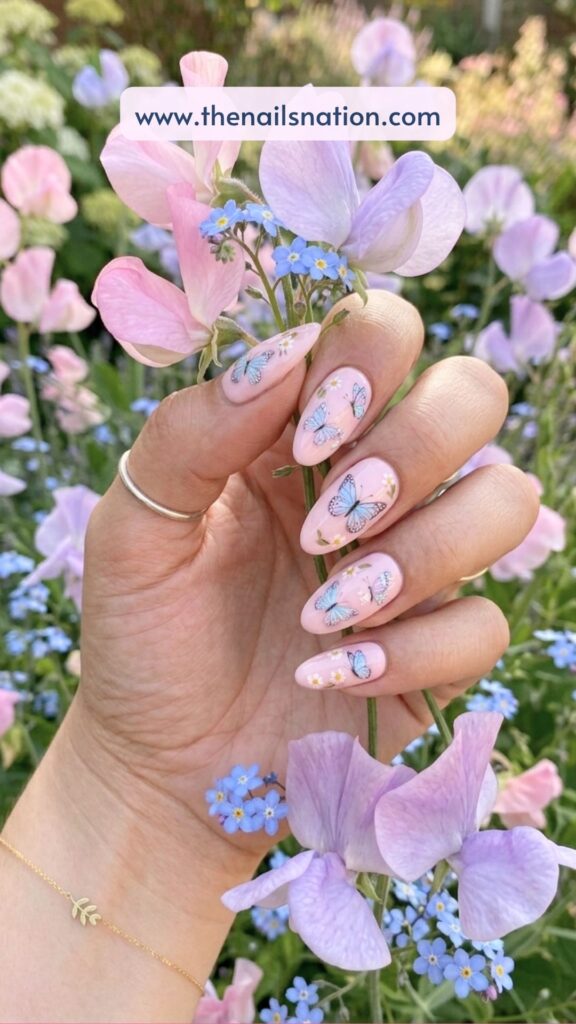
The Little Details –
Base Colour: Soft pastel pink
Shape: Almond
Design Element: Hand-painted butterflies
Finish: High-shine glossy top coat
Nail Art Tutorial –
- Apply base coat.
- Paint nails with a soft pastel pink shade.
- Use a thin detail brush to create butterfly wing shapes.
- Add blue, lavender, and pink colours to the wings.
- Outline lightly with white polish.
- Add tiny body details and antennae.
- Allow the artwork to dry.
- Finish with a glossy top coat.
Best Occasions –
- Baby showers
- Garden weddings
- Birthday celebrations
- Weekend brunches
7. Wildflower Meadow Nails
This manicure feels like a field full of wildflowers captured on your fingertips.
What makes this design feel so special is the imperfect placement. Real wildflowers don’t grow in perfectly straight lines, and neither should these. The slightly scattered floral arrangement makes the manicure feel organic and realistic.
The soft floral details look beautiful against a creamy white base because they stand out without overwhelming the design. Every nail becomes its own tiny floral painting while still working together as a complete set.
This manicure practically screams June.
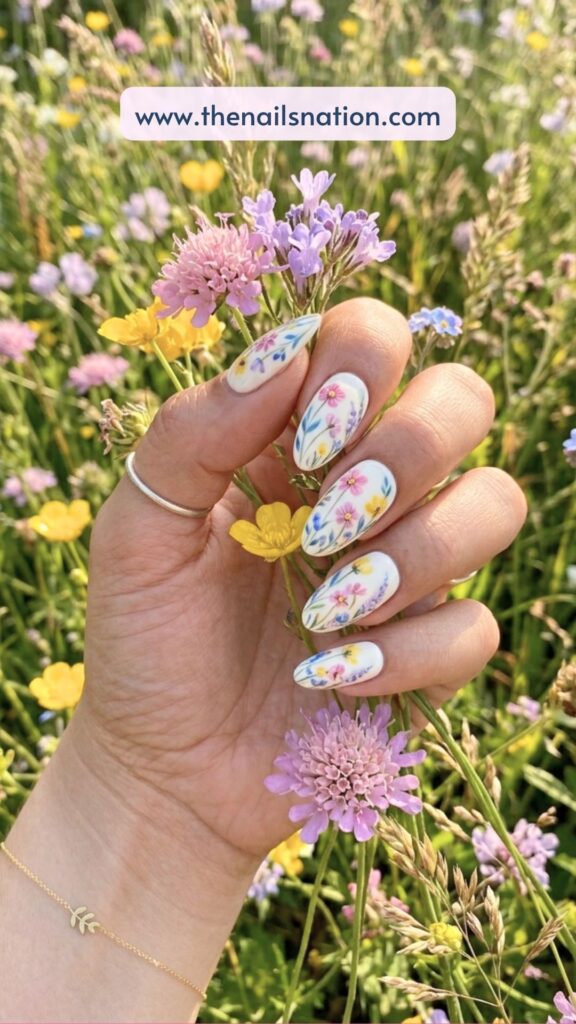
The Little Details –
Base Colour: Creamy white
Shape: Almond or oval
Design Element: Tiny colourful wildflowers
Finish: Glossy finish
Nail Art Tutorial –
- Apply base coat.
- Paint nails creamy white.
- Using various colours, paint tiny flower petals.
- Add yellow centres to some flowers.
- Paint fine green stems and leaves.
- Scatter flowers naturally across the nails.
- Allow the artwork to dry fully.
- Finish with a glossy top coat.
Best Occasions –
- Garden parties
- Summer festivals
- Vacation outfits
- Bridal showers
- Everyday summer wear
8. Watermelon Accent Nails
Few things feel more like summer than a juicy slice of watermelon, which is exactly why this manicure belongs on every June nail inspiration board.
The bright pink shade instantly makes your hands look vibrant and sun-kissed, while the watermelon accents bring a fun seasonal touch that feels perfect for vacations, beach trips, and summer weekends.
This design always seems to make people smile.
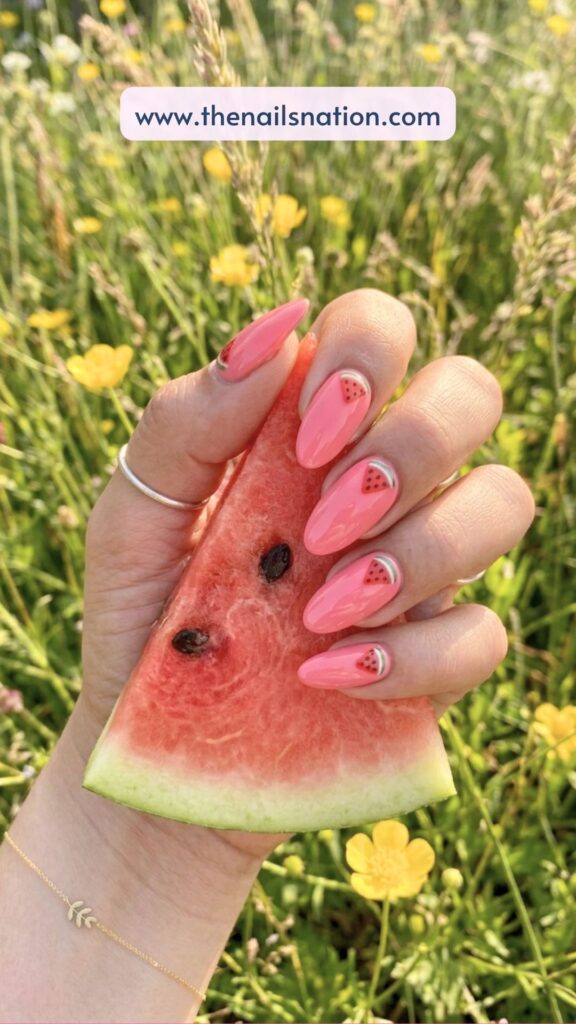
The Little Details –
Base Colour: Watermelon pink
Shape: Square, almond, or coffin
Design Element: Tiny watermelon slices
Finish: Ultra glossy
Nail Art Tutorial –
- Apply base coat.
- Paint most nails with bright watermelon pink polish.
- Choose one or two accent nails.
- Paint semi-circle watermelon slices using pink polish.
- Add a thin white line beneath the fruit.
- Paint a green rind section underneath.
- Add tiny black seeds using a dotting tool.
- Seal with glossy top coat.
Best Occasions –
- Beach vacations
- Pool parties
- Summer barbecues
- Tropical holidays
9. Peachy Gloss Nails
Some nail designs don’t need intricate artwork to make an impact. Sometimes, the colour does all the work.
This peach-inspired manicure is proof. The soft, juicy peach shade feels warm, fresh, and perfectly suited for June.
What makes this manicure special is its simplicity. The glossy finish gives the nails a healthy, almost glass-like appearance, while the peach tone adds just enough colour to feel seasonal without being overwhelming. It has that effortless “my nails always look good” kind of energy.
This is the type of manicure that works with literally everything in your wardrobe. White dresses, denim shorts, linen trousers, floral tops, swimwear, everything pairs beautifully with this colour.
If you’re looking for June nails that are simple but still feel polished and put together, this is one of the easiest choices on the list.
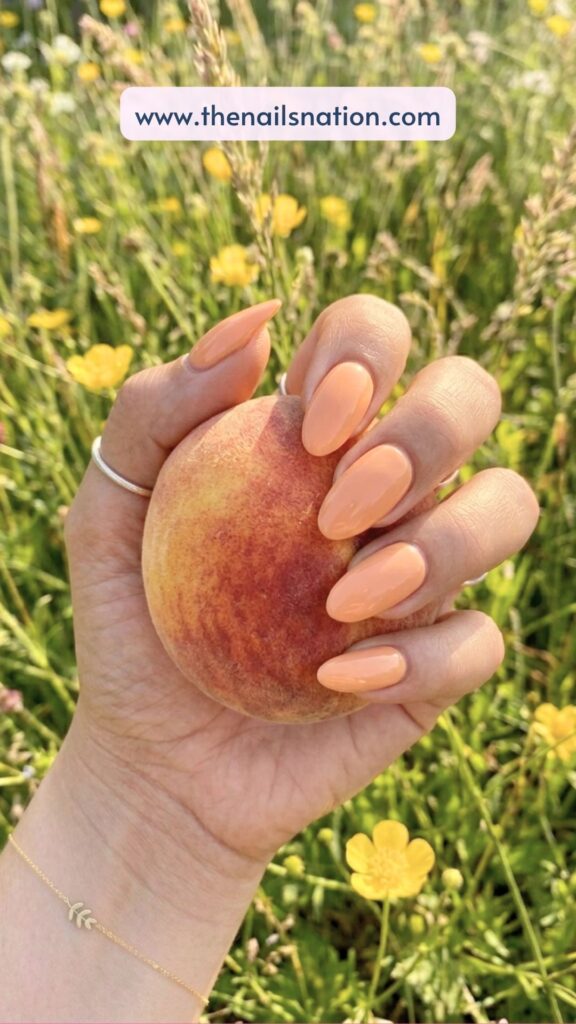
The Little Details –
Base Colour: Juicy peach
Shape: Short square, almond, or oval
Design Element: High-shine colour focus
Finish: Glass-like glossy top coat
Nail Art Tutorial –
- Prep nails and apply a smoothing base coat.
- Apply two thin coats of peach polish.
- Allow each coat to dry fully before applying the next.
- Apply a third coat for extra colour depth.
- Finish with a high-shine glossy top coat.
- Add cuticle oil once fully dry.
Best Occasions –
- Everyday wear
- Office-friendly manicures
- Weekend brunches
- Graduation celebrations
10. Ocean Wave French Tips
This manicure feels like standing at the shoreline, your feet in the water, with the sound of waves rolling in around you.
One of the prettiest things about this manicure is how much movement it creates. The curved wave lines naturally follow the shape of the nail, making the design feel fluid and organic. Every nail looks slightly different, which makes the set feel more realistic and artistic.
The sheer base keeps everything looking clean and balanced, while the blue details provide that fresh coastal energy that always feels right in June.
This design is perfect for anyone counting down the days until their next beach trip.
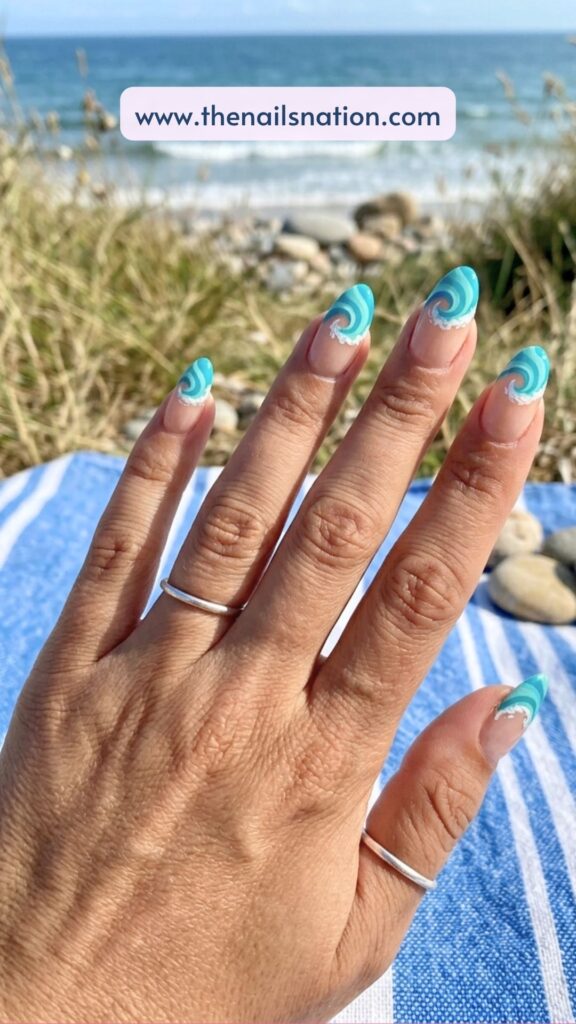
The Little Details –
Base Colour: Sheer pink
Shape: Almond
Design Element: Layered ocean wave French tips
Finish: Glossy beach-inspired shine
Nail Art Tutorial –
- Apply a sheer pink base colour.
- Allow it to dry completely.
- Using a fine detail brush, paint curved wave lines across the tips.
- Use multiple shades of blue for dimension.
- Add tiny white highlights to mimic sea foam.
- Refine the wave shapes as needed.
- Finish with a glossy top coat.
Best Occasions –
- Beach holidays
- Cruise vacations
- Poolside weekends
- Coastal weddings
- Summer getaways
11. Blueberry Milk Nails
Blueberry milk nails have quietly become one of the biggest nail trends recently, and honestly, it’s easy to understand why.
Unlike some trend-driven nail colours that come and go quickly, blueberry milk nails have a timeless quality. They’re colourful enough to feel fun but subtle enough to work for everyday wear.
The cool blue tones feel especially refreshing during June when temperatures start rising, and everyone naturally gravitates towards lighter colours.
This is one of those manicures that looks expensive even when the design itself is incredibly simple.
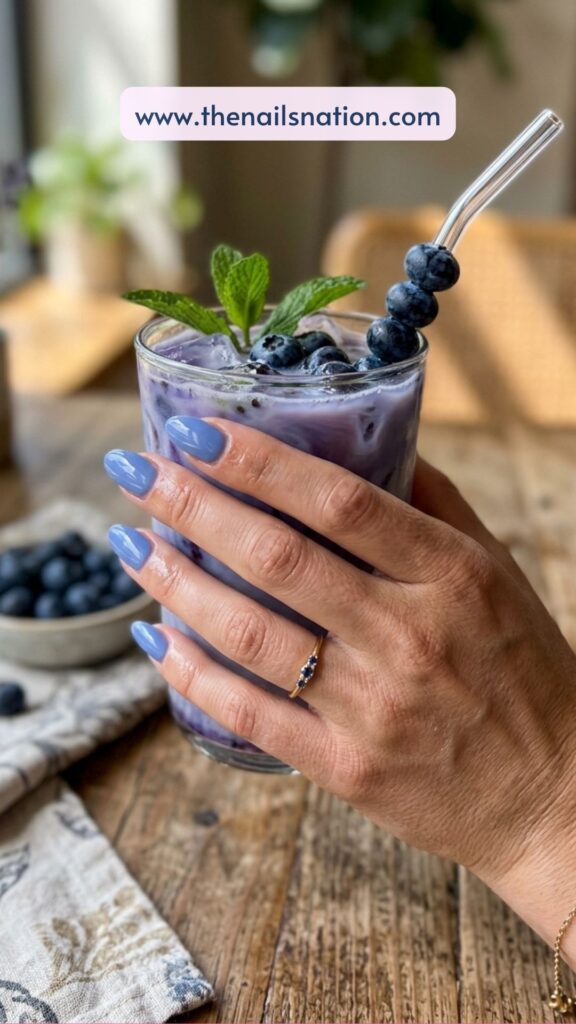
The Little Details –
Base Colour: Milky blueberry blue
Shape: Almond, oval, or short square
Design Element: Soft creamy colour
Finish: Ultra glossy
Nail Art Tutorial –
- Apply base coat.
- Paint nails with a milky pale blue polish.
- Apply two to three thin coats for even coverage.
- Clean edges carefully.
- Apply glossy top coat.
- Finish with cuticle oil.
Best Occasions –
- Everyday wear
- Summer work outfits
- Weekend brunches
- Travel days
- Casual events
12. Tropical Palm Leaf Nails
This manicure practically comes with an out-of-office reply.
What makes palm leaf nail art so appealing is that it feels vacation-ready without relying on bright neon colours. The rich green leaves bring all the tropical energy, while the neutral background keeps everything sophisticated.
Every nail feels like a tiny piece of a luxury resort brochure.
Whether you’re heading somewhere tropical or simply wishing you were, this manicure delivers those holiday vibes instantly.
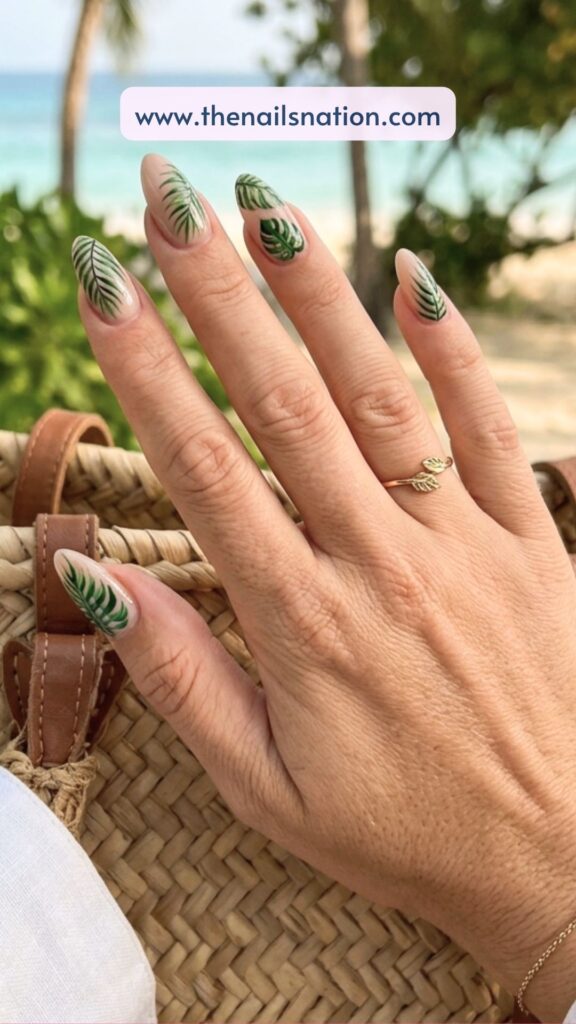
The Little Details –
Base Colour: Soft cream
Shape: Almond or coffin
Design Element: Tropical palm leaves
Finish: Glossy finish
Nail Art Tutorial –
- Apply base coat.
- Paint nails with a creamy neutral shade.
- Use a fine brush to paint palm leaf stems.
- Add individual leaf fronds using green polish.
- Layer darker green for dimension.
- Allow artwork to dry fully.
- Finish with a glossy top coat.
Best Occasions –
- Tropical vacations
- Resort holidays
- Beach trips
- Summer parties
- Cruise holidays
13. Pink Hibiscus Nails
Some flowers instantly make you think of tropical holidays, and hibiscus flowers are definitely one of them.
What makes this design so beautiful is the contrast between the delicate floral details and the bold size of the blooms. Instead of scattering tiny flowers across every nail, the hibiscus acts as the star of the show, creating a manicure that feels artistic and elevated.
The pink colour palette keeps everything soft and romantic, while the tropical flowers add a vacation-inspired twist that feels perfect for June.
This is the kind of manicure that belongs beside a pool, on a beach, or anywhere sunshine is involved.
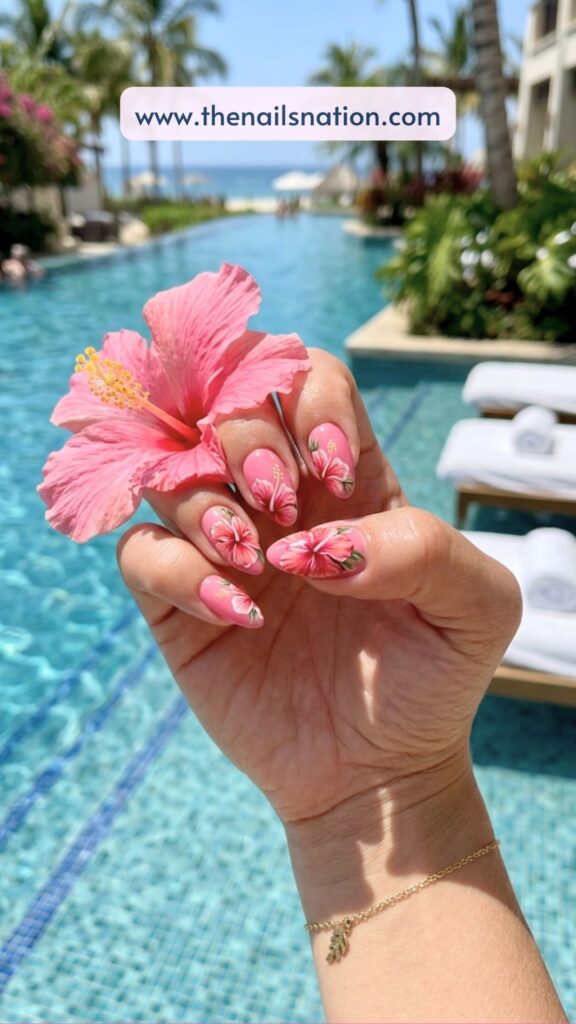
The Little Details –
Base Colour: Soft tropical pink
Shape: Almond or coffin
Design Element: Hand-painted hibiscus flowers
Finish: High-shine glossy finish
Nail Art Tutorial –
- Apply a base coat.
- Paint nails with a soft pink polish.
- Use a detail brush to create large hibiscus petals.
- Layer darker pink shades near the centre for depth.
- Add flower stamens using yellow and white polish.
- Refine petal edges carefully.
- Let the artwork dry fully.
- Seal with a glossy top coat.
Best Occasions –
- Tropical holidays
- Beach vacations
- Pool parties
- Summer weddings
- Resort getaways
14. Cherry Red Summer Nails
There is a reason cherry red nails never go out of style.
They’re bold without being overwhelming, timeless without feeling boring, and somehow manage to work with almost every summer outfit imaginable. For June, this classic shade feels especially fresh because it contrasts beautifully with lighter seasonal clothing and sun-kissed skin.
The beauty of this manicure lies in its simplicity. No artwork. No complicated details. Just a rich, juicy cherry red colour with an ultra-glossy finish that catches the light beautifully.
Sometimes the most striking manicure in the room is the simplest one.
For readers searching for short or simple June nail ideas, this is proof that colour alone can be enough.
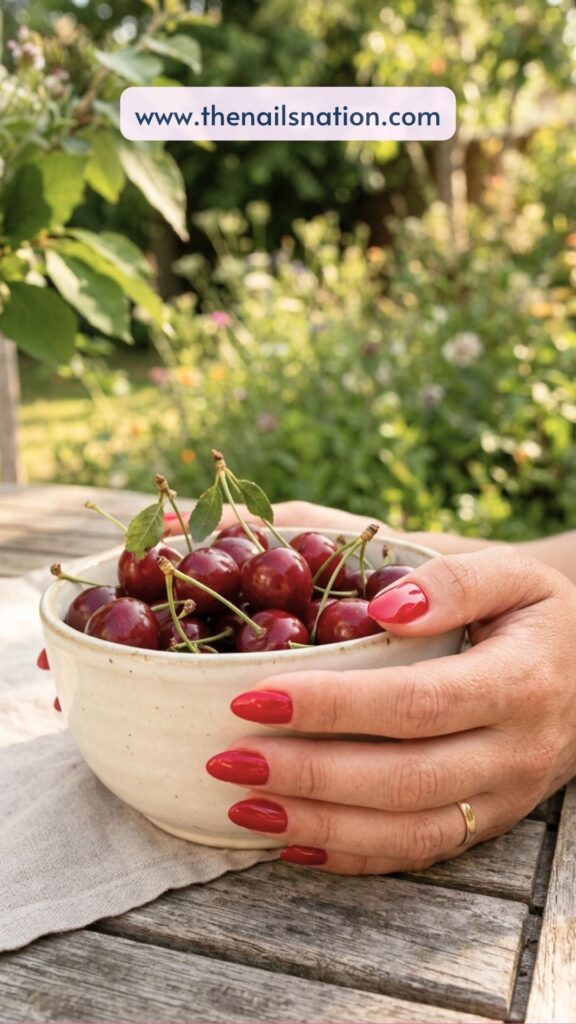
The Little Details –
Base Colour: Cherry red
Shape: Any shape
Design Element: Rich colour payoff
Finish: Mirror-like glossy finish
Nail Art Tutorial –
- Apply a smoothing base coat.
- Paint one thin coat of cherry red polish.
- Apply a second coat for full opacity.
- Clean any excess polish around the cuticle.
- Apply a glossy top coat.
- Finish with cuticle oil for a salon-quality look.
Best Occasions –
- Date nights
- Summer weddings
- Everyday wear
- Weekend dinners
- Special events
15. Seashell Chrome Nails
This manicure feels like collecting seashells along the shoreline and turning them into nail art.
One of the things that makes this design so popular is how expensive it looks. The reflective finish gives the nails a luxury feel, while the shell-inspired details keep them connected to the beachy June theme.
Every movement of your hand reveals a slightly different shimmer, making the manicure feel alive in natural sunlight.
This is one of those nail designs that looks stunning both up close and from a distance.
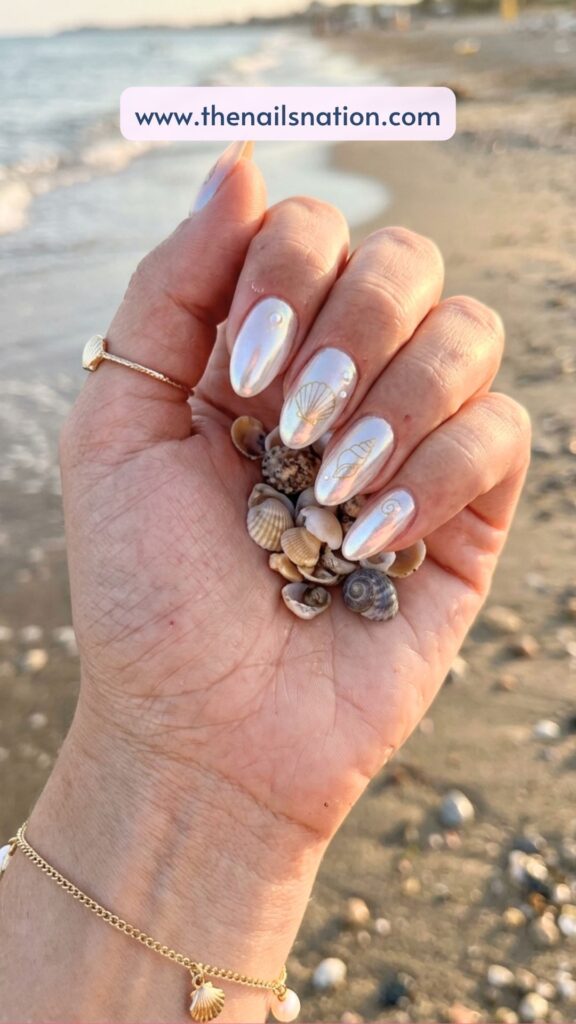
The Little Details –
Base Colour: Pearly ivory chrome
Shape: Almond
Design Element: Seashell-inspired chrome effect
Finish: Reflective pearl chrome
Nail Art Tutorial –
- Apply a gel base coat.
- Paint nails with a pale ivory shade.
- Cure under a lamp if using gel.
- Rub pearl chrome powder over the nails.
- Create subtle shell texture using a fine detail brush.
- Seal with a no-wipe glossy top coat.
- Cure and finish.
Best Occasions –
- Beach weddings
- Luxury vacations
- Summer parties
- Resort stays
- Honeymoons
16. Sunset Gradient Nails
Few things feel more like summer than watching the sky change colours as the sun slowly disappears below the horizon.
What makes sunset nails so special is the emotion behind them. Looking at them instantly brings back memories of holidays, late-night walks, beach evenings, and long summer days that you wish would last forever.
The blend of colours works beautifully on longer nails because it gives each shade enough room to transition naturally.
This manicure feels like summer bottled into a nail design.
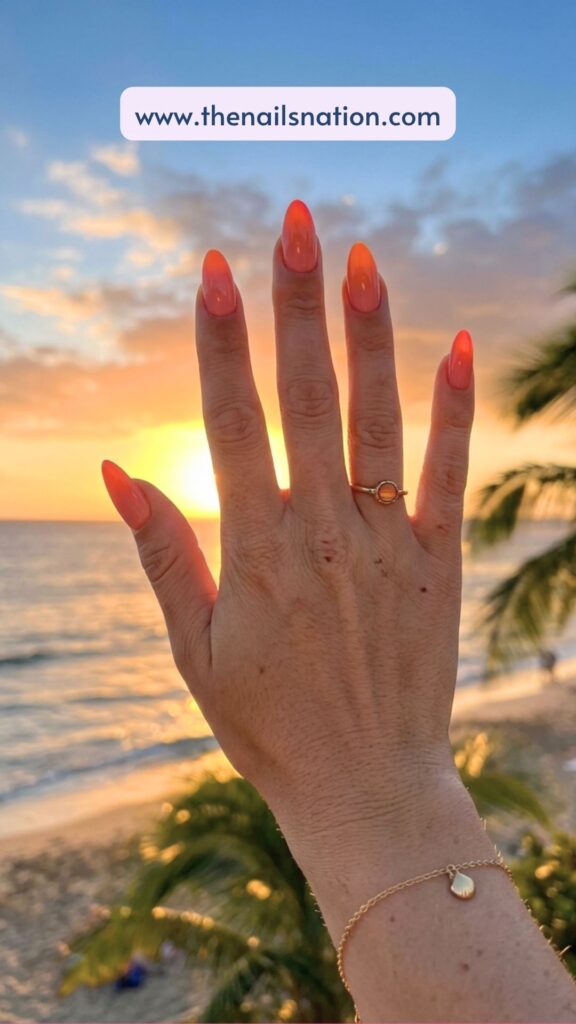
The Little Details –
Base Colour: Sunset ombré blend
Shape: Almond or coffin
Design Element: Multi-colour gradient
Finish: Glossy finish
Nail Art Tutorial –
- Apply a base coat.
- Paint sunset colours onto a makeup sponge.
- Blend peach, coral, pink, and orange.
- Dab repeatedly onto the nail.
- Build layers until the blend appears smooth.
- Clean around the nail edges.
- Finish with a glossy top coat.
Best Occasions –
- Beach vacations
- Summer festivals
- Holiday dinners
- Weekend getaways
- Sunset photoshoots
17. White Daisy Nails
If there is one flower that perfectly captures the feeling of early summer, it has to be the daisy.
One of the reasons daisy nails remain popular year after year is that they instantly brighten up any manicure. There is something about those simple white petals that feels happy and carefree. They bring a youthful charm without looking childish, making them suitable for almost every age and style.
Every flower feels like a tiny reminder of sunny afternoons, blooming gardens, and all the simple joys that come with June.
This is the kind of manicure that never feels out of place. Whether you’re dressing casually or heading somewhere special, Daisy nails always seem to fit perfectly.
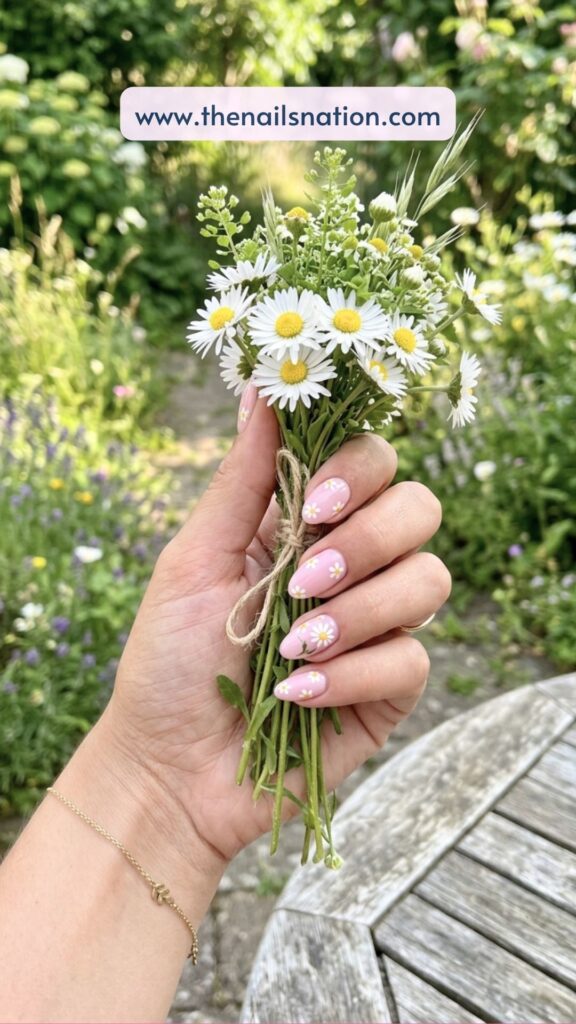
The Little Details –
Base Colour: Soft pink or creamy white
Shape: Almond, oval, or short square
Design Element: Hand-painted white daisies
Finish: Glossy finish
Nail Art Tutorial –
- Apply a base coat and allow it to dry completely.
- Paint your chosen base colour using two thin coats.
- Use a dotting tool and white polish to create flower petals.
- Arrange five or six dots in a circular pattern.
- Add a small yellow dot in the centre of each flower.
- Repeat on accent nails or across the entire set.
- Allow the artwork to dry thoroughly.
- Finish with a glossy top coat for extra shine.
Best Occasions –
- Garden parties
- Summer brunches
- Bridal showers
- Weekend outings
- Everyday summer wear
18. Starfish Accent Nails
This manicure feels like a beach holiday captured on your fingertips.
The design combines soft ocean-inspired colours with tiny starfish accents that instantly transport you to sandy beaches, salty air, and warm summer evenings by the water. The starfish details can be painted in soft coral, peach, or sandy beige tones, helping them feel elegant rather than overly themed.
What makes this manicure stand out is how subtle the beach inspiration feels.
The result feels sophisticated, vacation-ready, and surprisingly versatile. Even if you’re nowhere near the ocean, these nails bring a little bit of seaside magic to everyday life.
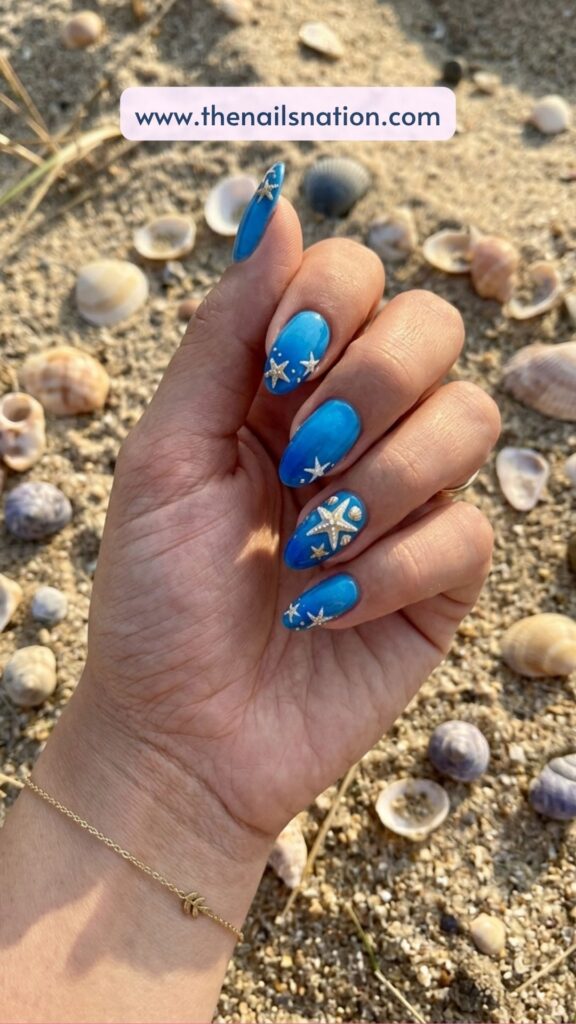
The Little Details –
Base Colour: Ocean blue and sandy beige
Shape: Almond
Design Element: Tiny starfish accents
Finish: Glossy beach-inspired finish
Nail Art Tutorial –
- Apply base coat.
- Paint most nails with a soft ocean blue shade.
- Choose one or two accent nails.
- Paint accent nails with a sandy beige colour.
- Use a detail brush to create small starfish shapes.
- Add texture using tiny dots and lines.
- Allow all artwork to dry completely.
- Finish with a glossy top coat.
Best Occasions –
- Beach holidays
- Summer vacations
- Poolside weekends
- Cruise trips
- Coastal weddings
19. Lavender Bloom Nails
Lavender always seems to have a calming effect, and this manicure captures that feeling beautifully.
The design pairs a soft lavender base with delicate floral details inspired by real lavender stems. Tiny purple blossoms and fine green stems create an elegant botanical look that feels fresh, feminine, and incredibly sophisticated.
One of the most beautiful things about this manicure is how graceful it appears. It almost looks like a hand-painted illustration taken from a botanical sketchbook.
This manicure feels peaceful, polished, and effortlessly beautiful.
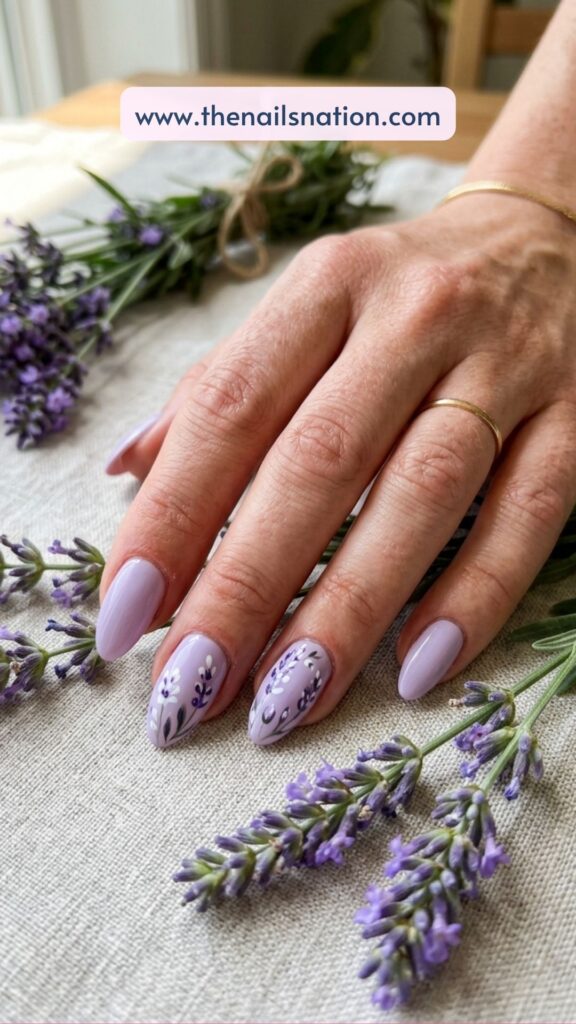
The Little Details –
Base Colour: Soft lavender
Shape: Almond or oval
Design Element: Lavender stem artwork
Finish: High-shine glossy finish
Nail Art Tutorial –
- Apply a protective base coat.
- Paint nails with two coats of lavender polish.
- Use a fine brush to paint thin green stems.
- Add tiny purple blossoms along each stem.
- Layer darker purple details for depth.
- Allow the floral artwork to dry completely.
- Apply a glossy top coat.
- Finish with nourishing cuticle oil.
Best Occasions –
- Garden weddings
- Brunch dates
- Baby showers
- Summer celebrations
- Everyday elegance
20. Butter Yellow Chrome Nails
Butter yellow nails have quickly become one of the standout colours of the year, and adding chrome takes it to an entirely different level.
One of the reasons this design works so well is the balance between softness and shine. The yellow colour keeps the manicure cheerful and approachable, while the chrome finish adds a fashion-forward twist that feels straight off a trend forecast.
In natural sunlight, the reflective finish creates a subtle glow that makes the nails look almost illuminated. It is one of those manicures that attracts attention without needing any additional artwork.
For anyone wanting to try a trend-driven summer manicure without committing to complicated nail art, this is an excellent choice.
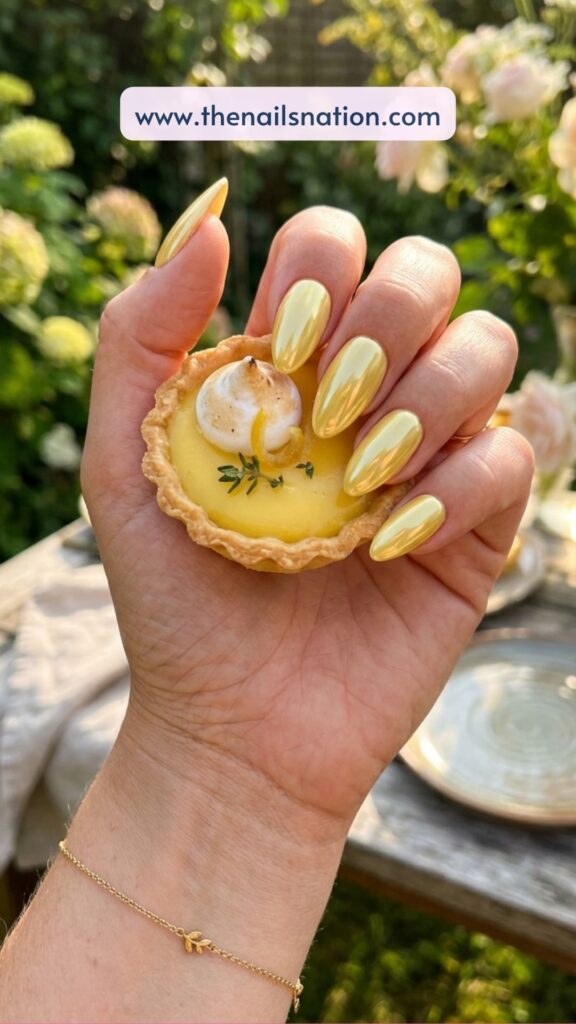
The Little Details –
Base Colour: Creamy butter yellow
Shape: Almond, square, or coffin
Design Element: Reflective chrome finish
Finish: High-shine chrome
Nail Art Tutorial –
- Apply a gel base coat.
- Paint nails with two coats of butter yellow polish.
- Cure if using gel products.
- Rub chrome powder evenly across the nail surface.
- Buff gently until the chrome effect appears smooth.
- Remove excess powder.
- Apply a no-wipe glossy top coat.
- Cure and finish.
Best Occasions –
- Summer parties
- Vacation outfits
- Weekend brunches
- Fashion events
- Everyday trend lovers
21. Coral Reef Nails
This manicure feels like peeking beneath crystal-clear ocean water and discovering an underwater world full of colour and life.
The design combines vibrant coral shades, soft turquoise blues, and delicate ocean-inspired details that mimic the beauty of a coral reef. Some nails can feature abstract coral patterns, while others showcase subtle swirls and tiny marine-inspired accents that create depth and movement throughout the set.
What makes this manicure so eye-catching is the colour combination. The warm coral tones contrast beautifully against cool ocean blues, creating a look that instantly feels tropical and full of energy.
This is one of those manicures that practically demands a vacation.
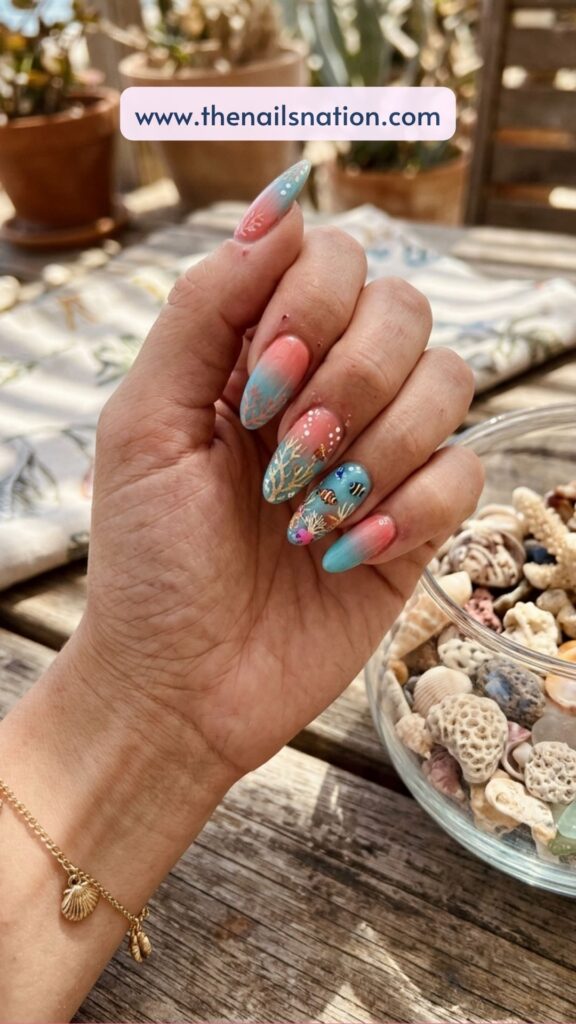
The Little Details –
Base Colour: Coral pink and ocean blue
Shape: Almond or coffin
Design Element: Coral reef-inspired artwork
Finish: Ultra glossy
Nail Art Tutorial –
- Apply a strengthening base coat.
- Alternate coral and turquoise shades across the nails.
- Use a fine detail brush to create organic coral branch shapes.
- Add lighter highlights to create dimension.
- Blend small touches of blue and white for underwater effects.
- Keep each nail slightly different for a natural look.
- Allow the artwork to dry completely.
- Finish with a glossy top coat.
Best Occasions –
- Tropical vacations
- Beach holidays
- Cruise trips
- Summer parties
- Resort stays
22. Pressed Flower Nails
There is something incredibly romantic about pressed flowers.
They have a timeless beauty that feels delicate, feminine, and effortlessly elegant. This manicure takes inspiration from real pressed flowers by placing tiny floral details across a sheer base, creating the illusion that flowers have been preserved beneath glass.
One of the things that makes this manicure so special is its versatility.
Every nail looks like a miniature botanical artwork, making this one of the prettiest June nail ideas for anyone who loves floral designs.
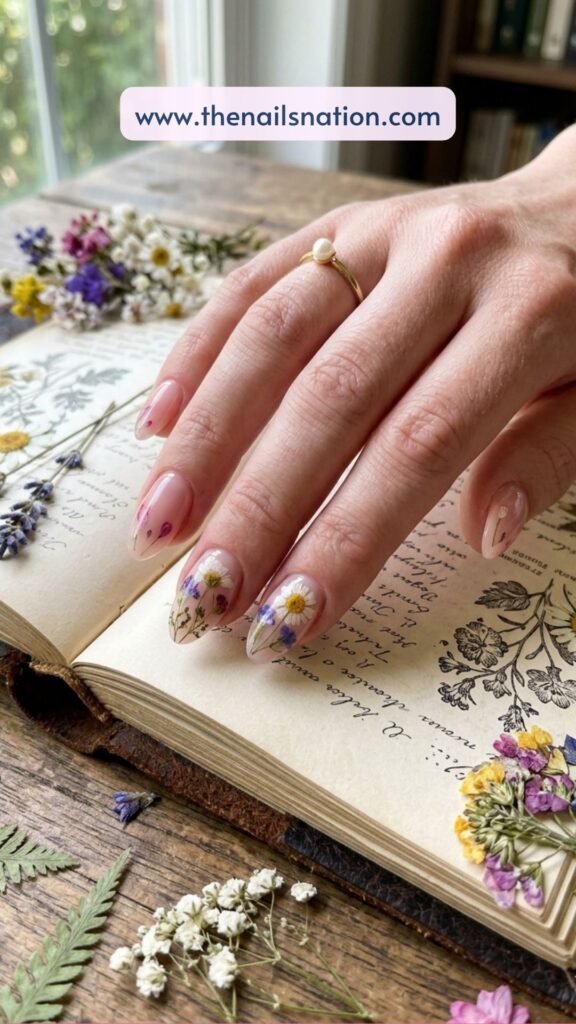
The Little Details –
Base Colour: Sheer pink
Shape: Almond or oval
Design Element: Pressed flower artwork
Finish: Glass-like glossy finish
Nail Art tutorial –
- Apply a sheer pink base colour.
- Allow the base to dry completely.
- Use dried nail flowers or paint tiny floral details by hand.
- Arrange flowers naturally across the nail.
- Add tiny green leaves where needed.
- Apply a layer of clear polish to seal the artwork.
- Finish with a glossy top coat.
- Apply cuticle oil for a polished finish.
Best Occasions –
- Summer weddings
- Garden parties
- Bridal showers
- Baby showers
- Everyday elegance
23. Pink Aura Nails
Aura nails continue to dominate nail trend predictions, and June is the perfect time to embrace this dreamy look.
One of the reasons aura nails have become so popular is that they look intricate while remaining surprisingly simple. There are no complicated details or tiny illustrations. Instead, the magic comes from the colour blending itself.
The pink tones feel feminine and summery without being overly sweet. They work beautifully on both shorter and longer nail lengths, making this trend incredibly versatile.
The finished look feels soft, trendy, and slightly futuristic in the best possible way.
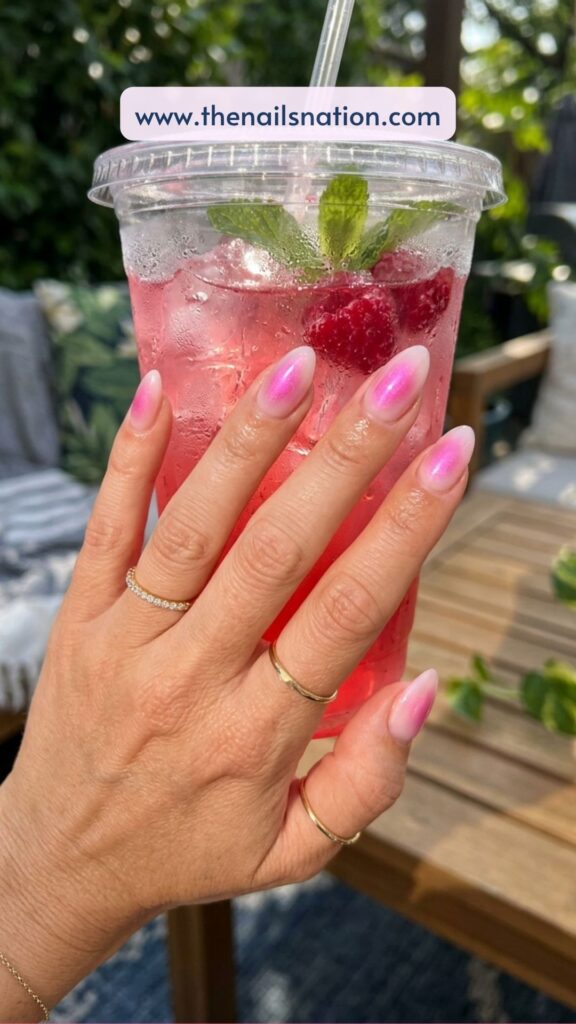
The Little Details –
Base Colour: Soft pink
Shape: Almond, oval, or short square
Design Element: Airbrushed aura effect
Finish: Glossy finish
Nail Art Tutorial –
- Apply a pale pink base colour.
- Allow the polish to dry fully.
- Use a sponge or airbrush tool to apply a deeper pink colour to the centre of each nail.
- Blend carefully until the edges appear soft.
- Build colour gradually for a smooth aura effect.
- Clean up around the nail if necessary.
- Apply a glossy top coat.
- Allow everything to cure or dry completely.
Best Occasions –
- Summer parties
- Concerts
- Weekend brunches
- Vacation photos
- Everyday trend lovers
24. Coconut Milk Nails
For anyone who loves clean, minimalist manicures, coconut milk nails are about as perfect as it gets.
One of the biggest reasons this trend has become so popular is its versatility. It works with every outfit, every occasion, and every nail shape. Whether your style leans minimalist or glamorous, this manicure fits effortlessly into your aesthetic.
The creamy tone also helps hands look fresh and polished without drawing too much attention. It feels elegant rather than flashy, making it a great option for anyone who prefers understated beauty.
Sometimes simplicity really is the most beautiful choice.
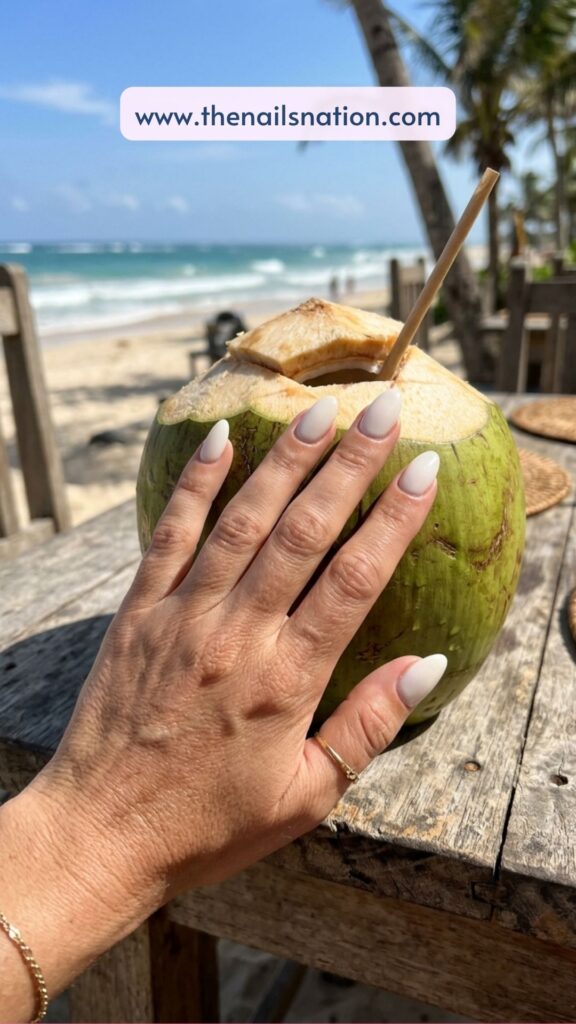
The Little Details –
Base Colour: Coconut milk ivory
Shape: Any shape
Design Element: Clean monochromatic finish
Finish: Ultra glossy
Nail Art Tutorial –
- Apply a smoothing base coat.
- Paint nails with two coats of creamy ivory polish.
- Allow each layer to dry fully.
- Apply a third coat if needed.
- Clean edges carefully.
- Apply a glossy top coat.
- Finish with cuticle oil.
Best Occasions –
- Weddings
- Office wear
- Everyday wear
- Summer vacations
- Special events
25. Pearlcore Summer Nails
Pearlcore has quietly become one of the prettiest nail trends of the year, and June is the perfect time to embrace it.
This manicure is inspired by the soft glow of freshwater pearls, combining luminous pearl finishes, subtle iridescent details, and delicate dimensions that catch the light beautifully.
One of the things that makes Pearlcore nails so appealing is their ability to elevate any outfit. Whether you’re wearing a casual white sundress, relaxed denim, or something more formal, these nails instantly make everything feel a little more polished.
This manicure has a timeless quality that never feels trendy in a way that will look dated next season. Instead, it feels classic, romantic, and effortlessly luxurious.
If you’re looking for June nails that feel sophisticated without being boring, Pearlcore might become your new obsession.
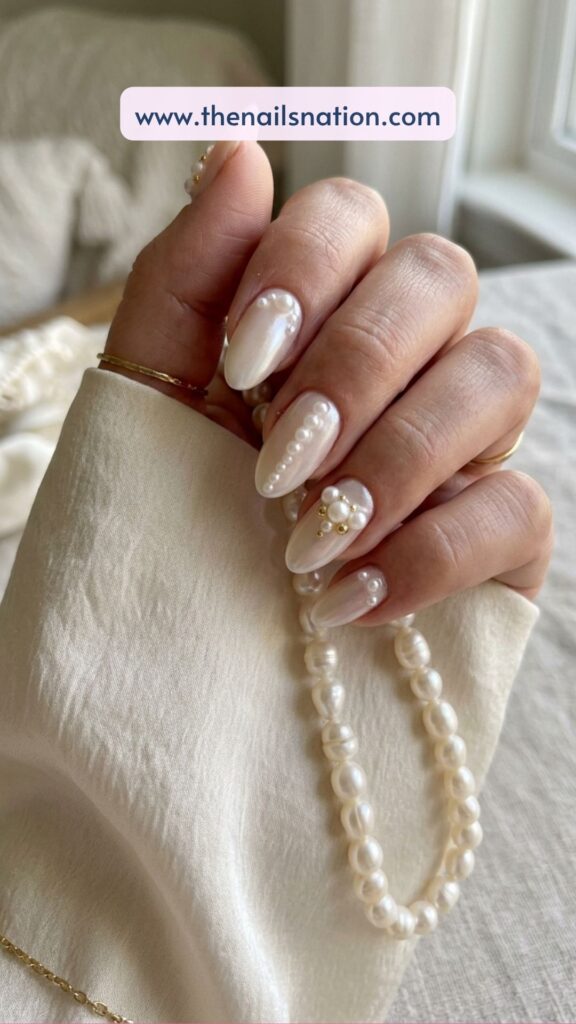
The Little Details –
Base Colour: Soft pearl white
Shape: Almond or oval
Design Element: Iridescent pearl finish
Finish: Luminous glossy shine
Nail Art Tutorial –
- Apply a smoothing base coat.
- Paint nails with a soft pearl white polish.
- Apply a second coat for full coverage.
- Gently rub pearl powder onto the nail surface if desired.
- Add tiny pearl embellishments on one or two accent nails.
- Secure embellishments carefully with nail glue or gel.
- Apply a glossy top coat.
- Finish with cuticle oil for extra shine.
Best Occasions –
- Summer weddings
- Bridal showers
- Vacation dinners
- Anniversary celebrations
- Elegant everyday wear
26. Baby Pink Micro French Tips
Sometimes the simplest nail ideas end up looking the most expensive.
This manicure takes the timeless French tip and makes it feel fresh for June by using ultra-thin baby pink tips instead of traditional white. The result is clean, delicate, and incredibly elegant.
The micro French trend has become so popular because it enhances the natural beauty of the nail rather than covering it.
What makes this version especially perfect for June is the subtle pink colour. It feels fresh, feminine, and slightly playful while still maintaining that classic French manicure sophistication.
This is the type of manicure that works for absolutely everyone. Long nails, short nails, almond shapes, square shapes, office settings, weddings, and vacations. It truly goes with everything.
If you are someone who usually struggles to choose a nail design because everything feels too bold, this might be exactly what you’re looking for.
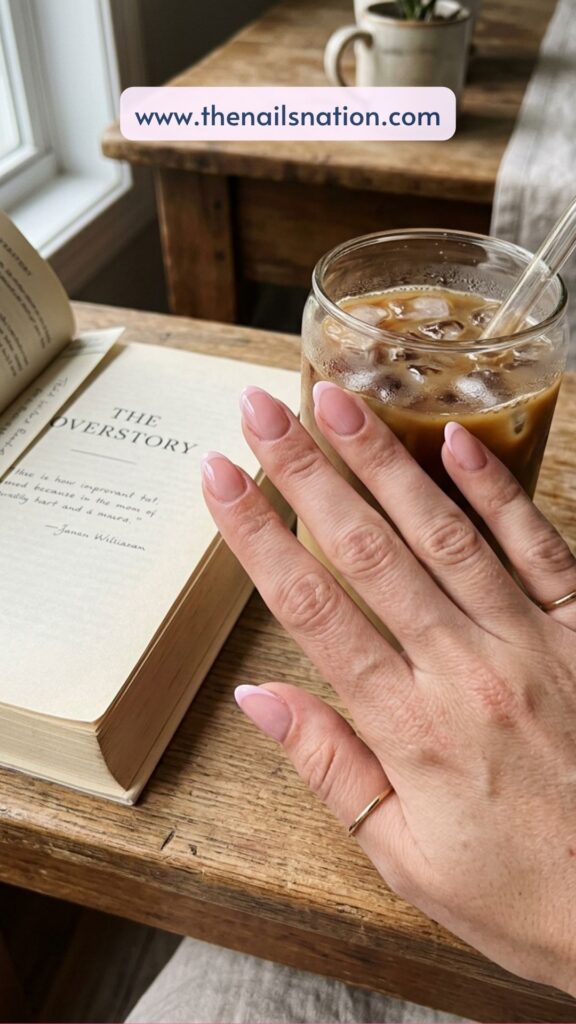
The Little Details –
Base Colour: Sheer pink
Shape: Short square, almond, or oval
Design Element: Baby pink micro French tips
Finish: Glossy clean-girl finish
Nail Art Tutorial –
- Apply a strengthening base coat.
- Paint nails with a sheer pink polish.
- Allow the base to dry completely.
- Use a detail brush to create ultra-thin pink French tips.
- Keep the lines as fine as possible.
- Refine any uneven edges.
- Apply a glossy top coat.
- Finish with nourishing cuticle oil.
Best Occasions –
- Everyday wear
- Office days
- Summer weddings
- Graduation events
- Weekend brunches
27. Short Pastel Mix Nails
This manicure features a different pastel shade on every nail, creating a playful rainbow effect using soft summer colours like butter yellow, baby blue, lavender, mint green, peach, and blush pink. The colours are cheerful without being loud, making the entire set feel fun, youthful, and perfectly seasonal.
One of the best things about this design is how easy it is to customise. You can choose your favourite pastel shades or follow a specific colour story. Either way, the finished look feels light-hearted and full of personality.
The mixed-colour approach also means you’ll never get bored looking at your nails. Every finger brings a slightly different pop of colour, creating a manicure that feels fresh and playful from every angle.
This design has become incredibly popular because it strikes the perfect balance between trendy and wearable. It feels fun enough for summer while remaining simple enough for everyday life.
For readers searching for short, cute June nail ideas or easy summer manicures, this is one of the best options on the entire list.
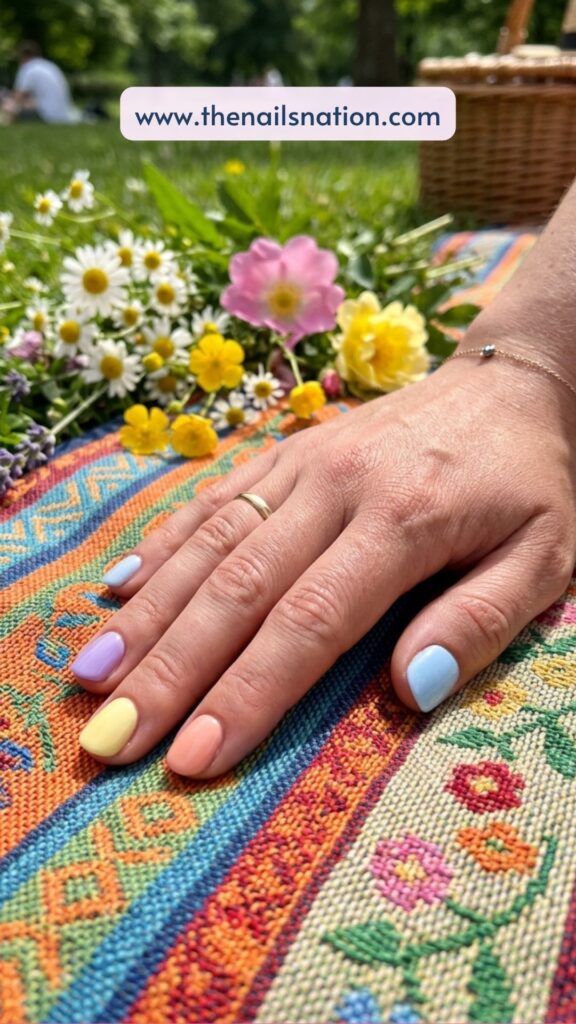
The Little Details –
Base Colour: Mixed pastel shades
Shape: Short square or short oval
Design Element: One colour per nail
Finish: Glossy finish
Nail Art Tutorial –
- Apply a protective base coat.
- Choose five different pastel shades.
- Paint each nail a different colour.
- Apply two thin coats for even coverage.
- Clean around the cuticles carefully.
- Allow all colours to dry fully.
- Apply a glossy top coat.
- Finish with cuticle oil for a salon-quality shine.
Best Occasions –
- Summer vacations
- Weekend outings
- Festivals
- Everyday wear
- Beach trips
June Nail Ideas FAQ
What nail colours are trending for June 2026?
→ Some of the biggest June nail colour trends include butter yellow, blueberry milk blue, soft peach, cherry red, lavender, coral pink, coconut milk white, and pearly chrome finishes. These shades feel bright, fresh, and perfectly suited to the transition into summer.
What are the best June nails for short nails?
→ Short nails look especially beautiful with:
- Baby Pink Micro French Tips
- Coconut Milk Nails
- Short Pastel Mix Nails
- Lemon Sorbet French Tips
- Cherry Red Summer Nails
- Blueberry Milk Nails
Simple designs often look cleaner and more polished on shorter nail lengths.
What nail shape is best for June nail designs?
→ Almond nails remain one of the most popular shapes because they elongate the fingers and work beautifully with florals, ombré designs, and chrome finishes.
However, short square nails are also trending for summer because they are practical, low-maintenance, and perfect for everyday wear.
Are floral nails still popular in 2026?
→ Absolutely. Floral nail designs continue to dominate Pinterest and Instagram every spring and summer. Daisy nails, hibiscus nails, lavender nails, and pressed flower manicures are especially popular during June because they complement the season’s bright and cheerful aesthetic.
What are the easiest June nail ideas to recreate at home?
→ If you’re a beginner, start with:
- Peachy Gloss Nails
- Cherry Red Summer Nails
- Coconut Milk Nails
- Short Pastel Mix Nails
- Lemon Sorbet French Tips
These designs require minimal nail art skills but still look stylish and seasonal.
What are the biggest June nail trends right now?
→ Some of the most searched June nail trends include:
- Aura nails
- Pearlcore nails
- Butter yellow nails
- Blueberry milk nails
- Chrome finishes
- Floral nail art
- Fruit-inspired nail designs
- Micro French tips
What are the best June nails for vacations?
→ Vacation-ready June nails include:
- Ocean Wave French Tips
- Seashell Chrome Nails
- Tropical Palm Leaf Nails
- Coral Reef Nails
- Starfish Accent Nails
- Sunset Gradient Nails
These designs perfectly capture summer holiday vibes.
Can I wear bright nail colours in June?
→Definitely. June is one of the best months to experiment with brighter colours like coral, cherry red, watermelon pink, lemon yellow, and tropical blues. These shades complement summer outfits and naturally look more vibrant in sunshine.


